Last Updated on December 26, 2022 by Mathew Diekhake
Hardware acceleration is a feature used by many Windows applications to help eke out better performance. One of the fundamental differences between Windows 10’s Movies & TV app getting close to double the battery life compared to some of the competition was because Microsoft’s native app is using hardware acceleration whereas the others were not.
Microsoft uses hardware acceleration wherever it makes sense for them to do so, which is often anything that involves the use of moving graphics. This also extends out to the native Photos application in Windows 10 and its 3D effects. When you save the pictures with 3D effects, the Photos app writes the data to a video file. This uses the GPU for hardware accelerated video encoding.
Hardware accelerating sends all decoding work to the graphics processor instead of it being done with the central processing unit. The GPU can do the math on certain equations better than a CPU can, and that is what makes the hardware acceleration so much more efficient to use. However, in doing so, you’re also adding some more functions into the equation, and that means you’re also increasing the chance of something going wrong.
Because of the significant savings you get with battery and hardware usage when things are working as they should, most users should strongly consider leaving hardware acceleration turned on. If by the odd chance, however, you are experiencing technical difficulties with specific apps that use hardware accelerating, it’s often also possible to disable the hardware acceleration to help troubleshoot problems that it may have created.
The same tune can be sung for the Windows 10 Photos app: leave it turned on to help your computer perform at its best, which includes helping your battery last longer, and disable it if you’re experiencing any bugs to see if it fixes the problem.
The following tutorial demonstrates how to turn on and off the hardware acceleration in the Photos app when you’re using a version of the Windows 10 operating system.
How to Disable Hardware Acceleration in Windows 10 Photos App
Here’s what you need to disable the hardware acceleration feature found in the Windows 10 Photos app.
1. You can disable the hardware acceleration from the Photos application itself. To get started, head to your Start menu and click on the Photos tile to get access to the Photos app.
2. In the top right corner of the Photos app, click on the three dotted More menu.
3. Click on the Settings gear icon from the three dotted menu.
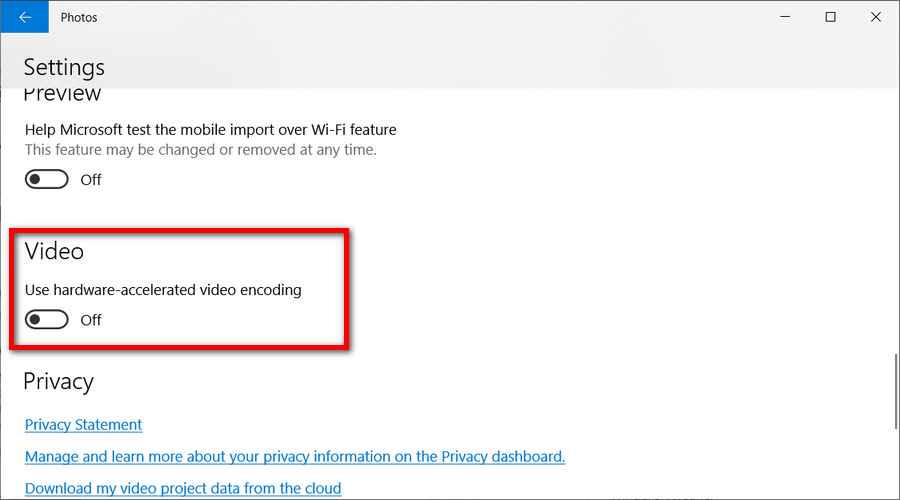
4. Scroll down until you see the Video toggle.
You can now close the Photos app and it’ll automatically remember your preferences. Just remember to head back to the same area should you ever want to try enabling it again in the future—Windows updates might solve the problem without you realizing if you keep it off for long periods—so you can get the most out of your hardware and battery.
That’s all.
This article was last updated on June 4, 2019.
Related Tutorials
- How to Turn On/Off Text Suggestions for Hardware Keyboard in Windows 10
- How to Turn On/Off Autocorrect for Hardware Keyboard in Windows 10
- How to Uninstall Mixed Reality Portal in Windows 10
- How to Disable Cortana in Microsoft Edge in Windows 10
- How to Disable Telemetry and Data Collection in Windows 10
- How to Enable Windows Photo Viewer in Windows 10
- How to Enable/Disable Native Google Chrome Notifications in Windows 10
- How to Enable/Disable Adobe Flash Player in Microsoft Edge in Windows 10


September 19, 2018 @ 20:32
I couldn’t get hardware acceleration to work on my computer in the first place.
I needed to update my computers graphics card drivers. My computer is Dell and I managed to do it with the Dell Support Assist app, but you can also do it by heading to Windows Update and checking for updates.
I’m not 100% sure Windows update can help you with the device drivers though that comes from the manufacturer. If it doesn’t work you can definitely head to your manufactures website and get the drivers from there.
I like Dell computers for this reason. The support assist app that sits on the desktop is lightweight, easy to use, nonintrusive, and allows you to do a whole range of things. I also have an HP computer and have never seen anything that rivals this Dell app. I think there was something HP had installed but it wasn’t just a small desktop icon and it kept popping up all the time.
September 13, 2018 @ 19:39
It seems we are starting to get a lot of features linking back to the settings app every time we go to use the settings from a program.
This is making Windows a bit of a maze again.
It would be better if they were consistent. Sometimes things go back to the settings app and sometimes they don’t. The mail app never goes back to the settings app.
September 14, 2018 @ 16:04
It’s because not all things are available from the settings app. If you put everything in the settings app you have no choice but to inundate it with so many settings that it becomes cluttered.
Microsoft can probably see how people are interacting with the settings. In fact I’m sure they probably definitely can. If people were to use the search box in settings a heck of a lot more then maybe that would be enough of a reason for Windows to put everything in the settings. Everyone says that eventually Control Panel will be phased out but I don’t see that being the case.