Last Updated on December 26, 2022 by Mat Diekhake
The Quiet Hours feature starting from Windows 10 build 17074 has been completely revamped to include many more options for users to toggle on and off, or set up, than it did before.
In the past, Quiet Hours did nothing more than offer an on and off switch that users could toggle when they wanted to turn it on and off. When it was on then you wouldn’t receive any notifications or sounds from notifications, and then when you were ready to start getting them again you could toggle the switch and back on they go.
No one really knows exactly why Microsoft didn’t add more functionality to it, to begin with. Maybe they did it on purpose, and this was all part of the plan, or maybe they just didn’t put much effort into it until now. What we do know though is that Quiet Hours now has many more features, and if you’re a fan of using the Quiet Hours toggle to date, you’ll probably enjoy this update. And those who couldn’t have cared less about it might now start using it.
If you open up the Settings application, you’ll now find that Quite Hours has its own entire section dedicated to all its bells and whistles. A large part of those are devoted to the Quiet Hours automatic rules that we’ve run through in another article. The remainder is dedicated to the Quiet Hours priority list.
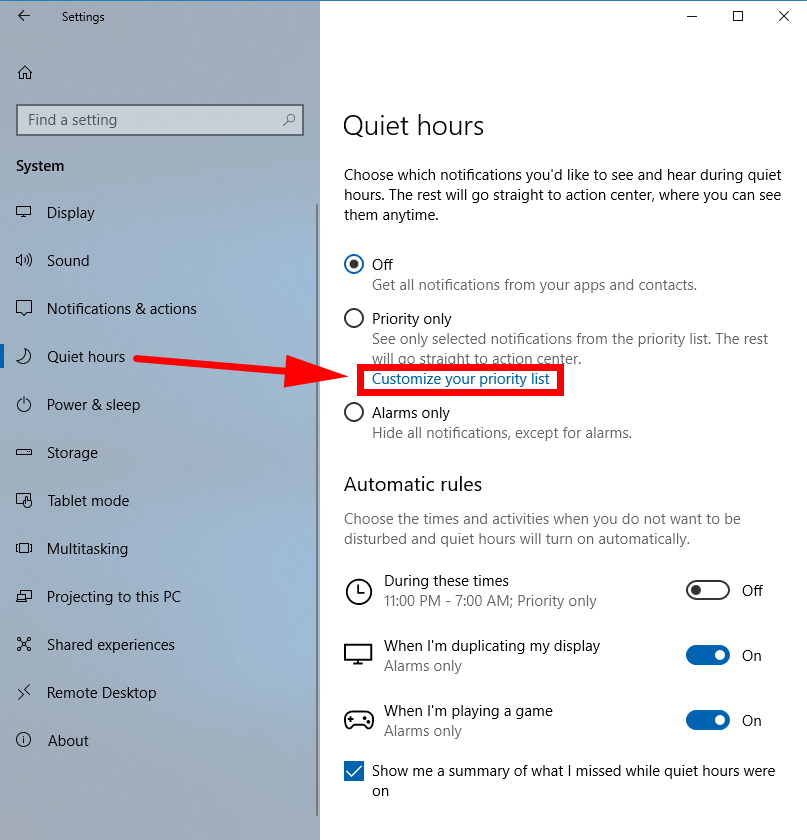
By default, the Quiet Hours priority list is set to the “Off” position, but you can swap it over to “Priority only” or “Alarms only” if you wanted. When you’ve got it selected on “Priority only” you can then click on the “Customize your prioritize list” to get access to all the stuff that you can prioritize, and then you’ll only see those notifications which you’ve selected and the rest end up in the Action Center. And lastly, the “Alarms only” when selected will mean that all notifications are turned off unless it’s an alarm of some description.
How to Customize Quiet Hours Priority List in Windows 10
You can customize the Quiet Hours priority list by using the Settings application in Windows 10. To get started, head to the Start menu > Settings gear icon in the Start menu’s left side pane and then click on the “System” link from the Windows Settings window.
Once you’re within the System area, click on the “Quiet Hours” link in its left side pane and then you’ll see the same area as in the screenshot below, where you can then click on the “Customize your priority list” in the right side pane.
You’ll then see a few checkboxes relating to the Cortana settings on your phone, an option for showing notifications for people from your contacts, and another option to show notifications from apps. You can also upload your apps and choose the ones that you want to have notifications for and leave the ones that you don’t. Likewise, you can choose the list of people you want to get notifications for and leave the others out of it as well.

There’s now much more flexibility in Windows 10 starting from build 17074 to pick and choose what you want to get notifications for with regards to Quiet Hours instead of there just being an on and off switch for all of them. If you’re someone who spends quite a bit of time in front of the computer, or that works in front of one for that matter, then you might be interested in setting up your Quiet Hours priority list to help you get more production out of your day. In this day and age where a notification always seems to be just around the corner from something, it’s sure to make more than a few people happy.
You might also be interested in:
- How to Change Quiet Hours Automatic Rules in Windows 10
- How to Create System Sleep Diagnostics Report in Windows 10
- Windows 10 Insider Preview Build 17074 for PC Announced
- How to Manage App Execution Aliases in Windows 10
You can subscribe to our RSS, follow us on Twitter or like our Facebook page to keep on consuming more tech.