Last Updated on December 26, 2022 by Mat Diekhake
Have you found yourself stuck in a situation where you want to connect the computer to the internet, but you’ve forgotten your WiFi password and don’t know how to go about obtaining it? Other than following our guide on getting the password again, there’s also a way you can still connect to the internet so long as the router you are using is relatively new.
Most modern Internet Service Providers have figured out that there is no security risk by allowing people within the home where the router is situated to be able to connect to the internet without knowing the WiFi password. That password was originally created to keep everyone else out. Up until recently, you had to enter the password to get access to your own network, but that isn’t the case anymore.
Now there’s a button on most routers called “WPS” which stands for WiFi Protected Setup, and all you need to do is press it when you are trying to connect to the internet, and it’ll bypass the part where you need to enter the password. If your router is relatively new and you aren’t seeing the “WPS” button, it might be because the company you are signed up with has a different name for it. For example, the company I’m with offers a “Paired” button instead. Get in touch with your ISP and ask them what is the equivalent to “WPS” on your router if you aren’t sure what options you’re looking at on the router in your home.
The following tutorial demonstrates how to connect your computer that runs on a version of the Windows 10 operating system to a WiFi network without having to enter the password that would usually be required before it gets up and running.
How to Connect Windows 10 PC to WiFi Network Without Entering Password
A lot of people go to great lengths to make sure they don’t lose that little card they are given by their internet providers after they have set up a new WiFi connection. They do it with the assumption that without it they won’t be able to ever know the password, or at least not until they get in contact with that same internet provider and ask. What they often don’t realize though is that, while that card certainly is convenient, it isn’t the only way to know the password. In fact, you can find out the WiFi password without anything but your computer in front of you, as long as you know the right steps to take. But there are also ways around having to use a password altogether. You can connect your Windows 10 computer to the WiFi network without entering a password directly from the taskbar. Here is how you can do that:
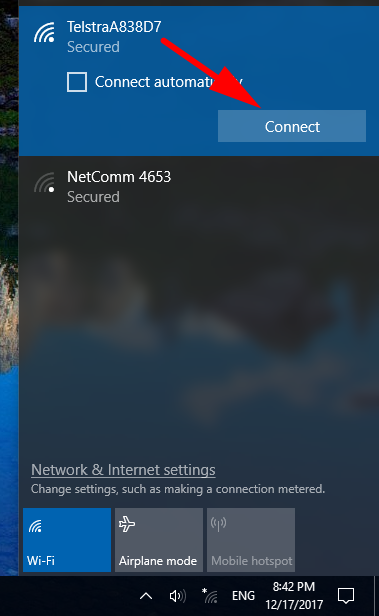
1. To get started, click on the WiFi icon available in your taskbar.
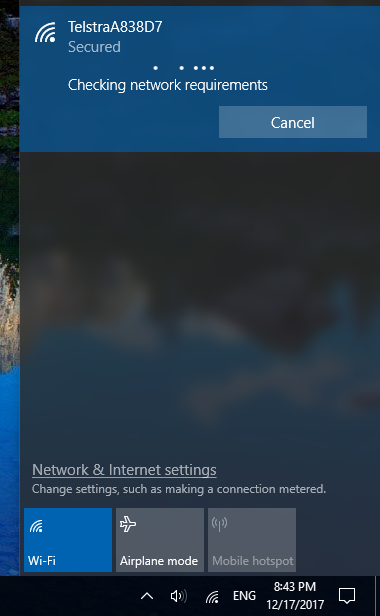
2. It then opens a similar flyout to the Action Center with your WiFi connections available at the top. It’ll also show any of your neighbors who are within close proximity. When you find the details to yours, click on it to expand it and then click on the Connect button.
3. If you’re lucky, you might get connected to the internet automatically because your Windows 10 operating system is remembering your password from previous attempts. If it doesn’t then you’ll see the password prompt. It’s at this time that you want to click on that WPS button located on your router. The router then automatically sends the password information to the computer, and it’ll start connecting you to the WiFi network.
Windows 10 does an excellent job of automatically remembering the WiFi networks you connect to along with their passwords, so you don’t have to keep keying in the information each time you disconnect and connect again. The operating system also allows you to “forget” any WiFi network that you’ve previously added just in case you don’t want any remembering to happen anymore. If you’ve hit that button so it forgets or you just haven’t entered the password for that particular network yet, then the guide above will be useful to you if you’ve forgotten your password.
Related Tutorials


October 1, 2019 @ 00:58
Hello Mathew,
Thank you for this wonderful content.
I just received Windows 10 update version 1903 on my laptop after waiting nearly a full year for my manufacturer to sort out a driver issue that was preventing the installation.
In the end, I don’t think they did manage to fix the driver but instead got Microsoft to install the update anyway, because I did not notice the driver ever getting installed.
My laptop is a Razer (which I love), but it is not like a Dell where they have dedicated applications assisting you with keeping your machine up to date.
In any event, one cool thing that occurred after the upgrade was apparent I have a new application, which installed itself, called Killer control center.
I know a lot of people suggest Intel make the best WiFi cards, but I’ve never had any issues with the speed I get from Killer, and I kind of like their branding. Who wants nothing but Intel inside their laptops anyway?
I just wanted to share a few screenshots of the new app. I know many of your readers may be interested. I will send them through via email.
October 1, 2019 @ 01:03
Oh, great.
Thank you Ernesto 🙂
Yeah, send them through. I’ll be interested to take a look and share them.
October 1, 2019 @ 01:10
Killer Control Center – Overview
Here you get to set WiFi download and upload speed limits:
Killer Control Center – Apps
Here you will find what applications are installed and active:
Killer Control Center – WiFi Analyzer
Here you get a chart of your WiFi signal strength:
Killer Control Center – Settings
Here you will find your WiFi network’s general information: