Last Updated on December 26, 2022 by Mat Diekhake
It seems as though Microsoft has come to the realization that people rate images pretty high up on the “how do things look” scale. What we mean by that is if you don’t have pictures, then people aren’t going to find it very appealing—kind of like the lack of enthusiasm for the front of our website. We know this because we hear it all the time: please put up some pictures, hey you should probably have some pictures, and other lines alike. We tell them to look at the inside of the articles for some relief.
One of the main attractions with Windows 10, at least visually, is the log in screen and Spotlight that always have a rotation of notably high quality images taken by expert photographers from around the world and make up the Windows 10 official wallpaper collection which you can download each individually from the Microsoft website if you want to use them yourselves. We only ever use the official Windows 10 wallpapers in our screenshots if anyone’s interested.
Once you are logged in to Windows 10, you can change the background wallpaper using one of those Windows 10 images by right-clicking on the desktop > click Personalization and then looking in the right side pane for the chance to upload a picture. Windows 10 has been around for nearly three years now, and in its early stages, the operating system would automatically detect the colors in the images you chose for the desktop background and apply a theme accordingly. The theme was the colors that you would see for things like the background of the tiles from the Start menu or the border from a File Explorer window.
Microsoft then changes that from happening automatically to just letting you pick the color and the images separate so you didn’t get that automatic color anymore, and that was a good thing because a lot of people didn’t always agree with Microsoft choosing an orange color for the theme just because an image featured a sunset or something similar.
If you venture into the Personalization section from the Settings application nowadays, you get a checkbox that you can check with a click of the mouse (or tap of the finger for touchscreen devices owners) so that it does go back to automatically choosing the theme colors if you want, but it still doesn’t have that setting on automatically by default.
As far as the Windows 10 themes go, there isn’t many options outside of changing the color that you can delve in to further customize it. The borders are one pixel wide by default and there’s nothing you can do to make them two pixels wide for example. Some people enjoy installing a theme to get wider borders in Windows 10, but we’ve tried it ourselves and didn’t like it very much. It is important to note that it is, in fact, a complete theme before you go ahead and install it. The theme itself looks quite dated and not as nice as Windows 10 in our opinion, so whatever upside there might have been with wider borders is quickly taken away with a design that, on a good day, might be able to rival Windows XP. It’s also important to understand that theme changes such as the ones you get with the theme offering wider borders can also change some of the features so it is more than just the design aspect being altered. One of the features we didn’t take to very well was when trying to upload saved images. It isn’t nearly as easy to use as how Windows 10 offers it: when you hold down the Ctrl key and then click on another image to upload more than one, it makes that very obvious when you are doing it whereas the theme doesn’t even bother to highlight a secondary image at all, so you are just left guessing what is highlight and what isn’t. Perhaps not a big deal for some, but it is for people like me who like to see what is happening.
Note that before you can make any changes to the appearance of your Windows 10 operating system, you’ll need to make sure that you do have an activated copy first, which is something that can be done directly from the Settings application and in just a few seconds. As mentioned in the activation article, there are some limitations when opting to roll with a non-activated version of Windows 10 has, and not being able to customize anything is one of them.
How to Change Color of Start Menu, Taskbar, and Title bar in Windows 10
You can change the color of the Start menu, taskbar and title bar from the Personalization area found in the Settings application. You can open up the Settings app the usual way for the Start menu to get there, or you can right-click on the background of the desktop and then click on the “Personalize” link from the menu, and it’ll get you there a bit quicker.

Now, well into the Creators Update, you can still find the “Personalization” link from the Windows Settings window if you wanted to go that route also.

Once you have the Personalization area open, click on the “Colors” from the left side pane and then choose your color from the right side pane. That’s going to give you your general theme color.
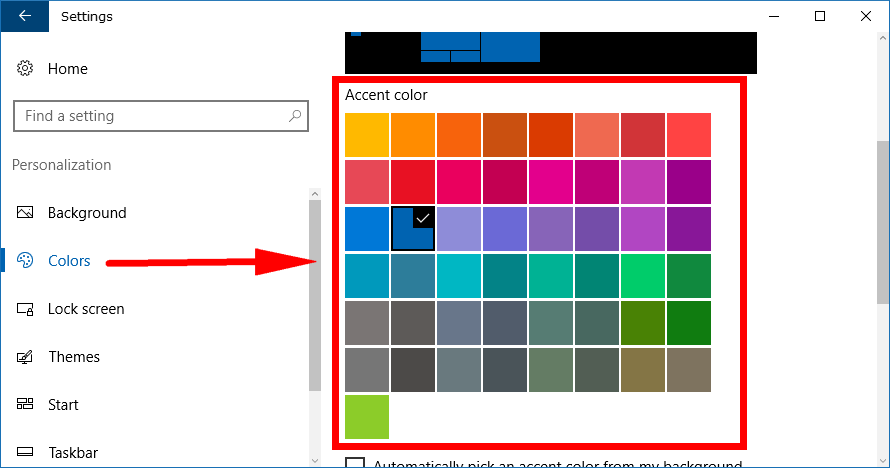
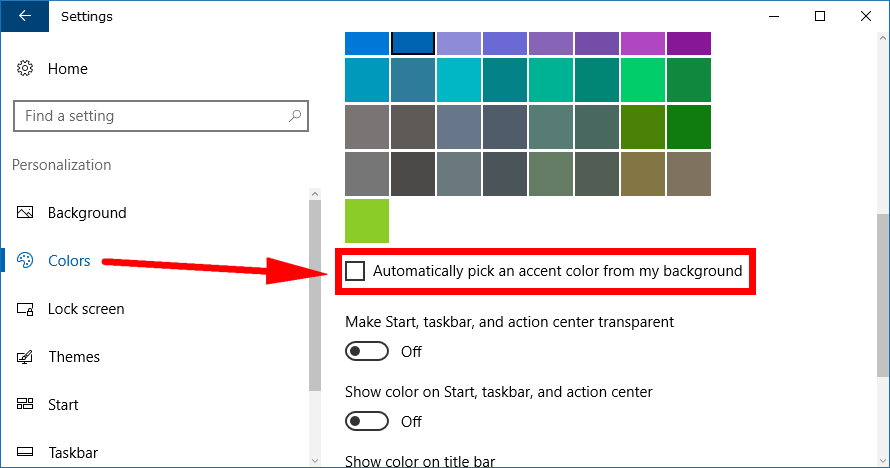
In earlier versions of Windows 10 (and when I say earlier, I mean still somewhere around the Anniversary Update/Creators Update) there is the “Automatically pick an accent color from my background” checkbox above the colors, and in later versions, like at the time of writing this article, it has been moved further down the right side pane a bit so that it is now underneath the colors. Either way, the option is still there to check this box if you want to have it like the way earlier versions of Windows 10 where the operating system would automatically choose your theme color for the things like the Start menu and File Explorer window borders based on your desktop background picture and its colors.
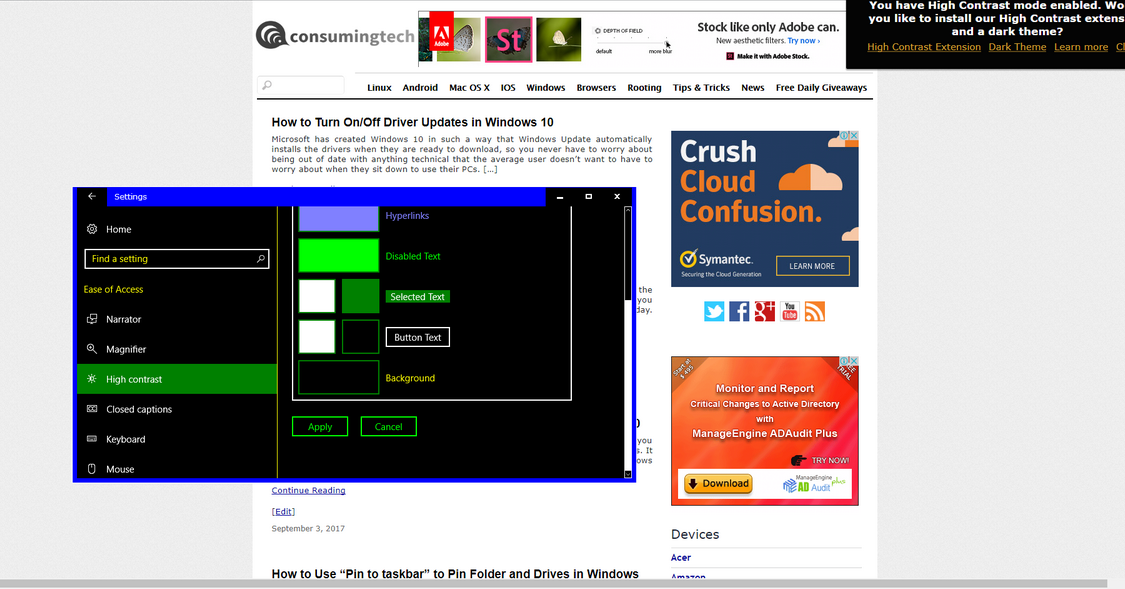
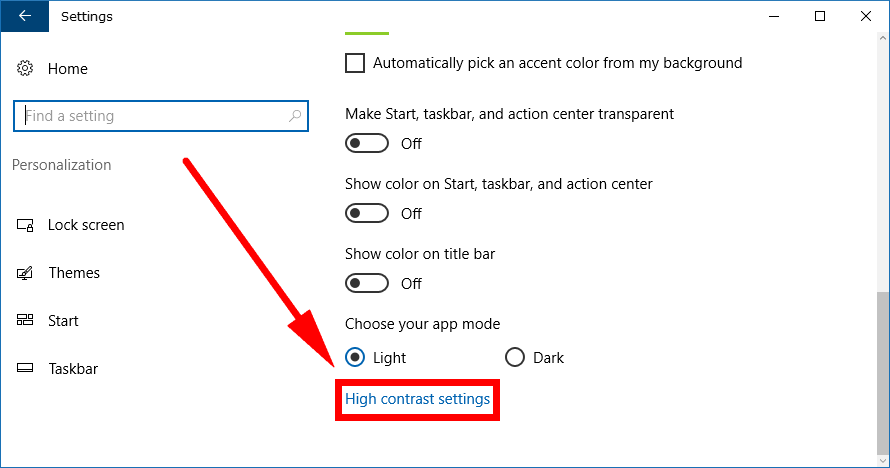
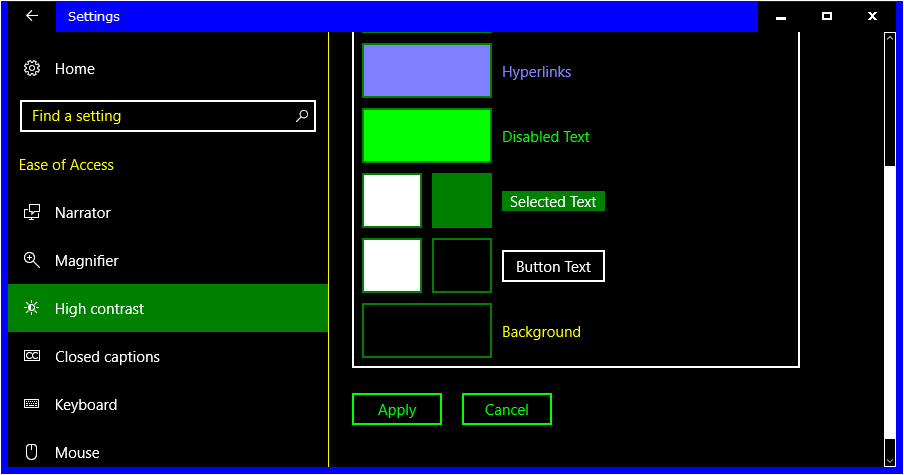
Called a “hidden high contrast dark theme” by some big name websites which we won’t plug because we want to keep your readership, Windows 10 does offer a high contrast set of themes which switch up the operating system entirely. Instead of getting a bright theme dominated with white or light shades, like the background of the Settings app, you can have a black background and high contrast colors for the text. It’s a bit of a mystery who exactly is going to find these high contrast themes favorable over the standard option, but perhaps it does help some people with a particular eye condition that regular folks like us wouldn’t know about without some further reading. Microsoft doesn’t go into any details about it either from their website, other than offering an alternative way to turn them on. It’s not something that people usually turn on just for kicks, so be warned. There are also some things that don’t get shown very well, like some of the menu options you will find in applications that just weren’t developed with high contrast themes in mind. Nonetheless, if you want to try them out, you can by staying in the same right side pane and scrolling down all the way to the end and then clicking on the “High contrast settings” link.
You’ll then see a drop-down menu available in the right side pane that gives you several options to choose from for various dark themes or high contrast themes as Microsoft likes to call them. Once you opt to apply them, you’ll notice the Settings app turn into something similar to what you can see below. Have a play around with your apps before committing to one of these themes because we have noticed some issues where text isn’t visible at all and you just have to guess that you’ve hit the right keys on your keyboard, which is never ideal. Suffice to say we have switched ours back already to standard.
Colors play a meaningful role in our lives: most people have a favorite one and some they don’t like. There are also some colors that work well together and some that don’t, much like a mathematical formula. Break the rule of the color chart, and you’ll have colors that just don’t go, no matter how much you want to make them try. Visuals are important for a Windows operating system, just like they are for your homes, cars, and other things you spend money on and time using. You can change most of the colors you see in Windows 10 by using the color option from the Settings application.
Related Tutorials