Last Updated on February 25, 2024 by Mathew Diekhake
These days there is no shortage of programs out there that promise to help you with your spelling: apps that you can install as browser add-ons, websites that want you to subscribe, and now we’re getting operating systems to help out natively as well.
While you won’t get spell checking everywhere when you use Windows 10, if it’s a modern application that you’re using, you likely will. To support and help promote Microsoft’s self-own web browser, you’ll also get spellchecking assistance from Internet Explorer and Microsoft Edge as well.
The problem that spell checkers have always had is that the English language comes with a lot of quirks, and it’s not possible for software to always know right from wrong unless you give it some additional information, so it knows the words in the context that you’re using them. For example, if you were to own a business called Xtreme computers, there would be nothing wrong with putting it down on paper exactly how it is, but you also can’t expect software to understand that’s your businesses name unless you give it a helping hand by letting it know to accept such a word for your personal spelling assistant dictionary.
And that’s what you can do: Windows 10 offers you the chance to add (and remove) words to the spell checking dictionary. That way you don’t have to keep correcting it if you’re continually typing words that it thinks is an error when in fact it is not.
There are of course some caveats with such a tool: if you’re sharing a computer with others, then you might get annoyed with them adding words to their dictionaries that don’t suit yours. In those cases, it might be best to leave it set on the default dictionary and get all parties involved to agree not to add words. That way at least you know your typos aren’t getting looked over.
But the spell checking dictionary offers tremendous upside if you’re able to make use of it on your personal computer, which is saving yourself time thanks to the added efficiency it provides.
Here’s what you need to add or remove words to the spell checking dictionary when you’re using a version of the Windows 10 operating system.
How to Add or Remove Words in Spell Checking Dictionary in Windows 10
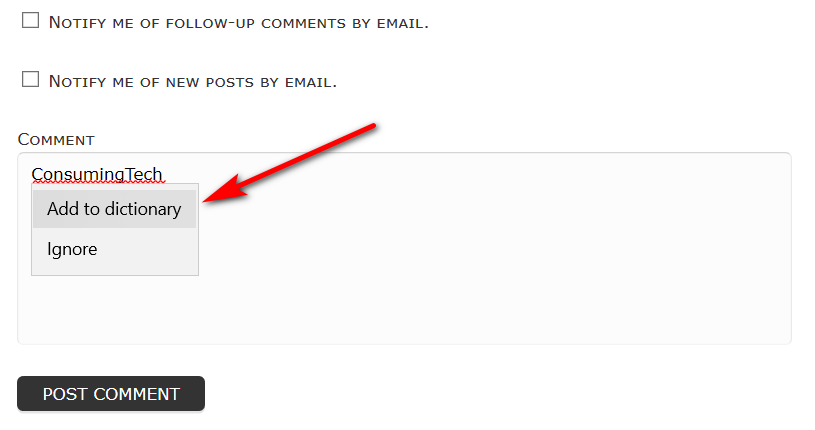
1. You can add words to the spell checking dictionary directly from where you’re leaving the comment, provided that you’re using a compatible web browser (IE 11 or Microsoft Edge) or app. This example is done using Edge.
2. Type the word you want to add, and then right-click on it and select the “Add to dictionary” option.
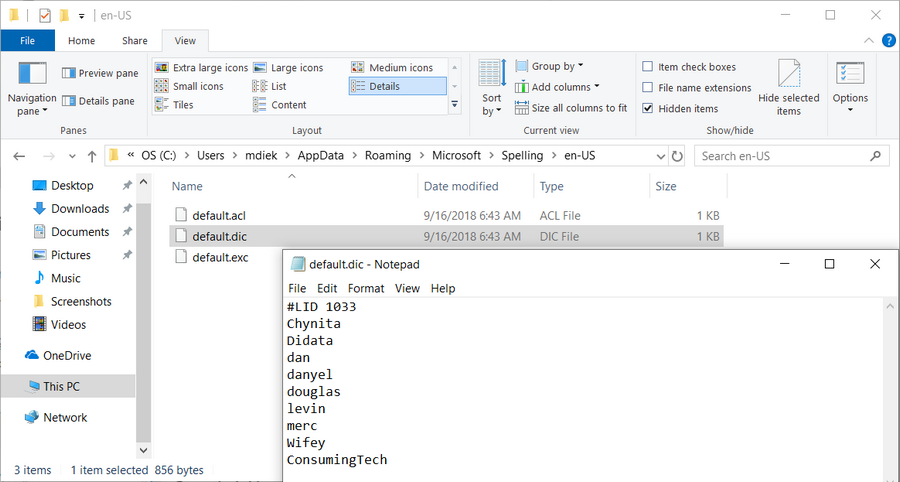
3. The word gets added to the “default.dic” file, which you can always get access to from File Explorer.
How to Remove a Word from the Dictionary
1. If you only want to remove individual words and not the full dictionary, then you can do that manually by heading into the file that contains your saved words.
2. Get started by navigating to the Start menu or taskbar > File Explorer > and then head to C:\Users\Username\AppData\Roaming\Microsoft\Spelling\(Your Language).
3. Now double-click on the “default.dic” file and choose to open the file with the Notepad app. You’ll then see your words that you can individually delete before updating the file.
How to view and clear the dictionary contents
You can clear the dictionary words from the Settings app.
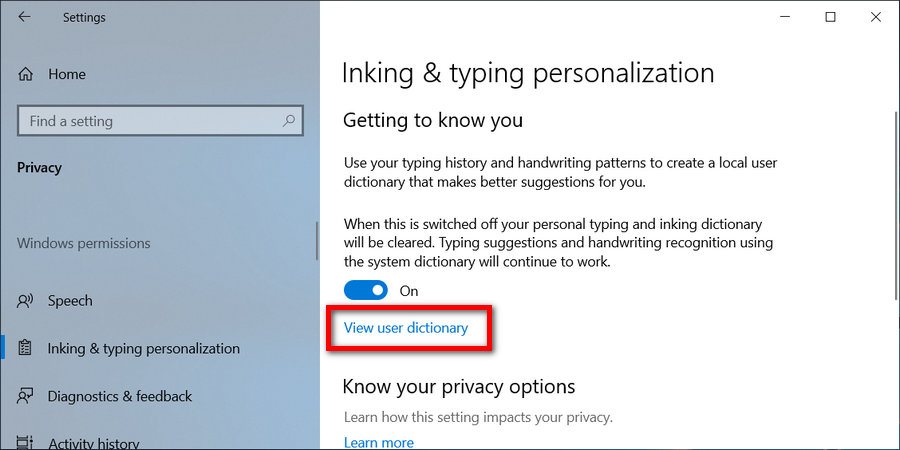
1. To get started, head to the Start menu > Settings > privacy > Inking and typing personalization and then click on the “View user dictionary” link from the right side pane.
2. Now click on the “Clear dictionary” button. It’ll show you the signal that it’s cycling and then in a few seconds it will be cleared.
That’s it.
Related Tutorials
- Windows Modules Installer Worker High CPU & Disk Usage in Windows 10
- How to Automatically Sign-in After Restarting Windows 10
- How to Create System Restore Wizard Shortcut In Windows 10
- KB4090007 Intel Microcode Cumulative Update for Windows 10 (1709)
- How to Fix “You’ve been signed in with a temporary profile” Error in Windows 10
- How to Turn On/Off Embedded Handwriting Panel in Windows 10
- How to Enable/Disable Adobe Flash Player in Microsoft Edge in Windows 10
- How to Turn On/Off Text Suggestions for Hardware Keyboard in Windows 10
- How to Turn On/Off Autocorrect for Hardware Keyboard in Windows 10


September 15, 2018 @ 21:34
I tried following this guide but when I entered the path into File Explorer it could not be found.
I worked out this is because my AppData folder was hidden.
To unhide your AppData folder you need to go to C:\Users\(Your Username) and then click on the “View” tab and then check the option to show “hidden items.”
You will then see the AppData folder that you can click through and complete the rest of the path i.e. C:\Users\YourUsername\AppData\Roaming\Microsoft\Spelling\en-US
Also worth mentioning is when you get to the spelling folder it will show you the available language folder names so you don’t have to guess what it is. It would obviously be pretty difficult to guess your language as “en-US” but you don’t have to either. You can navigate through the folders and then take a look at the names.