Last Updated on December 24, 2022 by Mathew Diekhake
The following tutorial demonstrates how to specify target feature update version when using a version of the Windows 11 operating system.
Microsoft releases one new feature update for Windows 11 each year. Historically, regardless of the operating system, you had to upgrade to the newest software update because the companies always want you running on the latest software. While there are valid reasons for this that are unlikely to change for a long time — compatibility, added security, so forth — Microsoft in Windows 11 has made it possible to specify which Feature Update you would like to have installed, so you don’t always have to be on the latest one. What exactly does that mean for security concerns and compatibility woes? They’re likely still going to be there for some users, which is why this is only an option for experienced administrators to perform via Group Policies rather than a toggle for dummies to turn on and off from the Settings app.
How to Specify Target Feature Update Version in Local Group Policy Editor in Windows 11
You can specify what Feature Update you want installed on your computer that runs on Windows 11 via the Local Group Policy Editor. Here is how to do that:
Note: If you have enabled the Select the target Feature Update version policy and specified the target updates you would like to receive and don’t ever change the policy again in the future, the computer will automatically be updated as of 60 days past its end of service date.
1. Open the Local Group Policy Editor. See this tutorial for all the different ways in which you can open the Local Group Policy Editor in Windows 10/11: How to Open Local Group Policy Editor in Windows 10/11 [Tutorial].
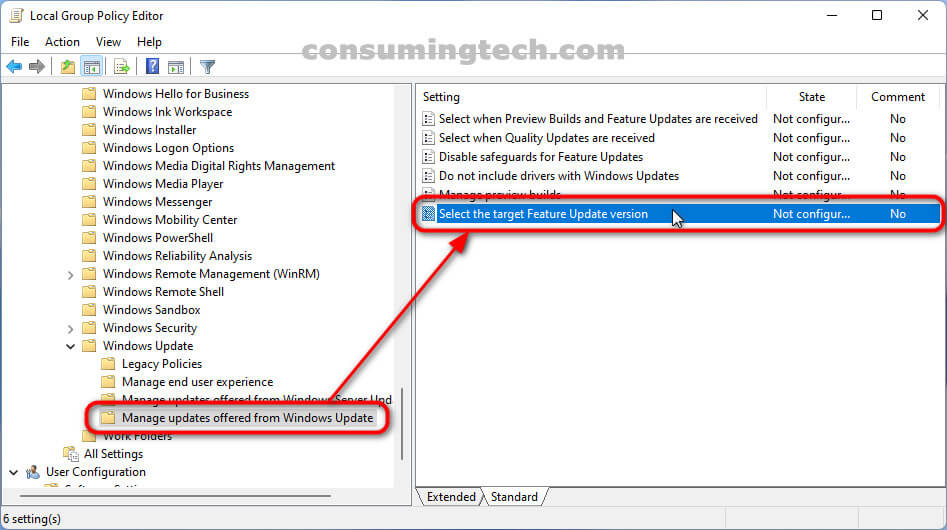
2. Using the Local Group Policy Editor’s left pane, navigate through to the following policy location:
Computer Configuration > Administrative Templates > Windows Components > Windows Update > Manage updates offered from Windows Update
3. With Manage updates offered from Windows Update selected, click on the Select the target Feature Update version policy in the right side of the same window.
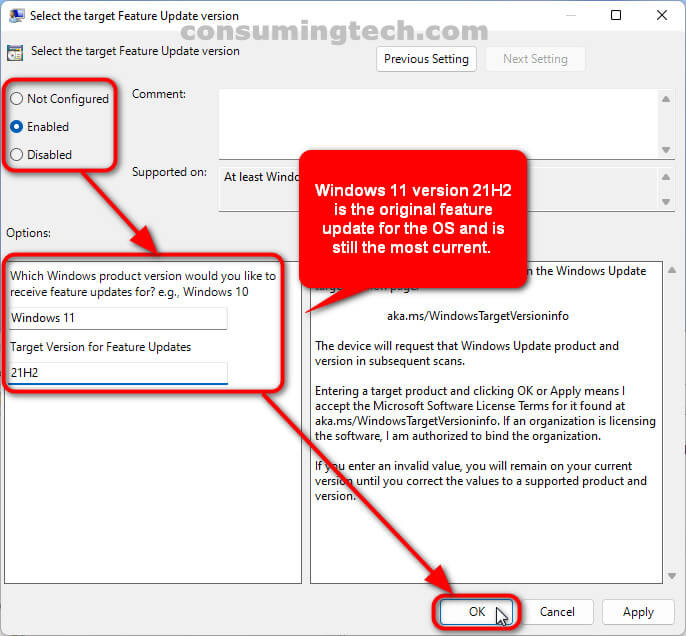
4. From the Select the target Feature Update version policy, click on either Not Configured (to not specify target Feature Update version), Enabled (to specify target Feature Update version), or Disabled (to remove the ability to specify target Feature Update version), and then click on the OK button at the bottom of the policy window to save the changes.
Note: If you have selected dot Enabled, you will see under the Options: heading the ability to add your Windows version and the target version for the Feature Updates. In these available fields is where you must enter the information for the specified updates.
In conclusion, that is how to specify the target feature update version vua the Local Group Policy Editor in Windows 11.
Related Tutorials
- How to Add/Remove Common Program Groups from Start Menu in Windows 11 [Tutorial]
- How to Add/Remove Quick Access in Navigation Pane of File Explorer in Windows 11 [Tutorial]
- How to Enable/Disable Pin and Unpin Items on Jump Lists in Windows 11 [Tutorial]
- How to Change Maximum Number of Items in Jump Lists in Windows 11 [Tutorial]
- How to Enable/Disable Find My Device in Windows 11 [Tutorial]
- How to Enable/Disable Shared Experiences in Windows 11 [Tutorial]
- How to Open Power User Menu in Windows 11 [Tutorial]
- How to Enable/Disable Periodic Scanning in Microsoft Defender Antivirus in Windows 11 [Tutorial]
- How to Turn On/Off Tamper Protection for Microsoft Defender Antivirus in Windows 11 [Tutorial]
- How to Open Elevated Windows Terminal as Administrator in Windows 11 [Tutorial]


