Last Updated on November 12, 2024 by Mat Diekhake
Many people think that the QuickTime app on a Mac is only for playing media files, but my friend, it’s more than that. QuickTime is not just a media player, but it has got some great features in it that help you do more than just playing a media file. For instance, the app helps you record your screen, helps you convert your media files, and it also helps you to create two separate video clips out of a single clip.
You might wonder how you can go about doing these things with the app. Well, for you folks, here we have listed out all the steps that you can use to enjoy the features of the app and get the most out of it on your Mac.
Here you go:
Get Your Videos to Float on the Top
If you’re one of those users who like to watch videos while they are doing other stuff on their Macs, you would be glad to know that you can now have your videos on top of all other windows you’re working with on your Mac using the QuickTime app.
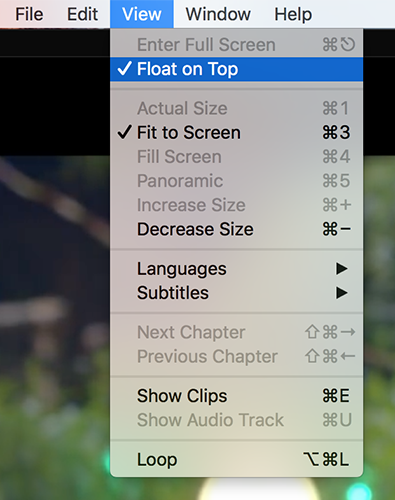
To use the feature, all you need to do is just launch the video file with QuickTime on your Mac, and when the video starts to play, click on the View menu at the top and select the option that says Float on Top. The video should now float on all of the windows that you are working with on the Mac.
Record the Screen of Your Mac
You no longer need a third-party app to record screencasts on your Mac as the built-in QuickTime app has everything to get you going with your screen recording tasks. With QuickTime, it’s now easier to create screen recordings for your video tutorials and the following is how you can do that.
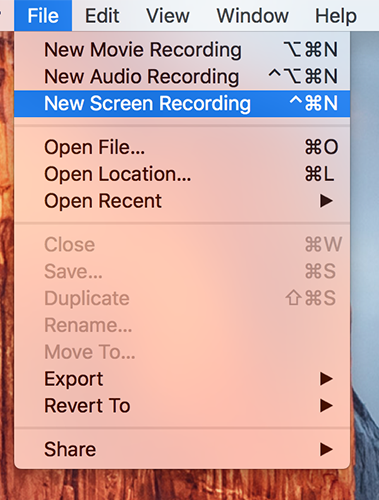
Launch QuickTime on your Mac either from the Launchpad or using the Spotlight search. When the app launches, click on the File menu at the top and select the option that says New Screen Recording and it will let you create a new recording of your Mac’s screen.
Convert Videos to Audio Files
If you have downloaded a really nice music video on your Mac but what you want is only the audio part out of it, then the QuickTime app can help you do that. The app allows you to get only the audio part from the video and then you can save the audio file somewhere on your Mac.
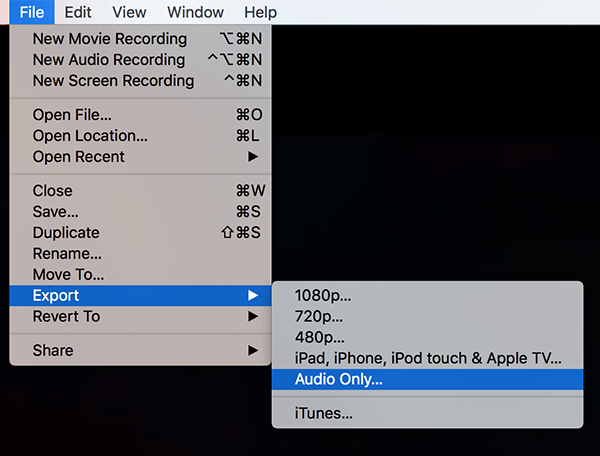
To do that, open your video file with QuickTime, click on the File menu at the top and select the option that says Export followed by Audio Only… only to export the audio part of the video. You now have your audio file available on your Mac.
Split a Video File Into Various Clips
If you would like to split your video into multiple short clips, then you can do that using the built-in QuickTime app as shown below.
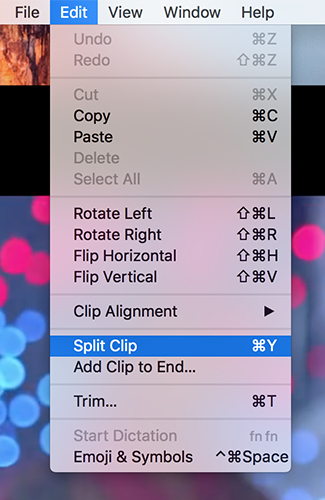
Launch the video file with the QuickTime app and play it. While the video is playing, click on the Edit menu at the top and select Split Clip.
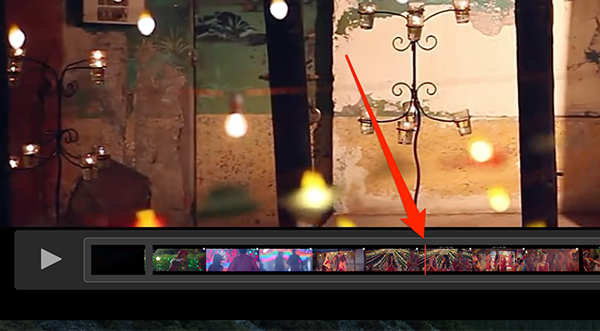
A marker will appear at the bottom. Set it to where you want to split the clip.
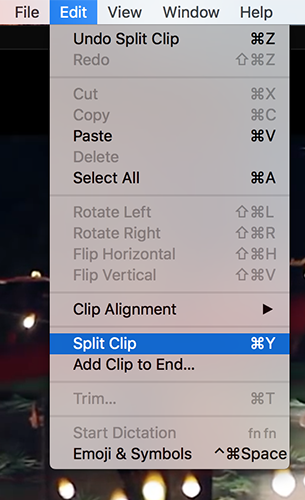
Once the marker is set, click on the Edit menu again and select Split Clip, and the video will be split into two separate clips.
So, above were some of the things you could do with the built-in QuickTime app on your Mac.
Let us know if this helped you get the most out of the QuickTime app on your Mac!
You might also be interested in:
- How To Play A Single Song Without Bothering iTunes On Your Mac
- View Files Of Major Formats Without Leaving The Chrome Browser
- How To Add Prisma Like Effects To Your Videos Using A Free App
- How To Make PDF Files Easier On Eyes In The Adobe Reader
- How To Add A Book To The iBooks Using An Email And Not iTunes
Have something to say? You can contribute to this tech article by leaving a comment below.