Last Updated on January 5, 2023 by Mat Diekhake
Don’t expect to find too many custom ROMs coming your way if you are an owner of the Xolo Q1000 device. Custom ROMs are usually reserved for some of the most popular devices in the world and become popular as the device ages to due to the ability of a new ROM to upgrade the firmware. One thing you can do with your rooted Xolo Q1000 device, however, is install the same root requiring apps on your device. If your Xolo has the ability to install apps from the Google Play Store, then it also has the ability to install any of the root apps from the Google Play Store and so forth. There’s nothing somebody with a Samsung Galaxy S6 smartphone can do with root applications that you cannot do with your Xolo Q1000 device.
Anyone with the Xolo Q1000 device who wants to do something similar to installing a custom ROM might like to check out the Xposed Installer application. Xposed is one of the most common rooted apps to install on your device at the moment. It took a brief exit from discussions when the developers needed to update it for Lollipop, but it’s all good now as we head into marshmallow updates. The Xposed Installer will install an internal binary on your device which gives you the option to change the operating system in certain areas. Some of those areas which you can explore include the settings, the notification bar, apply new themes, and anything else that you would assume you might be able to aesthetically alter.
Files You Need
- Download the MotoChopper rooting tool from here.
- You must have a Windows computer to run this MotoChopper rooting tool for your Xolo device.
Rooting the Xolo Q1000
- Enable the USB Debugging Mode on your Xolo Q1000 smartphone before connecting it to the computer.
- Connect the Xolo Q1000 to the computer with the USB cable.
- Extract the MotoChopper tool to the desktop of the computer.
- Double-click on the run.bat file that you should see on the desktop after extracting the file.
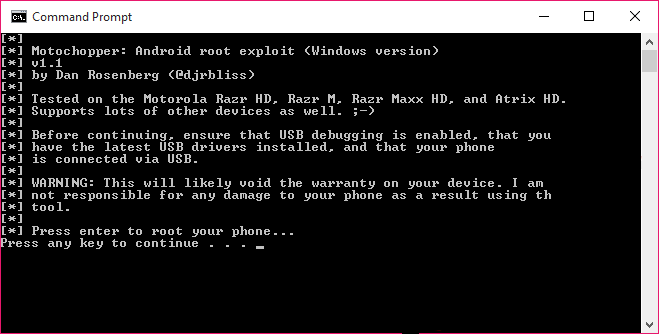
- Wait until you can see the following on your computer and then press any key to continue:
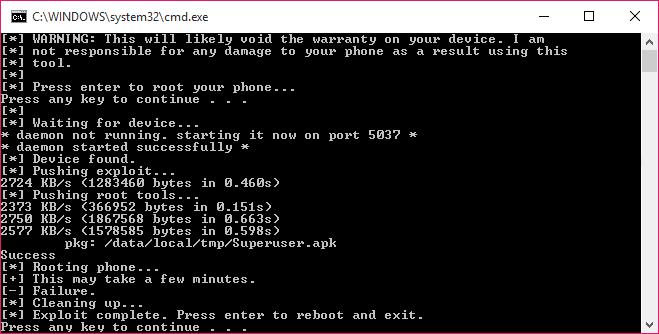
- The rooting program will now take over and apply those administrator permissions on your Xolo’s internal system. Wait until you get the following screenshot from your computer:
- Press the Enter key on your keyboard and you’re done!
In conclusion, that’s how to root the Xolo Q1000 smartphone using a Windows computer and the MotoChopper rooting tool. Reboot your smartphone before you attempt installing any applications that need root access to run. The first thing you are advised to do is head over to the Google Play Store and install the root checker application.
Anyone looking for ideas on where to start in terms of applications might want to install the Titanium backup application. I know that Titanium is the app I always install on my rooted Android first because it allows me to delete system apps that I deem to be bloatware. Just make sure you backup any apps that you are not sure about first or else you run the risk of removing important system apps that your device needed to run. That’s the reason why they say the Titanium Backup application is best for advanced Android users. With that being said, the Titanium backup application can be used by anybody as long as you play it smartly. Only confirm to uninstall apps you know are not required for your device to run and you’ll be fine. For example, if I delete the S Pen application on my Samsung Galaxy Alpha smartphone, I know that’s not going to harm my device.