Last Updated on January 5, 2023 by Mat Diekhake
The Samsung Galaxy S7 can be rooted using the guide below, which then opens the doors to installing root applications, enjoying your new SuperSU, installing a custom recovery and new ROMs or kernels. It doesn’t matter if you decide to flash the custom recovery first or after you root the device. As long as you have root and a recovery, you can think about checking our ROMs in the future. Since the S7 is so new, most people will be rooting for the sake of installing more applications — and more importantly, apps that require root access to the internal system of your device to run.
One of those new applications we recommend you check out after you root the Samsung Galaxy S7 smartphone is the Rec app. The Rec app can record the screen and even audio streams on your device. It records what’s on the display and whatever audio you want without having to be connected to a computer.

The new CF-Auto-Root package you find in this guide for the Samsung Galaxy S7 smartphone is based on the MMB29K.G935FXXU1APBF firmware which we know is part of an Android 6.0.1 Marshmallow update rolling out to some regions. That build ID is not rolling out to all regions and languages, and that’s fine. You do not have to flash that Build ID on your Samsung Galaxy S7 before following this guide. You should find the file in this guide will work for all Samsung Galaxy S7’s with the model number SM-G935F and running on the Android 6.0.1 Marshmallow update.
The Samsung Galaxy S7 will get frequent software update rolling out over the air and arriving as a notification. Make sure you wait a few days after installing a new software update before you attempt rooting. The new software updates can bring new bootloader with them. When that happens, the rooting file needs updating and you have to wait for the developers to make the necessary changes. Once Chainfire updates the files automatically, they will start working for your device again.
Files You Need
- Download the CF-Auto-Root tool for the Samsung Galaxy S7 SM-G935F from here.
- You must have the Samsung Galaxy S7 with the SM-G935F model number to use this guide. You can learn more about the model number of your S7 device by tapping on the Menu > Settings > About Device > Model Number.
Rooting the Samsung Galaxy S7 SM-G935F on Android 6.0.1 Marshmallow
- Turn on the USB Debugging Mode on your S7 device so you can get started with the guide.
- Download the rooting exploit from the files section above and drag it over to the desktop from the default downloads folder.
- Extract the CF-Auto-Root to the desktop so you have the S7’s rooting file and the Odin flashing tool executable.
- Double-click and open the Odin flashing tool so it’s waiting on the desktop with the user-interface open.
- Do not make any changes to the default settings you can see from the Odin flashing tool’s user-interface.
- Boot the Samsung Galaxy S7 SM-G935F smartphone to download mode and then connect it to the computer with the USB cable.
- Wait for a few seconds for your drivers to kick in and then look for the “added” message and the green ID: COM port from the Odin user-interface. Anyone who does not get the device detected will need to install the universal Windows ADB driver and try again.
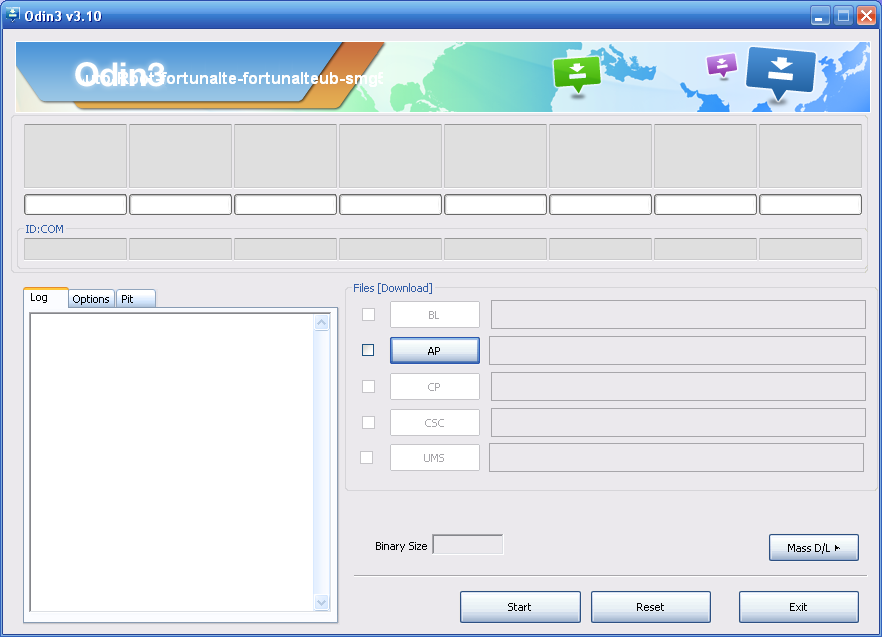
- Click the AP button and browse the desktop for your S7’s rooting file that it ending in tar.md5 format.
- Click the Start button and wait for the Odin flashing application to flash the CF-Auto-Root for your Galaxy S7 smartphone.
- Wait until the Odin gives you the pass message and your Samsung Galaxy S6 says that it is restoring the stock recovery, cleaning up and then rebooting in 10 seconds on the display.
The Samsung Galaxy S7 smartphone will now reboot to recovery mode automatically — Chainfire has programmed it that way. Any device that does not get into recovery mode will not yet be rooted. You need to press the hardware key combination on your Galaxy S7 to get it to recovery mode.