Last Updated on December 26, 2022 by Mathew Diekhake
Anyone who knows what System Restore is would know about Windows 10 automatically taking restore points whenever something of significant changes on the operating system.
Windows 10 also does something else when it thinks something of significance has happened, and that is to record event logs. You can view the event logs that have been recorded by opening up the Event Viewer program that comes preinstalled on all editions of Windows 10.
The point of recording the event logs is so that you or your system administrator can use them in the future to help troubleshoot problems. They can be helpful for lots of different issues.
That said, sometimes having too many even logs can also present a problem of its own by making it difficult to sort through what you want. If you know you won’t need any event logs that are now older and you want to clear them, Windows 10 offers you a way to do that.
The following guide demonstrates what you need to remove all event logs in the Event Viewer in Windows 10.
Note: Before you can use any of the methods for clearing the event logs, you’ll need to be signed into the computer using an account that has the administrative permissions assigned to it.
Method One: How to Clear All Event Logs in Event Viewer
You can clear the event logs directly from the Event Viewer. Here is how you can do that:
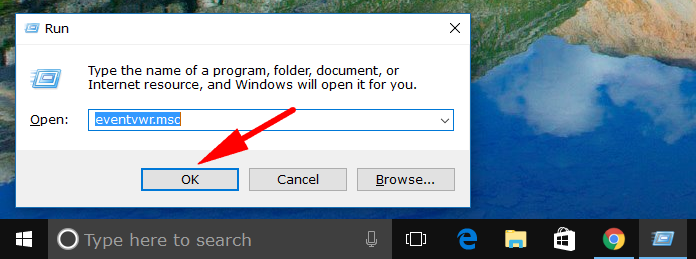
1. Start by opening up the Run dialog box by pressing the Windows logo key + R keys on your keyboard and then type eventvwr.msc. Click the OK button, and then the Event Viewer program opens up on your computer’s display.
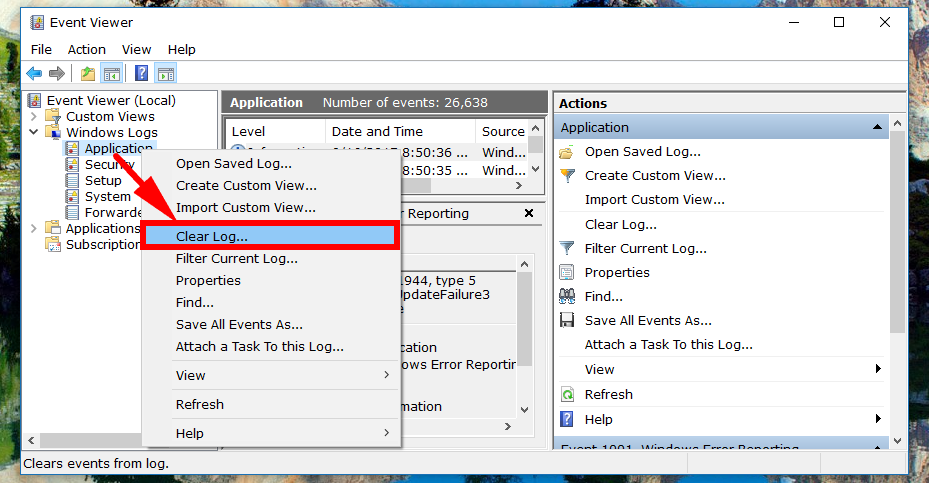
2. Click on the Windows logs folder in the left-hand pane and then find the log that you want to be deleted. In our example, we’ve chosen the Application logs. Regardless of the one you choose, once it has been opened, you’ll see the Clear log option available in the right side pane.
3. You could also open the log in the left pane and just right-click > select the Clear log entry from the menu and clear it that way also if you wanted to.
Method Two: How to Clear All Event Logs in Event Viewer from Command Prompt
It’s also possible to clear the event logs in the Event Viewer by just using the Command Prompt in Windows 10 if you prefer. Here’s how to do that:
1. To do that, just open the elevated version of the Command Prompt window so you are using it with the administrative permissions.
2. Once you’ve got the elevated Command Prompt window open, type the following command and then hit the Enter key on your keyboard:
for /F "tokens=*" %1 in ('wevtutil.exe el') DO wevtutil.exe cl "%1"
3. The event logs will be cleared, and you can close the PowerShell window again and continue using the computer.
Method Three: How to Clear All Event Logs in Event Viewer from Windows PowerShell
You could also use the more powerful Windows PowerShell to run the commands that clear the event logs too if you prefer. Here’s how to do that:
1. You’ll need to open up the elevated version of the Windows PowerShell window just like you did with the command line above so that you have the PowerShell able to execute commands that require administrative permissions.
2. Once you’ve got the elevated PowerShell window open, type the following command and then hit the Enter key on your keyboard:
Get-EventLog -LogName * | ForEach { Clear-EventLog $_.Log }
3. The event logs will be cleared, and you can close the PowerShell window again and continue using the computer.
The Event Viewer has been in the news a lot of the years for getting people into a lot of trouble. It was once a point of emphasis for scammers. They would call people up, get them to open the Event Viewer (which would inevitably show lots of problems) and then they’d trick people into giving up their credit card information so that they could get the problems fixed. Sadly, it seems no matter what Microsoft does it can’t win. But when used correctly and not exploited, the Event View is an excellent tool that can help you. Just don’t freak out when you see logs that record errors—-they’re pretty much always going to be there–and whatever you do, don’t fall victim to online or phone scams regarding people offering to help you fix them for money.
This article was last updated on May 22, 2019.
Related Tutorials


