Last Updated on December 26, 2022 by Mat Diekhake
System Protection is one of the methods Microsoft offers to help you backup your data and protect you from data loss. System Protection is what you need turn on if you are going to be able to take a System Restore.
Windows 10 automatically takes a new Restore Point whenever it feels something of significance has happened on your computer. You only have a certain amount of allocated space on the hard drive for the Restore Points by default though and when it’s filled up the oldest one gets deleted when the new one is created.
It’s possible for you to change what the default allocated amount of hard drive space is so you can either free up more hard drive space and have fewer Restore Points to choose from or have System Protection use up more hard drive space and offer you more Restore Points to backup if you want them.
If you’ve got a desktop computer with plenty of hard drive space then you probably don’t need to worry as the System Protection likely isn’t using up all of its allocated space anyway—my computer for instance currently has about 70 GB’s allocated for usage by System Restore but Windows 10 has only felt the need to use roughly 5 GB’s of that and feels using any more would be a waste. In other words, it won’t just automatically keep taking Restore Points unless it feels they are necessary. People using devices with smaller form factors, however, may find that System Protection doesn’t have as much allocated space as they would have hoped for, and that would be a fair example of one time when people might want it changed away from the defaults.
Here is what you need to change the System Protection maximum storage size for a drive when you’re using the Windows 10 operating system.
Change System Protection Max Storage Size for Drive in Windows 10
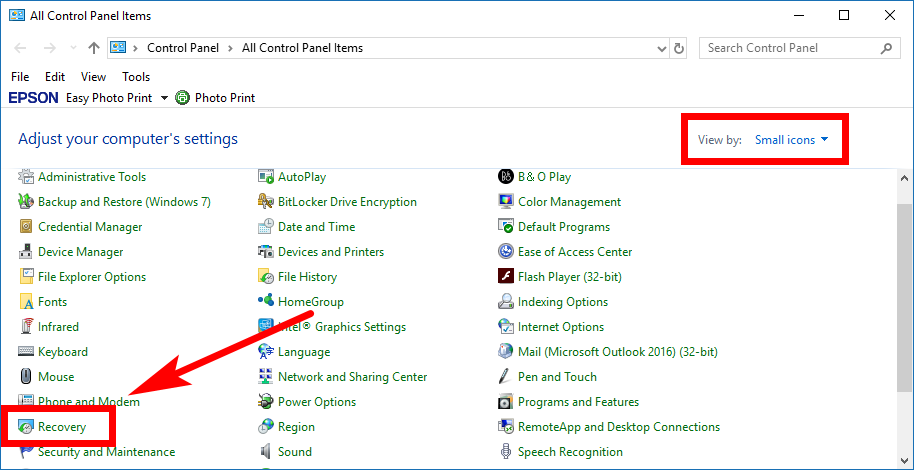
You can change the maximum allocated amount of storage size for the System Protection feature from the Control Panel. To get started, open the Control Panel so that it is showing the more classic view with the smaller icons. Then with the list of All Control Panel items window open, click on the “Recovery” link.
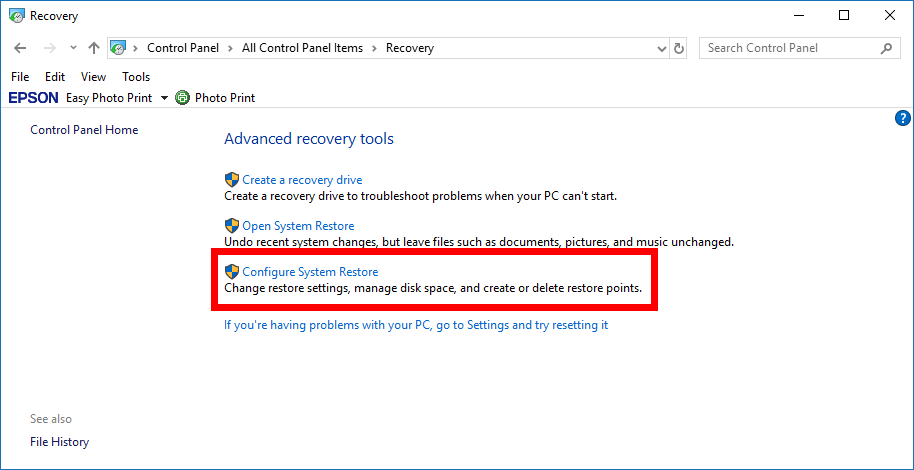
Next, click on the “Configure System Restore” link from the Advanced recovery tools section.
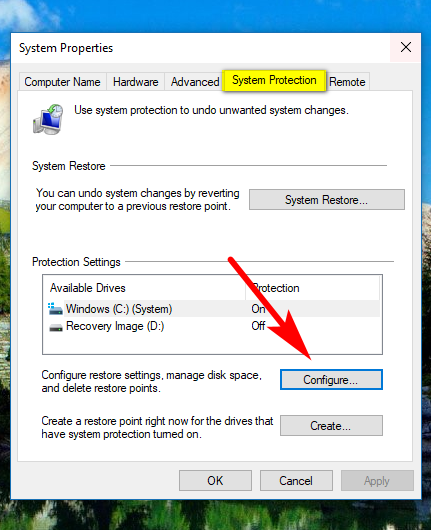
You’ll now have the System Properties dialog box open. Make sure it’s on the System Protection tab at the top of the dialog and then click on the “Configure” button under the Protection Settings section.
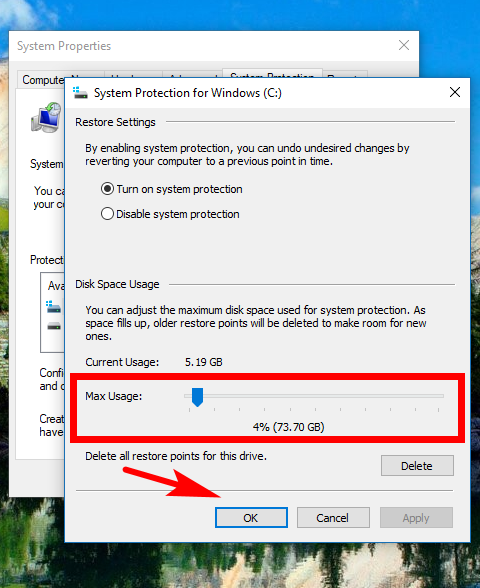
You’ll then see the “Max Usage” slider at the bottom of the dialog that you can slide with your mouse to get the desired amount. The default setting is 4% of the hard drive space, which is about 73 GB of my computer’s hard drive, but you would need to know the total amount of your storage space to know what 4% of yours is (or just look under the Max Usage bar for the figure that’s given in brackets for yours).
Make sure you click on the “OK” button at the bottom of the System Protection for Windows dialog before existing otherwise it won’t save your changes.
It’s hard to say exactly how much space System Protection is going to be using up because it differs in a case by case basis—you might be doing lots of things on your computer and making lots of changes, in which case Windows 10 might feel the need to use up more storage space for these Restore Points than it otherwise would have. You’ll need to head into the System Protection for Windows dialog box as shown in the guide above and check out how things are looking for your computer and then change it accordingly, based on what you can see us the current usage and how much space 4% of your hard drive is, all of which are statistics you can see from the dialog.
You might also be interested in:
- How to Turn On or Off My People Suggested Apps in Windows 10
- How to Turn On/Off Mobile Hotspot in Windows 10
- How to Turn On/Off Suggested Content from Settings app in Windows 10
- How to Change Layout of Touch Keyboard in Windows 10
You can subscribe to our RSS, follow us on Twitter or like our Facebook page to keep on consuming more tech.