Last Updated on April 28, 2023 by Mathew Diekhake
Here’s what you need to download the official Gionee A1 Lite firmware flash file onto a computer. You can then flash the firmware with the appropriate flashing tool that’s made to work with your device in mind.
Smartphone repair centers were the first places to know about flashing tools, as they often used them to help fix common mobile device-related problems. Since then they have become available on the Web for anybody to use. Now you can solve the same kinds of issues that were once left up to those repair centers: bootloops, soft-bricked devices, software errors, software bugs, update errors, so forth, by downloading the software onto your computer at home. And best of all, installing the Gionee A1 Lite flash file is an easy task, thanks to the flashing tool’s user-friendly interfaces that usually require just one click before the flashing is underway.
Most third-party developers who create tools for helping you customize your devices—the teams that work on custom recovery images, rooting applications, et cetera—recommend sticking with custom software if you’ve already changed the system partition or installed a custom recovery on the smartphone or tablet. If you are to go back to stock Android on the device, though, they also say that it’s always best to flash the firmware yourself instead of accepting the over-the-air updates. This is because OTAs can create unexpected behavior since they’re often only patching over existing software.
The flashing tools, such as the Smartphone flash tool, are always computer applications. On most occasions, these apps are relatively small files and won’t take up much hard drive space.
You can sometimes have a choice of what flashing tool you want to use to flash the Gionee A1 Lite firmware file. You can flash Stock ROMs with tools that work for either the system chip found in the device’s hardware, the firmware file type, or on occasion, tools that are specifically made to work for a particular manufacturer.
What Is Android Firmware?
Firmware is the operating system and its applications that control how the smartphone or tablet that runs on Android operates. While you may see the words “software update available” on your device’s display, we call it firmware to highlight its close relationship with the device manufacturers hardware.
If you prefer technical jargon, firmware is the specific programming that gets written to a device’s non-volatile memory. The firmware gets added to the device during the manufacturing process and is the middleman in helping software run on the hardware. Firmware can be written as read-only memory (ROM), erasable programmable read-only memory (EPROM), or flash memory.
The Android operating system is more open than much of its competitors in iOS, Windows 10 Mobile, and Tizen. You always get firmware running on your device out of the box, but if you do not like it, you can swap it over with custom firmware or other firmware versions that were made for your device. This flexibility helps with troubleshooting, or if you know you would prefer a different Android version that was made available.
Why Reinstall Stock Firmware?
Did you think you may need to restore the stock firmware on your device? Here are some of the things that you can achieve with stock firmware files:
- Upgrade or downgrade the version of Android on your device
- Fix common mobile device-related problems, such as unbearable bugs in the software
- Remove custom recovery images such as TWRP
- Unroot the Android operating system, regardless of what method/tool you may have used to get root access
- Unbrick your smartphone or tablet
- Reinstall the operating system
- Fix invalid IMEI problems
Gionee A1 Lite Firmware Flash File Download Links
The firmware can be downloaded directly onto a computer. After extracting the file, you can then upload it to a flashing tool that is also on the computer. Here is where you can download the firmware file:
File Name: Vivo_Y83_PD1803BF_MT6762_EX_A_1.11.14_10052018.zip
Firmware File: Download flash file
How to Install Gionee A1 Lite Firmware Using Smartphone Flash Tool
To install the Gionee A1 Lite firmware, you need to use a flashing tool that works for your manufacturer and run it on a computer. One flashing tool that works for this smartphone is the Smartphone Flash Tool. Here is how to use it:
Notes:
- Back Up Your Data. You should always back up your data before you begin flashing new firmware files to your smartphone or tablet. All of your pictures, music, videos, documents, etc. should be still on your device after you have updated the firmware, but you may need to restore the contacts and applications from a backup.
- Wipe Cache and Factory Reset. Some people claim that taking a factory reset isn’t necessary after updates, but at the very least you should wipe the system cache after installing new firmware. This way you can help eliminate any performance issues and battery draining bugs. Taking a factory reset is the best way of avoiding common problems many users face after applying software updates.
Before We Begin
- Make sure you have:
- A desktop computer or laptop that is running on a version of the Windows or Linux operating system (ideally Windows 10 but at least Windows 7).
- Note: The Windows and Linux SP Flash Tool files are separate files. If you have Windows, make sure you download the version for Windows. Likewise, if you have Linux, make sure you download the version for Linux.
- A USB data cable that allows you to connect your smartphone or tablet to the computer.
- The scatter loading file/files you want to flash to the smartphone or tablet.
- A desktop computer or laptop that is running on a version of the Windows or Linux operating system (ideally Windows 10 but at least Windows 7).
- You need to install USB drivers on the computer that allows for your smartphone or tablet to connect with the flashing tool. Several drivers can achieve this. If the drivers in the tutorial do not work for your device, try getting in contact with your smartphone’s manufacturer via an official website or phone number, or use a driver that works for MTK-based chipsets.
- We recommend backing up the smartphone or tablet before getting started. The SP Flash Tool is a reliable tool, but whenever you are installing firmware—regardless of the tool—it is possible you may want to restore the old version of your device. You can only do that from a backup.
- You need to download a version of the SP Flash Tool during the tutorial. You should always download the latest version of the tool. If that version does not work, try using an older version. Latest versions of tools have the best chance of being compatible.
1. Download the SP Flash Tool onto your computer and then extract the file by right-clicking on it > clicking Extract from the menu so you can use it.
2. Download the official OEM USB driver for your manufacturer onto your computer, or try using the Android USB driver or Universal ADB driver if your OEM is not listed.
3. Turn off the smartphone by long-pressing the Power button.
Some experts recommend removing the battery if your smartphone comes with a removable battery. Most newer smartphones do not come with removable batteries so you will not be able to do it. Since most people use the flashing tool without removable batteries, it is fine for you to use the tool without having removed your battery.
4. Download the stock firmware or custom firmware that you want to install on your smartphone or tablet and then extract the file by right-clicking on it > clicking Extract from the menu so you can use it.
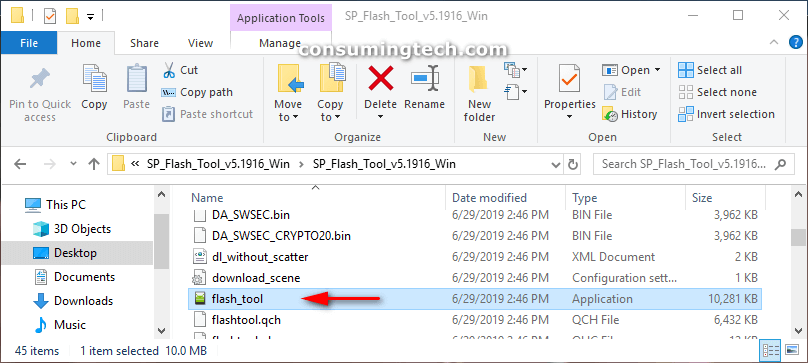
5. Double-click on the SP Flash Tool application that is found within the folder you extracted in the previous step.
If you get a message from Windows stating that “Windows Defender SmartScreen prevented an unrecognized app from starting. Running this app might put your PC at risk” click on the More info link and then click on Run anyway to open the file.
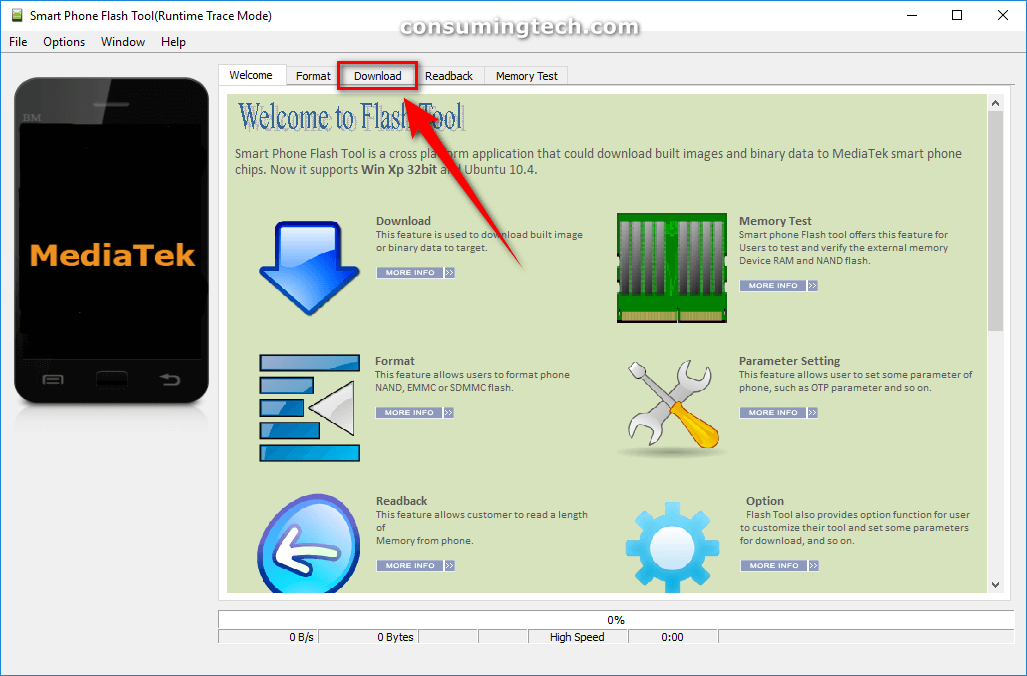
6. From the SP Flash Tool’s interface, click on the Download tab. (click to enlarge screenshot below)
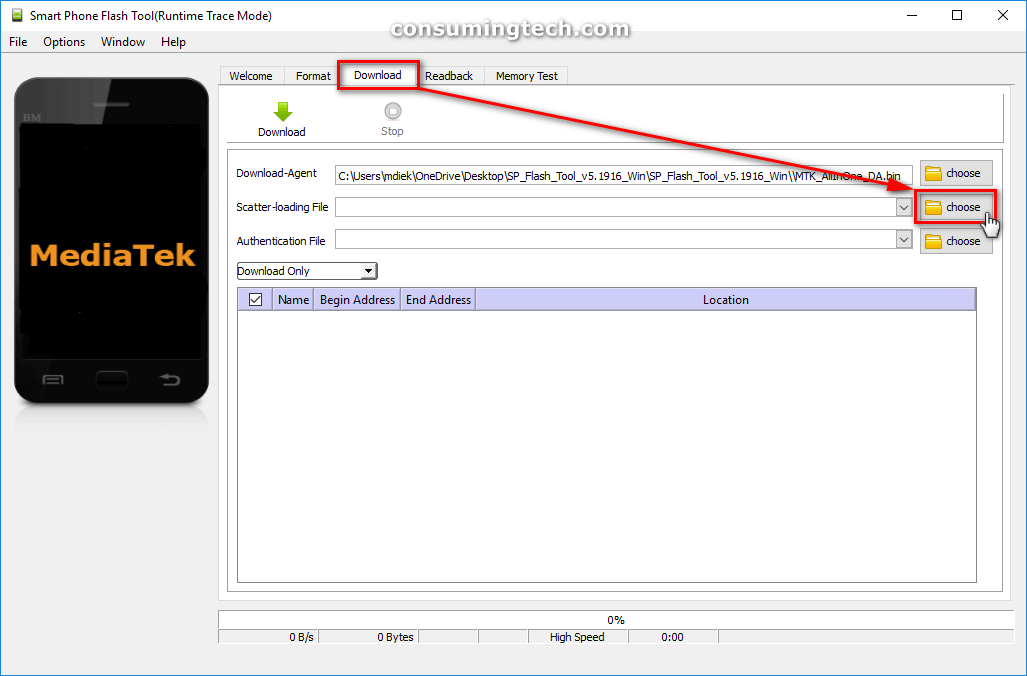
7. From the Download tab, click on the Choose button next to the Scatter-loading File area. (click to enlarge screenshot below)
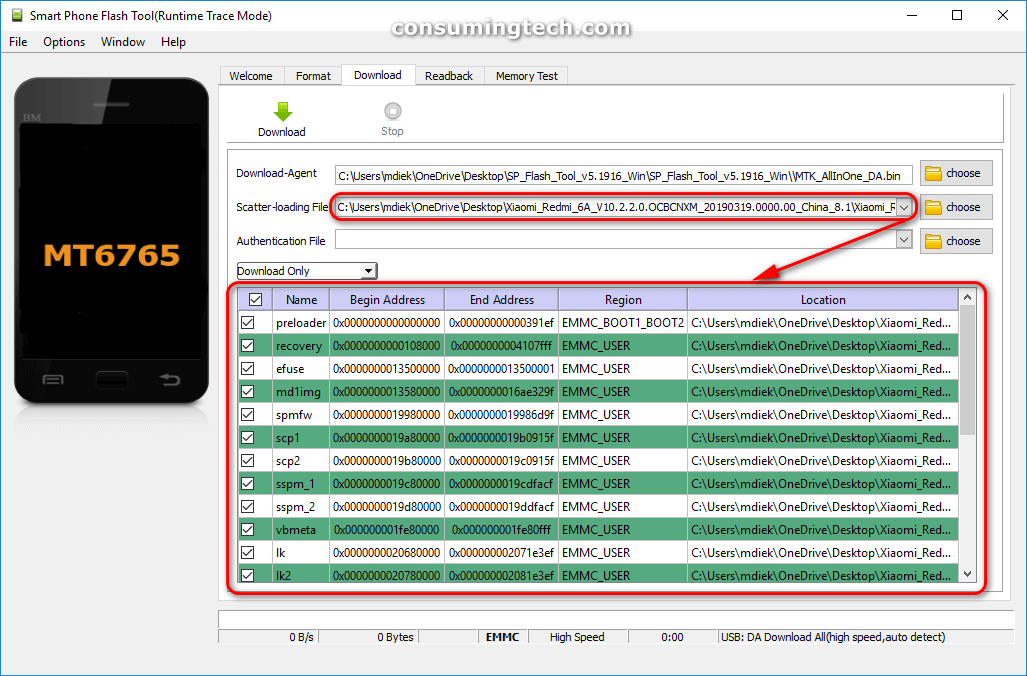
8. Browse your computer for the firmware scatter file and then upload it to this same location of the flashing tool. (click to enlarge screenshot below)
When you have loaded the file correctly, you will notice the details regarding the firmware gets filled in on the flashing tool’s interface.
9. Click on the Download button, and the firmware flashing is ready to begin. (click to enlarge screenshot below)
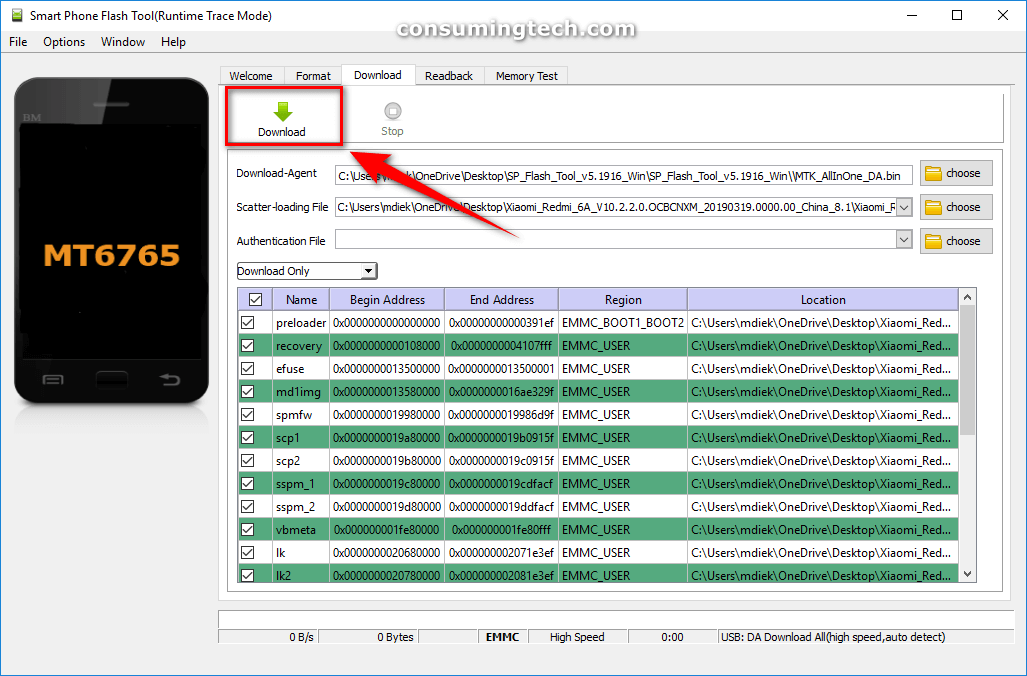
10. Connect your smartphone with the MTK chipset to the computer with the USB cable.
If you had a removable battery smartphone, ensure to insert the battery again before you connect it to the computer.
11. Once the connection is made, press one of the Volume buttons to help the computer detect your smartphone or tablet.
12. The flashing is completed when you get a green tick icon from the flashing tool.
You can now unplug your smartphone or tablet from the computer if you like.
That’s all.
FAQ
There are some common questions people have before installing firmware files. Here are the ones we are regularly asked:
How to Unroot Gionee A1 Lite When Installing New Firmware
There can often be a variety of ways to unroot a device that runs Android, and they depend on what method you used to get root access. If you installed SuperSU for root access, then you can open the app and find the option to unroot directly from SuperSU’s settings. On the other hand, if you do not have SuperSU, and you do have a Gionee smartphone or tablet, then you can always unroot by installing the stock firmware. Once you have followed the guide above, your device will automatically be unrooted. You can verify that is the case by installing one of the many applications from Google Play that checks for root access. As long as you are using a reliable app, then typically it will not lie about the root status of your mobile device.
How to Restore Stock Recovery on Gionee A1 Lite When Installing New Firmware
One of the most common reasons for installing the stock firmware is to remove a custom recovery image and revert to the stock recovery. There is nothing you need to do extra to reinstall the stock recovery on your device; when you install the stock firmware, it will automatically install the stock recovery partition on the device once again.
Additional Firmware
You can download Android firmware for other Android devices if you have another smartphone or tablet from a different manufacturer.
Related Tutorials
