Last Updated on December 24, 2022 by Mathew Diekhake
The Windows Subsystem for Linux (WSL) allows you to run Linux command-line tools on the Windows 10 operating system. While WSL wasn’t available in the early versions of Windows 10, anyone can use it because it requires an app to be installed from the Microsoft Store rather than a specific version of Windows. All you need is a compatible version of Windows that has the option to enable it.
Linux has been available as a virtual machine for years already, but virtual machines have never been great tools to use because they take up so much of the computer’s resources when they run. For instance, it’s not uncommon for people to run a virtual machine and find out that it’s using up most of the computer’s RAM or even CPU when they open Task Manager. The WSL requires much fewer resources and thus is friendlier to run.
WSL is intended to be mostly a tool for developers. In particular, web developers and those who work with open source projects. WSL allows developers to use bash, common Linux tools, and Linux first tools (such as Python) on Windows.
Before you can think about using Windows Subsystem for Linux, you’ll need to enable it on the computer first. It’s not a feature that comes automatically enabled on Windows 10 operating system versions to date.
The following tutorial demonstrates how to enable and disable the Windows Subsystem for Linux when you’re using a version of the Windows 10 operating system.
Method One: How to Enable/Disable Windows Subsystem for Linux (WSL) in Windows Features
You can enable and disable the Windows Subsystem for Linux (WSL) from the list of optional Windows features in Windows 10. Here is how you can do that:
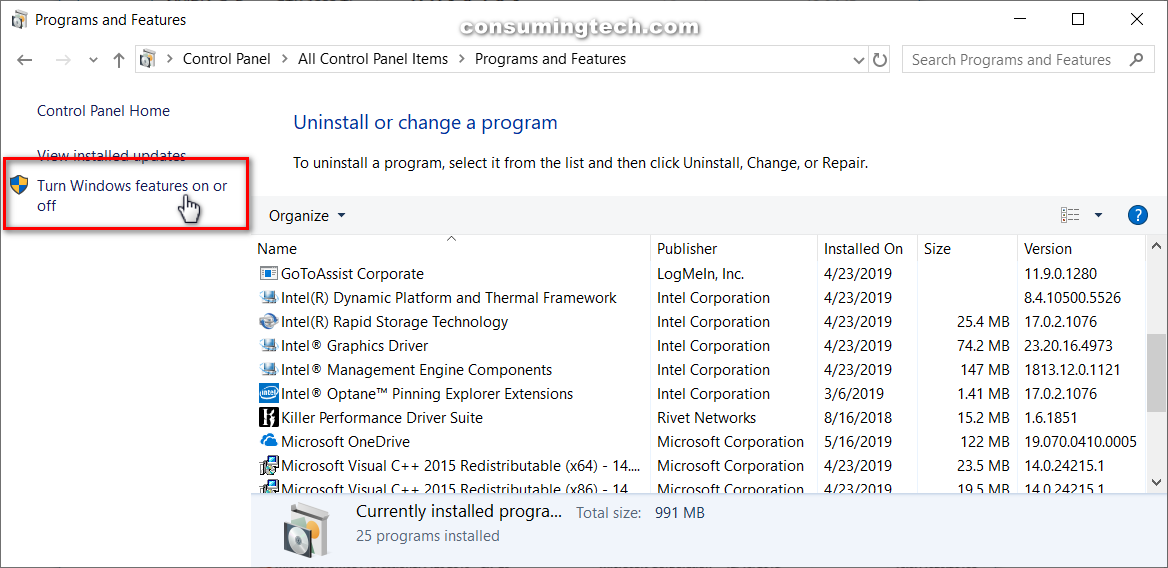
1. Open Control Panel in icons view, and then click on the Programs and Features icon from the list of All Control Panel Items.
2. Click on the Turn Windows features on or off link. (click to enlarge screenshot below)
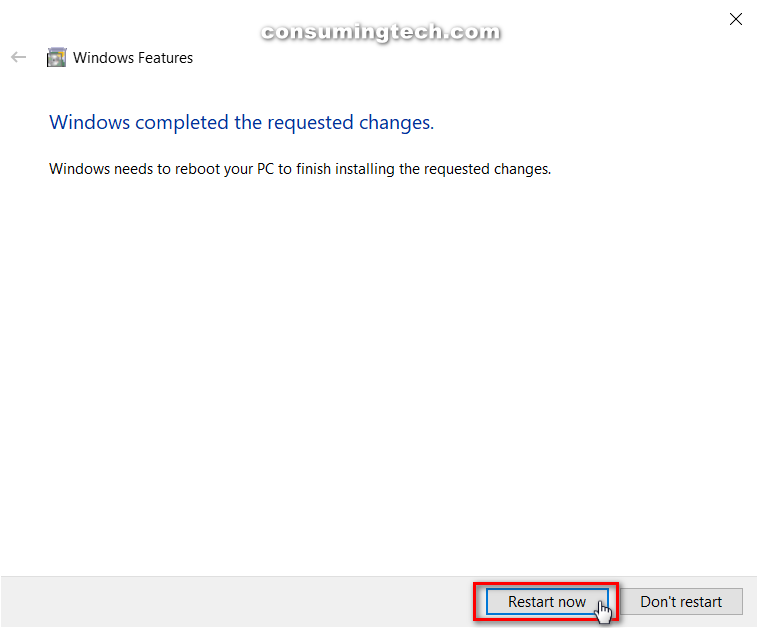
3. From the Windows Features dialog, check or uncheck the Windows Subsystem for Linux box and then click on the OK button to save the changes.

4. Before Windows can run the new feature, the computer needs to restart. Click on the Restart now button when you’re ready to start using the Windows Subsystem for Linux.
Method Two: How to Enable/Disable Windows Subsystem for Linux (WSL) in PowerShell
You can enable and disable the Windows Subsystem for Linux by using Windows PowerShell commands in Windows 10. Here is how you can do that:
1. Open the elevated Windows PowerShell.
2. Type one of the following commands into the command line, depending on what it is you want to achieve, and then press the Enter key on your keyboard to execute it.
To Enable Windows Subsystem for Linux:
Enable-WindowsOptionalFeature -Online -FeatureName Microsoft-Windows-Subsystem-Linux
To Disable Windows Subsystem for Linux:
Disable-WindowsOptionalFeature -Online -FeatureName Microsoft-Windows-Subsystem-Linux

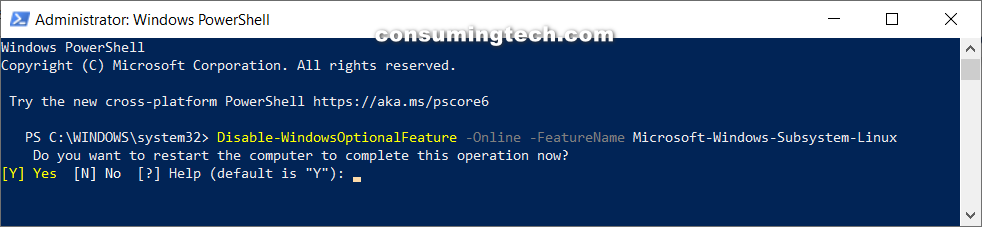
3. You need to restart the computer to apply the changes. When PowerShell asks if you want to restart now, press the Y and then Enter keys to restart the computer.
That’s all.