Last Updated on December 26, 2022 by Mat Diekhake
Windows 10 comes with a feature called disk write caching. It’s a feature that you get the choice between enabling and disabling, but unlike most of the other articles that we write-up, you should make sure you thoroughly research what you’re doing before you play around with these two options. There are positives to both but also downsides you should understand before making your selection.
Before your computer gets turned off or goes to sleep, all of the data that is waiting to be written to the disk’s cache should always be written to the disk if you are the standard user with only one power supply connected to your hardware. If you choose to write to the disk immediately by turning off this feature, you are making sure you don’t get any data loss if you were to experience a situation such as a power failure when having the single power supply like most computers you use do.
There can be some advantages to turning off the disk write caching if you have more than one power supply. You don’t have the stuff writing to the disk being cached. The point a cache, in general, is to make the system performance quicker because it doesn’t always need to pull the data from the system anymore. There’s another reason for caching at times as well which is to store those files so they can be reused if need be.
Note: There’s some debate about whether or not having the disk write caching enabled does, in fact, speed up your SSD. Some are of the opinion that it does and some say it doesn’t. It could well depend on the type of SSD that you have on your computer before knowing if it is going to increase system performance or not. In other words, even if you take the risk of losing the data by turning off the option to cache that data, it isn’t necessarily going to be useful to your SSD anyway. Microsoft themselves also give a stern warning for people wanting to turn off the write cache buffer flushing on their website that you ought to have a quick read through as well to get a better understanding of what’s happening.
How to Enable/Disable Disk Write Caching in Windows 10
You can find the settings for enabling and disabling the disk write caching from the Device Manager. Here is how you can do that:
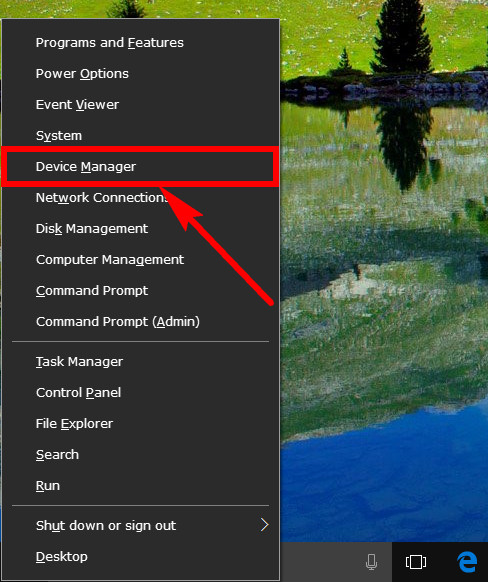
1. Press the Windows logo key + X to bring up the Quick Links menu and then click on the Device Manager entry.
2. Find where it shows you the Disk drives and then click on it to expand it. You’ll be shown all the disks that are available for your computer, including your internal and external options such as a Micro USB stick that you might have connected to the computer as well. Click on the internal disk option that it displayed from the list.

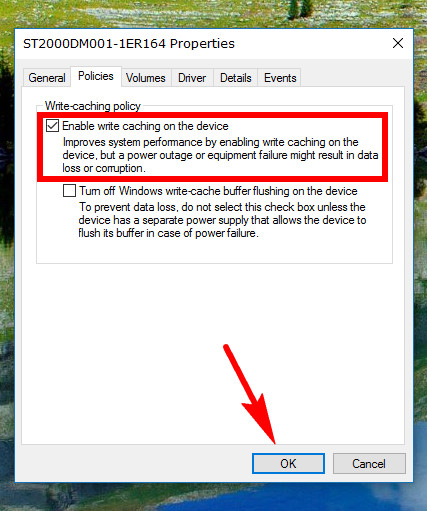
3. With the disk’s Properties dialog box open, click on the Policies tab at the top, and then you’ll see the checkbox available for the Write-caching policy that you can deselect to turn it off and keep it checked to leave it on.
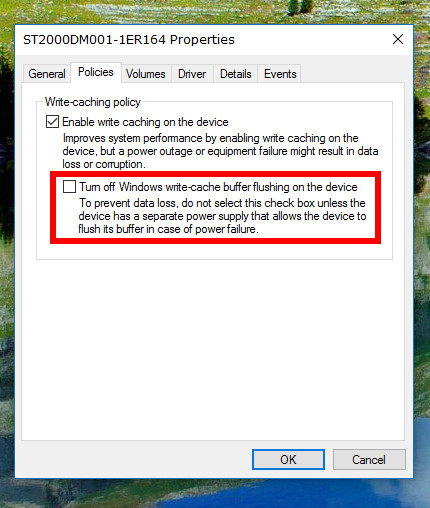
4. You’ll also notice another option beneath it for turning off the Windows write-cache buffer flushing. By default this option is not given a checkmark because you’ll potentially lose data during a power outage if it’s selected. If your device has a separate power supply, then you might want to choose this option for the sake of some additional performance, but that’s a big “if” and isn’t suitable for most individuals.
Trusting what Windows already does for you in Windows 10 is often the best case scenario unless you have a good reason not to. Some people do have separate power supplies, so the option is there for have some better performance if you are one of those people and it sounds appealing for you to do so. That’s about the only upside to swapping the default setting in this particular case for the disk write caching.
Related Tutorials