Last Updated on December 25, 2022 by Mathew Diekhake
If you’ve got a computer that has yet to upgrade to Windows 10, you don’t have to rush out and buy a new computer to start using it. There’s the Media Creation Tool that you can download free of charge directly from Microsoft that’ll allow you to get up and running with Windows 10 within a few minutes.
You can use the Media Creation Tool to install Windows 10 directly on the computer without the need for anything other than the web browser you’re using. There’s also the added option of creating a bootable USB flash drive. Installing the Media Creation tool onto the USB flash drive means you can share the same copy of Windows 10 between computers.
The Media Creation Tool is going to get you running on one of the latest versions of Windows. It won’t be as new as Windows Insider builds—for example, you won’t have to worry about bugs and incompatibilities with your applications—but it’ll be a lot newer than some of the earlier versions of Windows 10. As time has gone on, Windows 10 has been updated with lots of innovative features that make it overall a more desirable operating system to use than several years ago.
This tutorial demonstrates how to create a bootable USB flash drive to install one of the latest version of Windows for legacy BIOS and UEFI.
Method One: Use Media Creation Tool to Create Bootable Windows 10 USB for Legacy BIOS and UEFI
Requirements to use the Media Creation Tool for creating a bootable flash drive:
- You need to have a working internet connection to be able to download the Media Creation Tool. The Media Creation Tool is what’s going to allow you to download Windows 10 and then copy it over to a USB stick.
- You need to have enough space on both the computer and USB drive to store the downloaded version of Windows 10.
- You need a USB stick with 4 GB (32-bit or 64-bit) or 8 GB (both 32-bit and 64-bit) of space available for the download. (Note that all other data on the USB stick will be wiped, so use a blank USB stick or make sure you create copies of anything currently on the stick.)
- There are quite a few system requirements that you should check before you get started if you’re using an older computer or one without modern hardware specifications.
- Anyone installing Windows 10 for the first time on a computer and who wants to use a licensed version of the operating system will need to have their product key. For more information, see: Find your Windows product key.
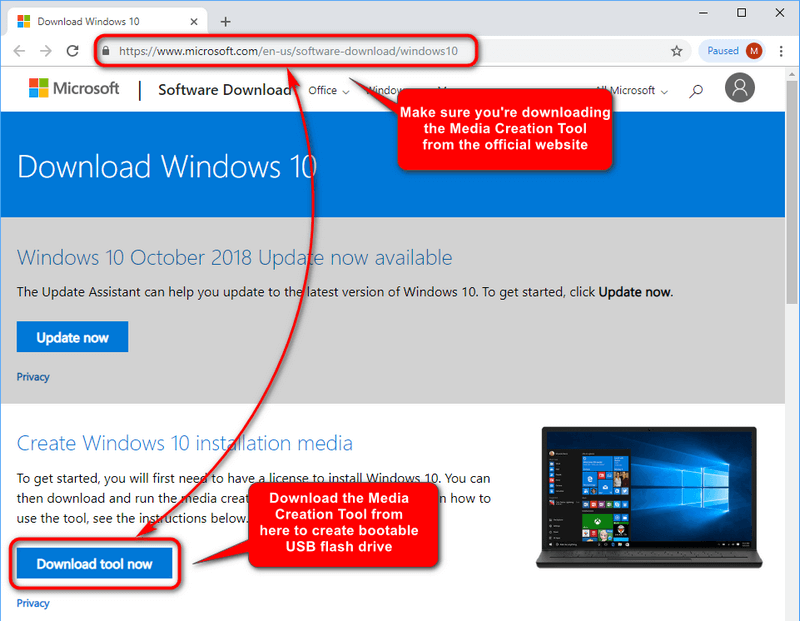
1. Open Microsoft’s download software page click on the Download tool now button.
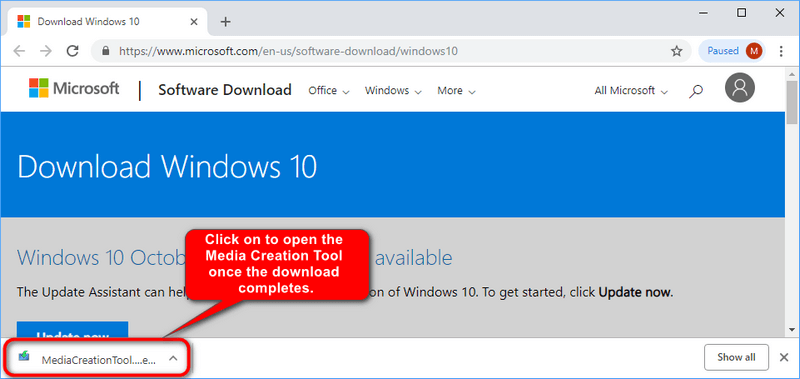
2. Wait for the Media Creation tool to finish downloading to your computer and then click on the file to open it. (If you don’t see it in your web browser, you can open File Explorer and find it in your Downloads folder.)
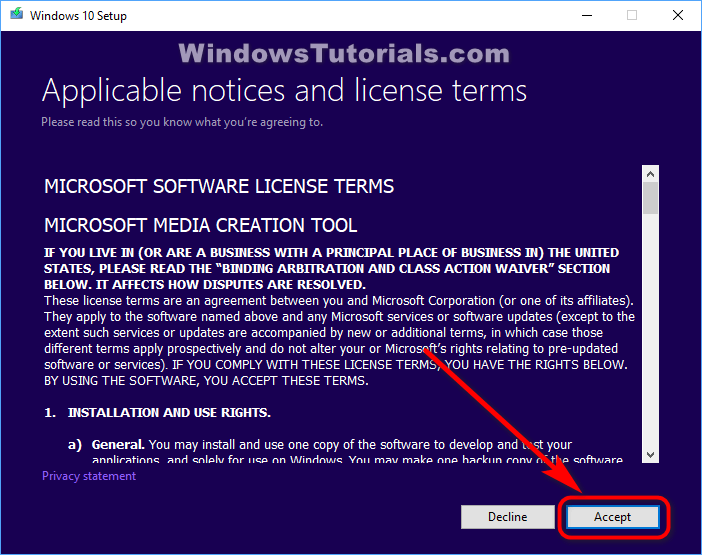
3. Click on Accept when you get to the applicable notices and license terms page.
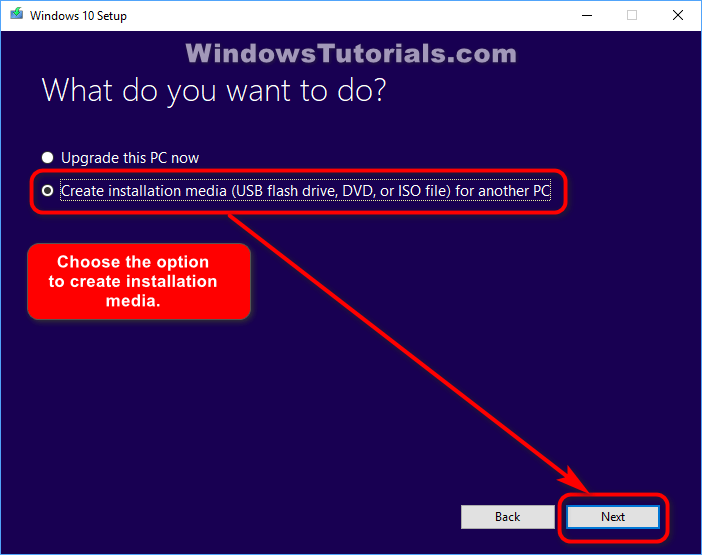
4. Put a checkmark next to Create installation media (USB flash drive, DVD, or ISO file) for another PC by clicking on the box available for it.
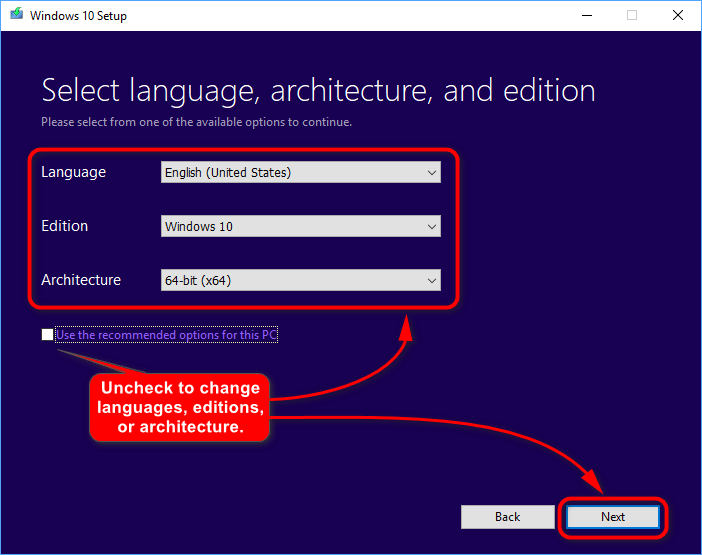
5. If you want to annually choose the language, Windows 10 edition, and the computer’s architecture, then you first must uncheck the box where it says Use the recommended options for this PC.
6. Click on the Next button to continue.
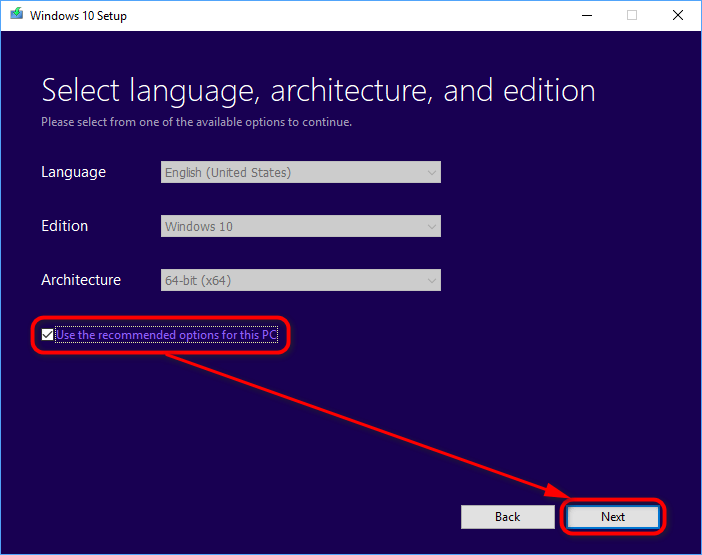
7. If, though grayed out, you are happy with the details you can see from the language, edition, and architecture fields, then leave the Use the recommended options for this PC checked.
8. Click on the Next button to continue.
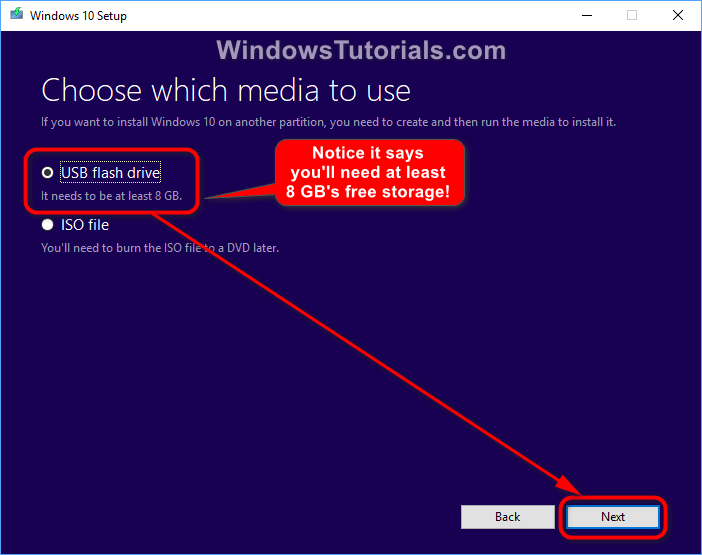
9. Choose USB flash drive by clicking on the checkbox available for it.
Note: beneath where it shows the USB flash drive option, take note of it letting you know that the flash drive needs to be at least an 8 GB thumb drive to be able to store Windows 10 on it.
10. Click on the Next button to continue.
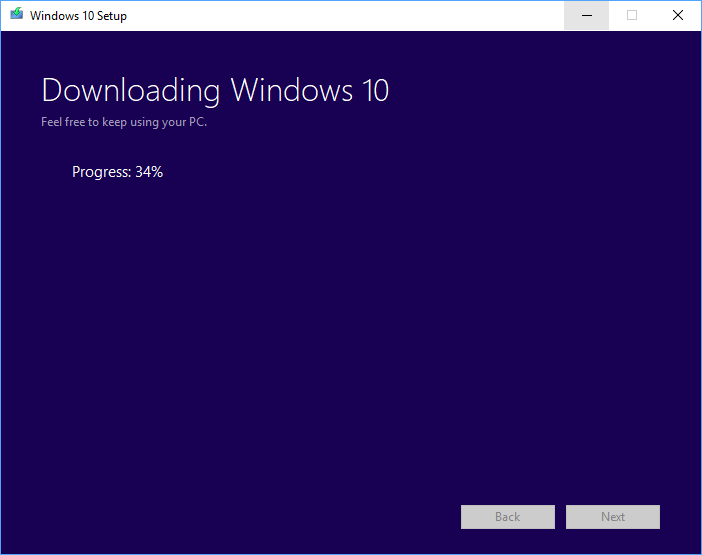
11. The Windows 10 ISO operating system file will now be downloaded onto the flash drive.
Method Two: How to Create Bootable Window 10 USB for Legacy BIOS and UEFI with Rufus
To use UEFI you’ll first need to meet the requirements:
- A 64-bit of the Windows 10 ISO file.
- At least GB’s of free storage space on the USB thumb drive that you want to use.
- Temporarily disable Secure Boot and Fast Boot in Windows 10 if you plan on booting from an external UEFI USB flash drive.
1. Download the Windows 10 ISO file from Microsoft’s software download webpage.
2. Download the latest version of Rufus from its official source. (Want more information on Rufus? See the FAQ available on GitHub.)
3. Connect the USB flash drive to the computer.
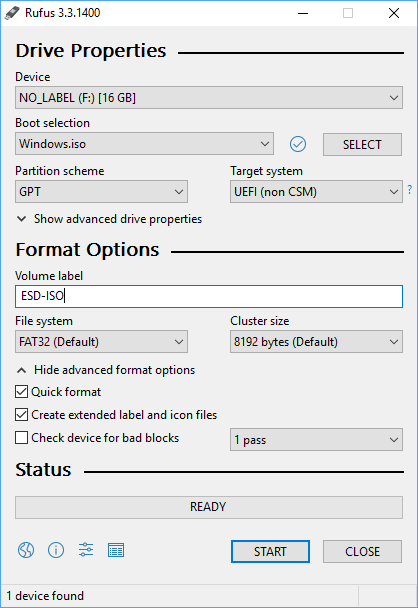
4. Double-click on the Rufus executable file and you’ll see the Rufus box open similar to the one below.
5. Fill in the details as follows:
Device: select the USB flash drive you want to format and use.
Boot selection: tap/click on the SELECT button, and navigate to and select your 64-bit Windows 10 ISO file.
Partition scheme: select GPT.
Target system: select BIOS (or UEFI-CSM).
Volume label: you can enter any name for the USB flash drive, or leave the default name.
File system: select NTFS.
Cluster size: select the one listed as the Default.
Method Three: How to Create Bootable USB Flash Drive for Installing Windows 10 Using Legacy BIOS (without UEFI)
1. Download the Windows 10 ISO file from Microsoft’s software download webpage.
2. Download the latest version of Rufus from its official source. (Want more information on Rufus? See the FAQ available on GitHub.)
3. Connect the USB flash drive to the computer.
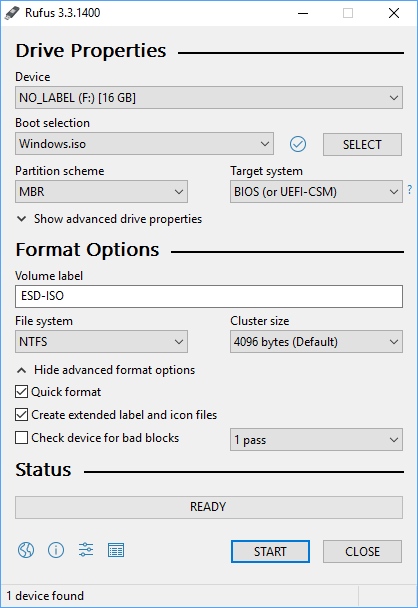
4. Double-click on the Rufus executable file and you’ll see the Rufus box open similar to the one below.
5. Fill in the details as follows:
Device: select the USB flash drive you want to format and use.
Boot selection: tap/click on the SELECT button, and navigate to and select your 64-bit Windows 10 ISO file.
Partition scheme: select MBR.
Target system: select BIOS (or UEFI-CSM).
Volume label: you can enter any name for the USB flash drive, or leave the default name.
File system: select NTFS.
Cluster size: select the one listed as the Default.
How to Use “Windows 7 USB/DVD Download Tool” to Create Bootable Window 10 USB for only Legacy BIOS
1. Download the Windows 10 ISO file from Microsoft’s software download webpage.
2. Download the Windows 7 USB/DVD Download tool.
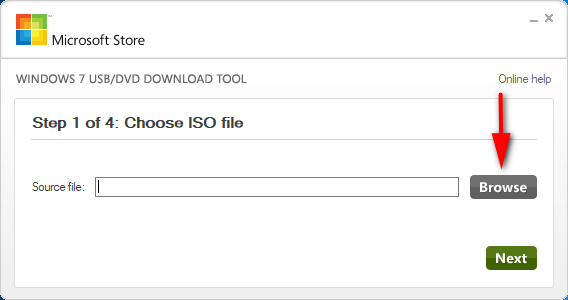
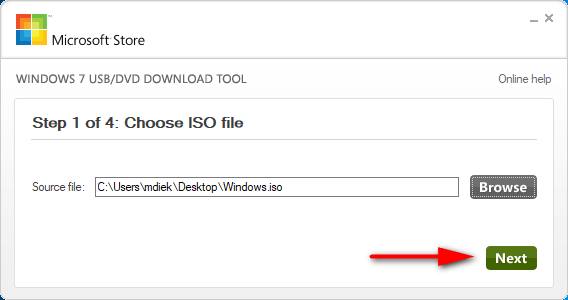
3. Navigate to your Downloads folder from File Explorer and run the Windows 7 USB/DVD Download tool. Tap/click on the Browse button once you’ve finished settings it up.
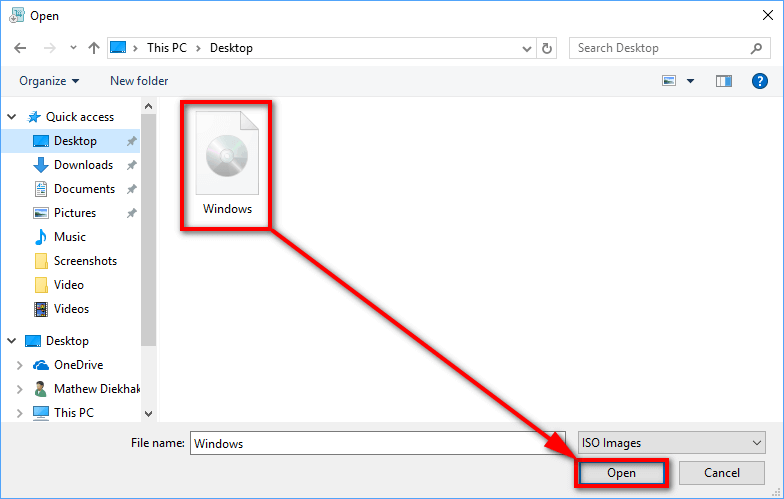
4. Navigate to the location of your Windows 10 ISO file and then tap/click on the Open button.
5. Once you can see the ISO file’s path is loaded, tap/click on the Next button.
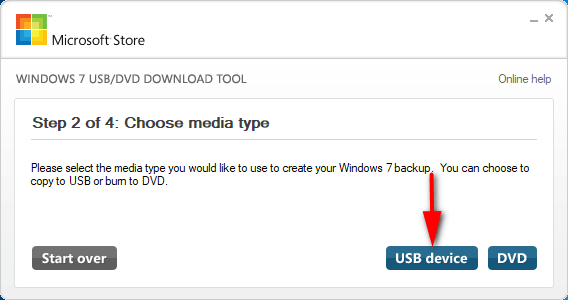
6. Tap/click on the USB device button.
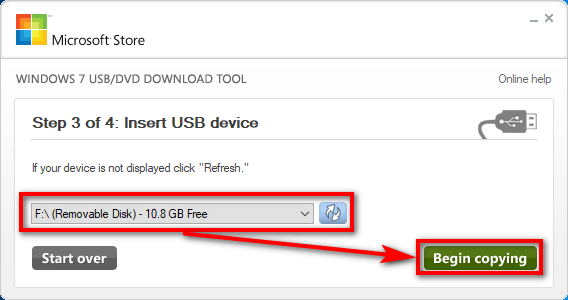
7. Insert the USB stick into the computer and then select it from the drop-down menu and tap/click on the Begin copying button.
That’s all.
Related Tutorials
- Create Bootable USB Recovery Drive in Windows 10
- How to Create System Repair Disc in Windows 10
- Download Windows 10 Latest Version ISO
- Delete Windows10Upgrade Folder in Windows 10
- How to Download Windows 10 ISO File
- How to Do a Repair Install of Windows 10 with an In-Place Upgrade
- Create Recovery Drive in Windows 10
- Create Bootable UEFI USB Flash Drive for Installing Windows 7, Windows 8, Windows 8.1
- Create a Password Reset Disk on USB Flash Drive in Windows 10

February 3, 2019 @ 06:24
I’ve managed to create the bootable USB flash memory drive, not I need to know how to install it. Who knows what to do next?
February 3, 2019 @ 06:32
There are two things you can do next: either boot it from within Windows 10 when you have it running or at boot if you haven’t got Windows 10 installed yet.
For existing Windows 10 Users
1. Connect the USB stick to a working USB port in the computer. (Use a port that you are familiar with and that you know works.)
2. Boot to the Advanced startup options menu.
3. From Advanced startup, click on the “Use a device” icon.
4. Click on the USN drive that you had Windows 10 installed on and that you connected to the USB port.
5. The computer will now restart and boot the Windows 10 operating system from the drive.
To Boot Windows 10 from the Boot Menu
1. Connect the USB stick to a working USB port in the computer. (Use a port that you are familiar with and that you know works.)
2. Turn on the computer (or turn it off and then on again).
3. Look at the computer’s display for the “F” key that you need to press to boot into the Boot Menu. (The F key can vary between manufacturers, but you’ll see the key you need to press on the computer’s display; every manufacturer should list it there for you to see.)
4. From the Boot menu, click on the drive that you installed Windows 10 on and that you have connected to the PC.
February 3, 2019 @ 06:44
Those options will work for a computer but for Surfaces devices, you have to hold Volume down and press and release the Power button to get to the Microsoft Surface logo. When the logo appears, release Volume down.
You should find the Surface now booting Windows from the USB stick.
February 3, 2019 @ 02:41
I can’t seem to boot from USB. It allows me to select the USB drive in boot order under UEFI settings when I try, but it ends up just booting the normal version of Windows 10.
I have been made aware of Secure Boot which apparently might have been impacting it, but it hasn’t made a difference. I feel like the problem is likely elsewhere.
Additionally, I can use this USB to boot Windows 10 from my Windows 7 laptop. It’s just that it won’t work to boot from my desktop.
February 3, 2019 @ 02:42
You should be able to select the USB UEFI from the BIOS exit screen and boot the drive from there.
January 23, 2019 @ 01:19
I bought a new Acer Aspire laptop for my girlfriend. It came with Windows 10 but installed on an HDD and not an SSD. So I bought an SSD and followed a guide online from a popular tech forum to transfer the Windows 10 installation from the HDD to the SSD. I didn’t have any problems at all until Windows Update installed a new version of Windows 10 on the computer. Now the Windows 10 installation has shifted back onto the HDD all by itself and nothing is on the SSD. Thankfully, we’ve always been able to use the computer, and everything runs smoothly with the operating system itself.
January 23, 2019 @ 01:23
It may be easier for you to install a fresh copy of Windows 10 on the new SSD using the Media Creation tool and the guide above and forgetting entirely about the transferring idea. Once you’re up and running on the new version of Windows 10 — perhaps even wait until you see an update come and go — then you can delete the OS from the HDD if you want to free up more space.
Buying a laptop that comes with an HDD isn’t a bad idea if you know how to install an SSD as well. Then you can use the SSD for your main operating system and then keep the HDD there for the rest of your files.
January 23, 2019 @ 01:03
If I had a problem with Windows 10 that I could not repair. I ordered a new SSD and installed Windows 10 on it without any issues. However, my old HDD had a Linux distribution installed on it and while I can see it there in Disk management, it won’t boot up from the old HDD. I’m not able to understand why anything I did to an SSD has created a problem with the HDD. My understanding was that these would be two separate entities.
January 23, 2019 @ 01:10
When you have a problem with Windows 10, you should get in contact with your manufacturer. No Windows 10 problem can’t be fixed one way or another, even if you run out of options from the Advanced options menu.
When I had run out of possibilities with my HP computer, I got in contact with them, and they sent me out a recovery disk (a series of recovery disks to be exact, and each disk was needed for future reference if anyone with the same problem is reading this). The recovery disks were able to get Windows 10 completely reinstalled on the same computer without the need for any hardware changing.
Changing hardware is not something that I’m trained in — I’m a software guy. But I will say that I’m not surprised you run into some troubles along your adventurous way. By attempting what you did, you probably opened a new kettle of fish that you and I are not aware of. And I’m not sure where you would turn to for help other than who manufactures the SSD that you bought. If all else fails, perhaps consider taking out the new SSD and getting in contact with the manufacturer for a recovery disk.
January 22, 2019 @ 23:15
Apparently, a new Windows 10 software update will start to automatically put some storage space aside (I think as much as 17 GBs from memory). My understanding of SSD’s was that the Windows operating system was already putting some of the storage aside just in case the computer needs it and that additional storage isn’t visible to us when we open File Explorer.
My question to you is will this new dedicated storage space still be visible from File Explorer, i.e. will we see it showing up as used space, or will it be taken off the hard drive total space but not be seen from File Explorer when we look at the graph that it gives us for the drives?
January 22, 2019 @ 23:19
It could go either way. It may show up as used space from File Explorer, or when you look at your total hard drive space available, it might show you have less available that you would have thought. If I were to take a guess, it would probably be the latter. Since it’s free space and not used space, I don’t think it would be easy — or make sense — for it to show up as used space.
January 22, 2019 @ 21:53
I’m going to make the upgrade to Windows 10 from Windows 7. Before I do I want to know when I should format the drive to NTFS. Should I do it before the installation of Windows 10 or after it? If I do it after the upgrade, will that remove the firmware update? And if so how do I format to the NFTS drive before I upgrade the firmware?
January 22, 2019 @ 21:57
Unless you’re using it as a secondary drive on the computer, you don’t have to manually format an SDD drive. The SDD will get formatted automatically during the upgrade by Windows. Windows handles everything for your computer these days. You don’t have to do anything but follow the instructions that are given to you on your computer’s display. That’s one of the reasons when you do a completely fresh install, it can take as long as a few hours to finish upgrading to Windows 10 from what you had running before. Most people don’t realize that when they buy a new computer, it comes with Windows 10 already installed. All they’re doing is the startup process, not the full installation process.
January 15, 2019 @ 18:23
You used to be able to download Fresh Start or download it from the Windows Defender Security Center (which has now been renamed to Windows Security, which I feel will probably get renamed again someday because as good a name as “Windows Security” seems, it is a little too straight forward and makes it hard to research).
You have to back up your data before you use Fresh Start. That is the only way it doesn’t lose your data. It will remove any of the applications that you’ve installed after you started using Windows 10 as well.
January 15, 2019 @ 18:11
There’s also a tool called Windows 10 Fresh Start that you can install instead if you’ve got Windows 10 already but are facing problems with it.
January 15, 2019 @ 18:11
Is this a new tool or an old tool?
January 15, 2019 @ 18:12
I thought it was a new tool because I saw a how-to guide on it just the other day but after checking it has apparently been around since the Windows 10 Creators Update. The point of Fresh Start is to allow users to do another clean install but without losing the data that they’ve already collected while using the operating system thus far.
January 15, 2019 @ 18:15
So in other words it’s like applying the hard reset where you can choose to keep data (which is a refresh) or do the full hard reset that wipes the data, only this time it is a full reinstall and keeps the data.
Shouldn’t that in theory make the refresh of Windows 10 theory updated?
January 15, 2019 @ 18:16
It might or it might not. It might back up the data and then reinstall it and still technically do a new clean install like it says it does. The Windows Refresh is a refresh because it doesn’t technically hard reset.