Last Updated on December 26, 2022 by Mathew Diekhake
Instead of bookmarking or adding things to your favorites as you do with web browsers, the Windows 10 operating system will intelligently remember the things you have done lately as well as the things you like to do most. These two features are appropriately defined as “Recent items” and “Frequent places” in Windows 10.
Some people like to turn off the Frequent places and Recent items so Windows isn’t giving away any secrets, and others prefer to just clear the current data so that the stuff it remembers starts from scratch. If you choose to do the latter, then you don’t turn off either of them. The Recent items and Frequent places stay on so you can still get the benefits of what they do starting from today.
The reasons for wanting to make that happen should be fairly self-explanatory, but we’ll give you an example so that things are crystal clear. If you are using a friends computer or have been using a friends computer for a while, and you don’t want them seeing what you have been doing recently, you could have turned off the Recent items and Frequent places when you first started using the computer and then turned the feature back on again after you stopped using their computer. However, if you have forgotten to turn it off, and you’ve already collected lots of data, then you can clear that data and keep the feature on so it continues working when you hand the computer back over again.
You also just might want to clear the current data that Recent items and Frequent places have because the older data isn’t proving very useful to you anymore because your browsing habits are about to change. Over time it should achieve that anyway, but you can help it cut to the chase by clearing it, which is particularly useful if you had visited certain places often and for a long time in the past and no longer plan on revisiting those places. For times like those it can take a lot longer than you had hoped to override the older information since you visited it too much—you might have suffered a similar fate when using the Google Chrome web browser and it continually loading a webpage that you don’t want to use anymore because you were so used to just typing the first few letters into the address bar and then loading the page.
How to Reset Recent Items and Frequent Places in Windows 10
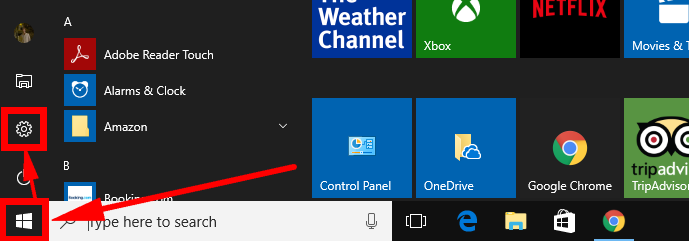
You can reset Recent items and the Frequent places using the Settings application and Control Panel in Windows 10. To get started, navigate to the Start menu > Settings gear icon in the Start menu’s left side pane.
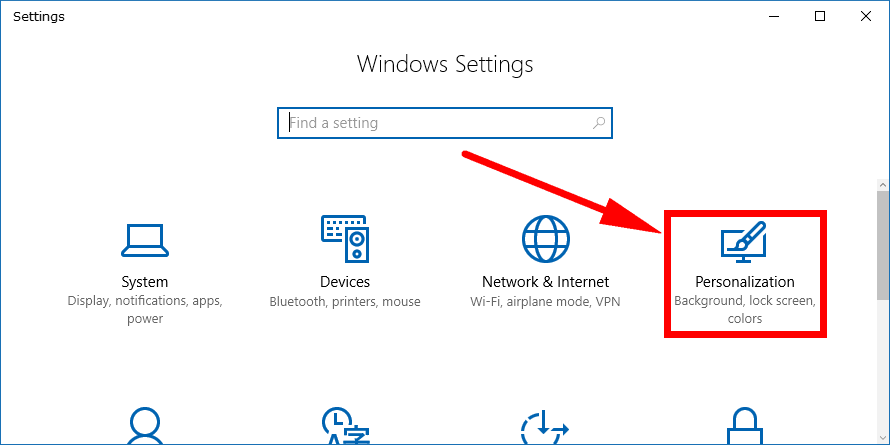
Then click on the “Personalization” link from the Windows Settings window.
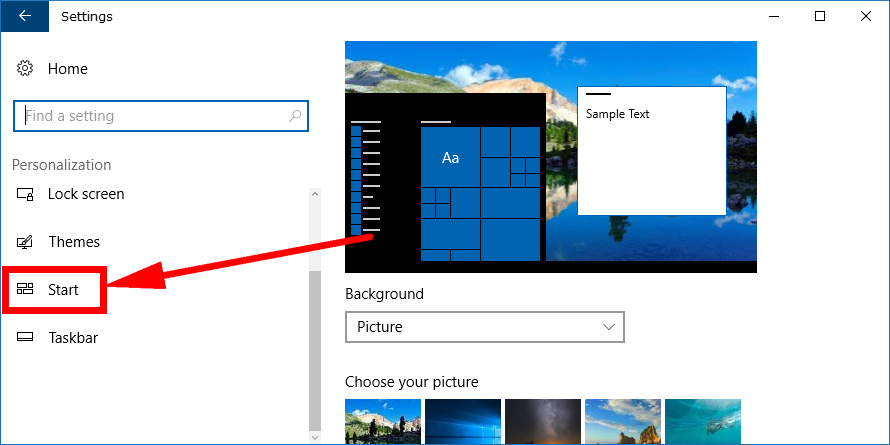
Scroll down the left side pane and then click on the “Start” link when you see it.
Scroll down the right side pane and stop when you see the “Show recently opened items in Jump Lists or Start or the taskbar.” That’s the toggle you want to click to turn off if you want to reset Frequent places or Recent items.
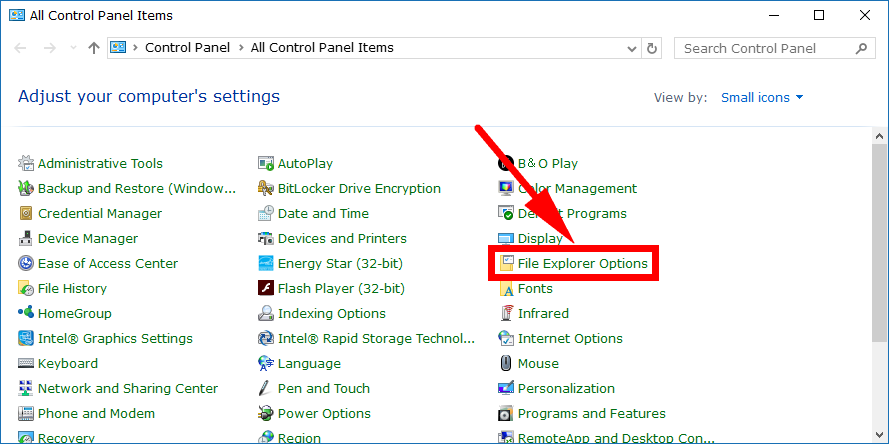
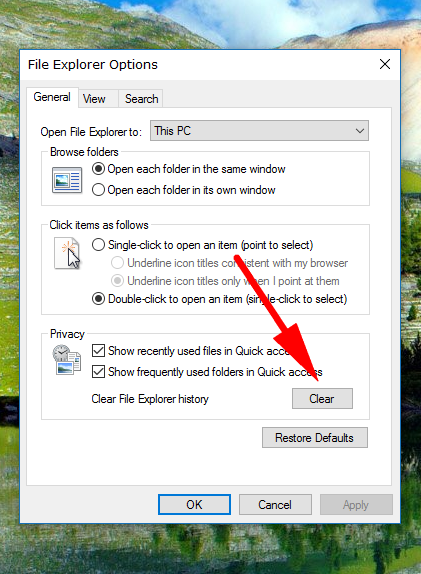
The Control Panel can also be used to open up the File Explorer Options dialog box where from within you can clear the data relating to the recent items and Frequent places as well. To get started, open the Control Panel so that it is showing the classic view that showcases the smaller icons and then click on the “File Explorer Options” link from the list of all Control Panel items.
It then opens the File Explorer Options box. Click on the “Clear” button under the Privacy heading. As long as you have a checkmark in both of the boxes within the Privacy heading, then it clears both the Recent items and Frequent places.
Most people find being able to bring up recently used documents or commonly opened files as a positive thing to have, but there are odd occasions when people prefer Windows hiding that information. Other times, people don’t mind showing the information but just want to reset it so that it starts showing more relevant stuff for today and tomorrow. Windows 10 makes it possible for you to do that using the guide above.
Related Tutorials

