Last Updated on December 26, 2022 by Mat Diekhake
Windows Backup was first introduced in Windows 7 under the different name of “Backup and Restore.” It then was taken away from Windows 8 and Windows 8.1. Windows 10 allows you to retake the backups with the new Windows Backup feature. There’s even an option to link you through to taking the backups the same way Windows 7 offered it too if you prefer doing them the way you already learned back when people were using Windows 7.
For a long time, people haven’t bothered to find out how to backup with Windows operating systems because they knew they always had the System Restore feature available. Those days might soon be coming to an end. If you haven’t yet learned how to take a backup, there’s never been a better time than now before it’s too late.
The Windows Backup in Windows 10 lets you backup all the files in the folders and on the drives. It also gives you the option of taking a backup of the system image as well if you want it.
You can take the backup as a once off or set a schedule for your files to be backed up automatically every so often. You probably won’t want to backup your stuff too often though because backing up requires space and a lot of it. You also need that space to not be on the same drive since backing up on the same drive would defeat much of the purpose of taking the backup in the first place.
Understanding Your Backup Options
Technically the geeks will tell you that the older “Backup and Restore” from Windows 7 is now referred to as “Windows Backup” instead, but the Settings app and Control Panel don’t show that name change. To avoid confusion, you will still see it offer the “Backup and Restore” both from the Settings app and the Control Panel, and that is the link you ought to click on when you want to take a backup using the “Windows Backup” method.
That said, there is also another way to backup in Windows 10 that shouldn’t be overlooked if you don’t know what it is. The other way is by using File History which is the preferred method for taking backups and is a proper tool that Windows has created for backing up your data that rivals dedicated third-party applications for backing up.
How to Change Windows Backup Settings from Settings Application
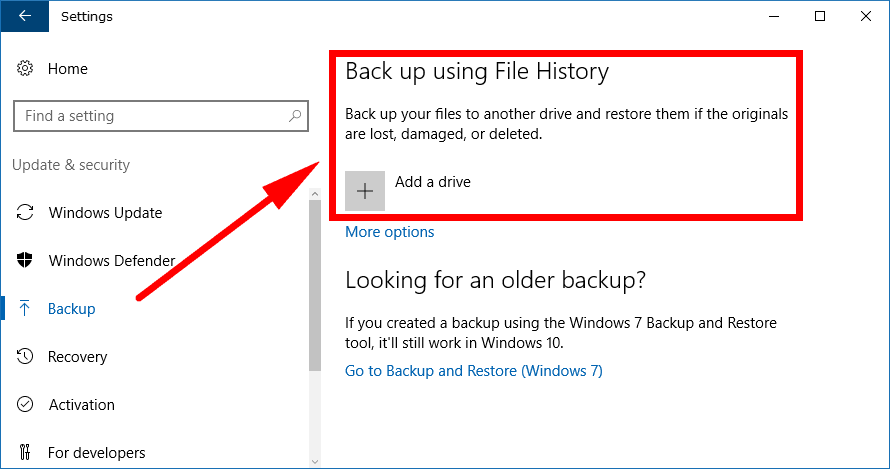
You can change the Windows Backup settings by using the Settings application in Windows 10. Just click on the Start > Settings gear icon in the Start menu’s left pane and then click on the “Update and Security” link from the Windows Settings window. Next, click on the “Backup” link from the left pane and then you’ll see all the options for backing up in the right side pane.
The top option is the “Backup using File History” heading with the option to add a drive for that. File History is the number one way to backup your data and has been there since Windows 8. There’s been some talk of File History disappearing from future versions of Windows, but for now, it’s still the option you want to use thanks to its feature-rich backing up capabilities. File History is more than just a tool for restoring older versions of Windows like System Restore. It gives you the same features you would expect from a dedicated third-party backup tool.
File History is already enabled and ready to go. All you need to do is click on where it says “Add a drive” and then add the drive that you want to use for the backup of your data. You’ll need to connect an external hard drive here because they are typically the only things that carry enough free space. As long as the external drive is currently connected to the computer with the USB cable, it’ll show up after you’ve clicked on the button to add the drive. Then all you need to do is select it and then follow the rest of the on-screen prompts to get the backup completed.
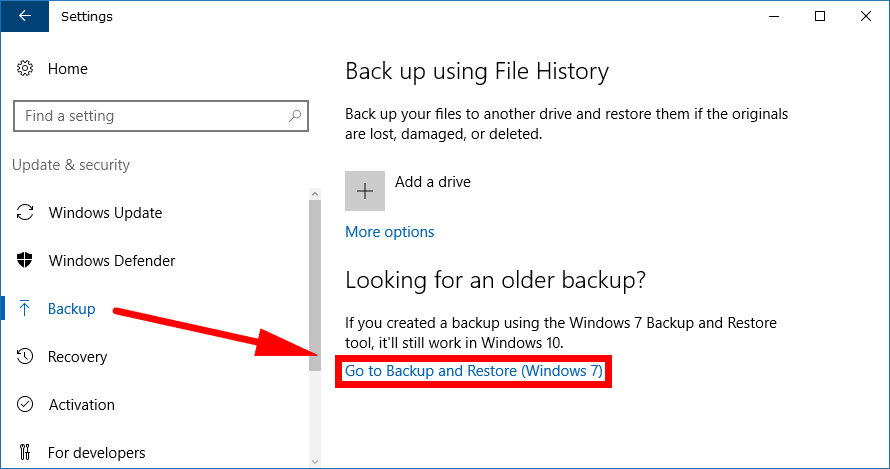
For everyone else who wants to take the Windows Backup, you need to look further down the same right side pane of the Backup section and then click on the “Go to Backup and Restore (Windows 7)” instead.
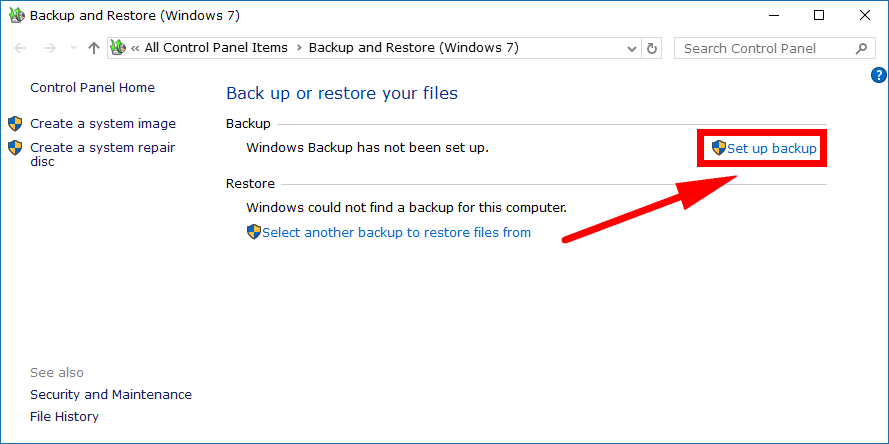
It then directs you through to the Control Panel area where you need to click on the “Set up backup” link in the right side of the window. (You could also navigate to this area from the Control Panel if you wanted, and we’ll show you how to do that later in the guide for everyone else who prefers the Control Panel. You can scroll down there now if you like and just look for the “Control Panel” heading).
It then gives you the chance to select the backup destination. You want to connect your external hard drive to the computer first, and then it’ll show up in this area for you to select.
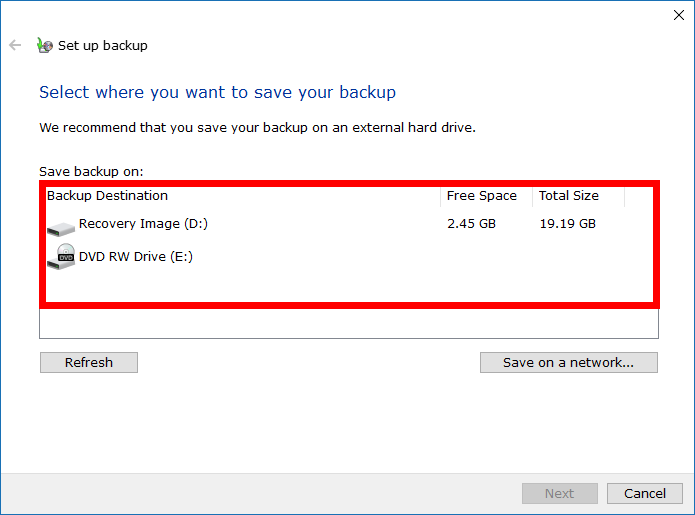
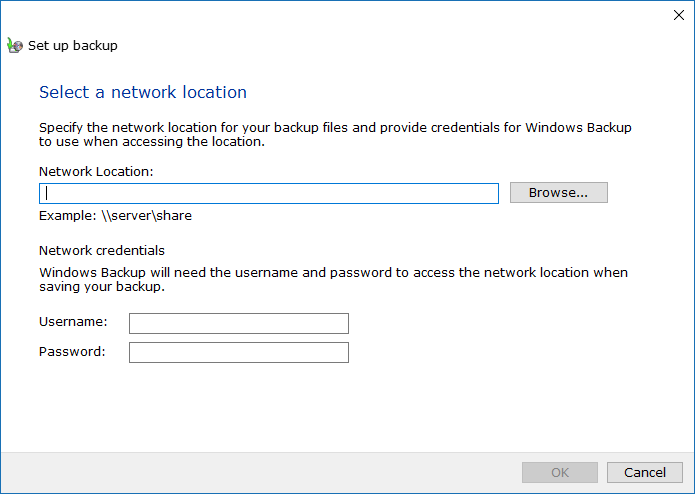
You can also choose to save the backup to a network instead of the external hard drive if you prefer. To do that, you’ll need to click on the “Save on a network” button and then give the network location in the available field.
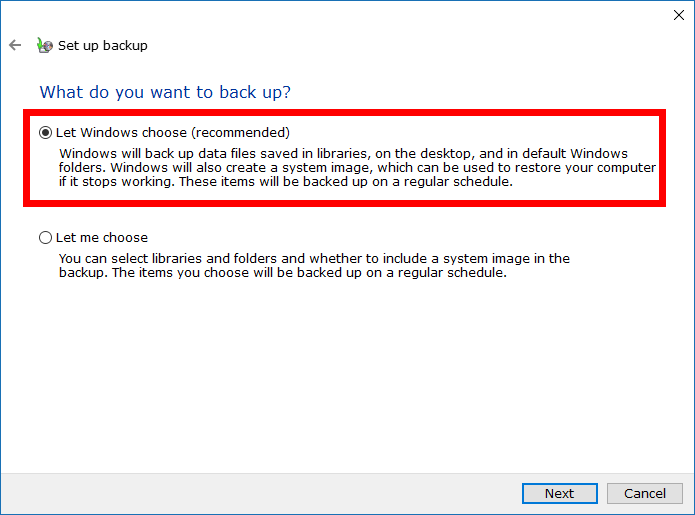
The next screen gives you the option of choosing to let Windows decide what needs backing up for you to tell Windows what you want it to back up. Click on the “Let Windows choose” if you want to let Windows decide what gets backed up. It is also worth noting that Windows recommends this method rather than you decide. We would agree with that unless you are an expert and know specifically what you want to backup.
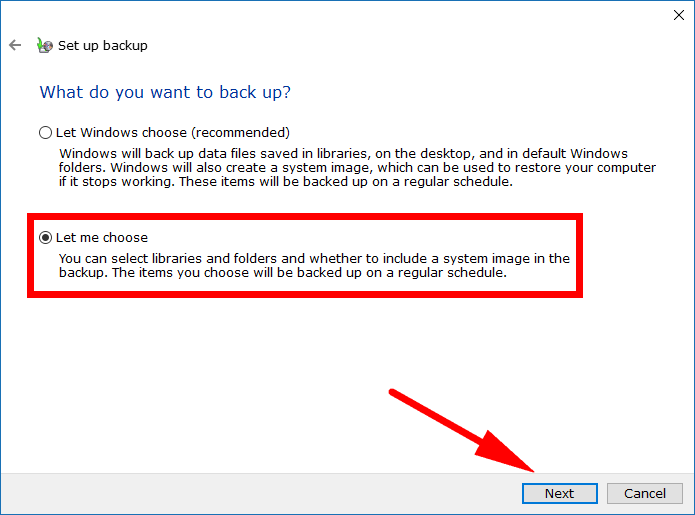
Being able to choose some locations to backup on the drive helps save space, but you’ll need to know what you’re doing if you choose this method. If you do want to be the one only selected certain places to be backed up, then just click on the “Let me choose” option instead, and it’ll let you select the files and folders manually.
When you get to the screen that asks you what you want to backup, you can check the boxes that you need. Also look under the “Data files,” and “Computer” section for a little checkbox tucked away that says “Include a system image of drives” if you want to backup the system image as well.
Note: Many geeks prefer using third-party tools for backing up system images. Macrium Reflect is a popular choice out there today. There’s also a free version that offers enough features for you to do basic backups of the system images without you needing to pay anything.

How to Change Windows Backup Settings from Control Panel
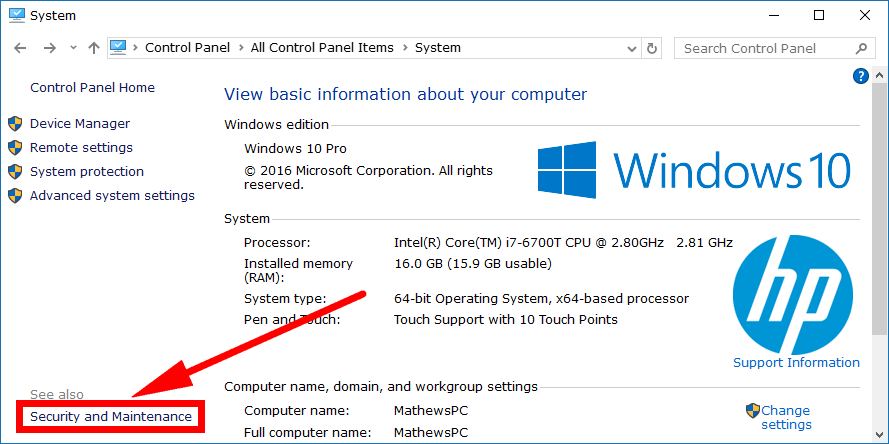
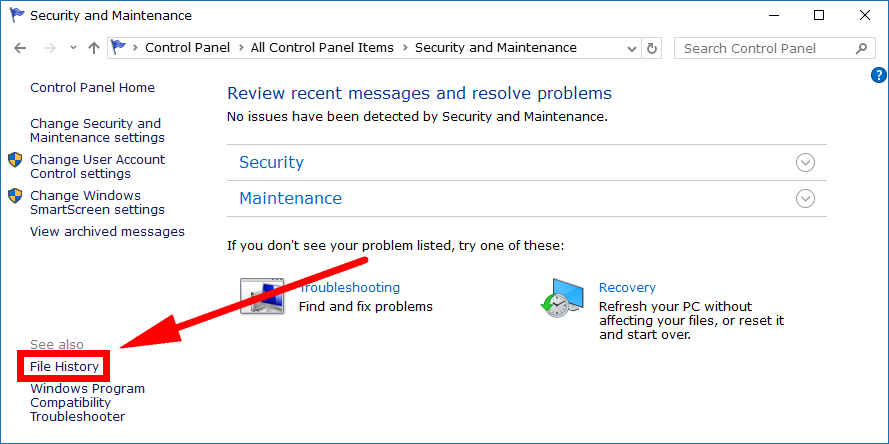
It’s also possible to get access to the File History for backups from the Control Panel in Windows 10 if you prefer the Control Panel over the Settings application. To do it this way, open the Control Panel so that it is showing the classic view with the smaller icons and then click on the “System” link from the all Control Panel items list. You’ll get see the “Security and maintenance” link you need to click on next available from the bottom left side of the window.
Look at the bottom left side again and click on the “File History” link.
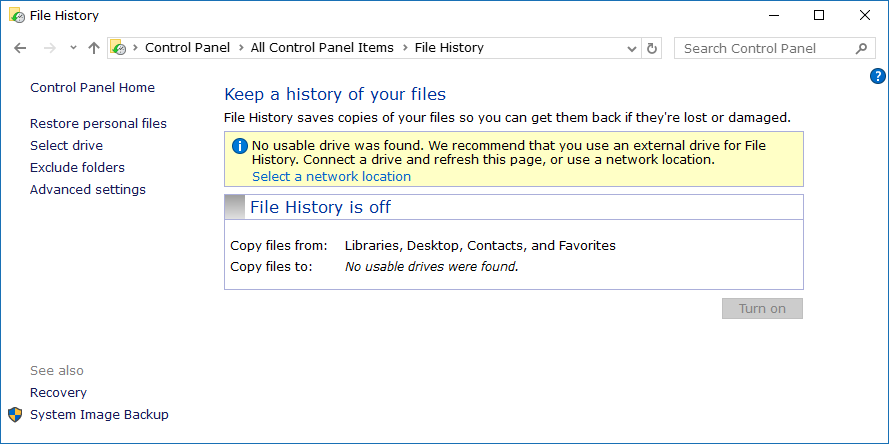
You are now ready to start taking your File History backups. You’ll need to connect your external hard drive before you can start using File History’s features.
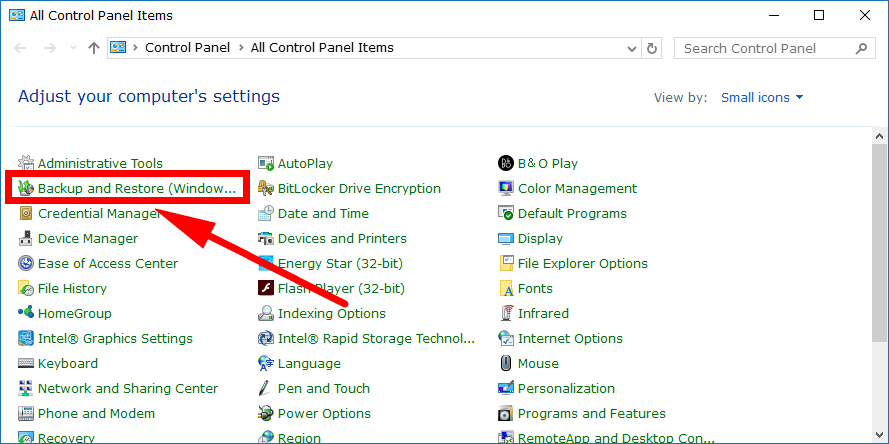
Otherwise you can click on the “Backup and Restore” link from the list of all Control Panel items to take the Windows backup instead of the File History backup.
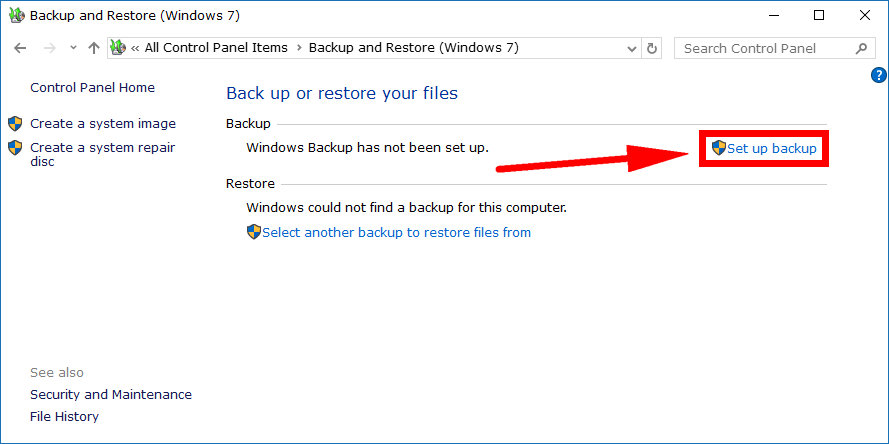
Click on the “Set up backup” link from the right side of the window to start taking your backup. Again, you’ll need to connect the external hard drive to the computer before it works.
There are quite a few backup tools available within Windows 10 for you to use: File History, Backup and restore, system image backups, OneDrive, System Restore, all part of what makes Windows 10 so great.
You might also be interested in:
- How to Cast Media to Device in Microsoft Edge in Windows 10
- How to Remove Windows 10 PC from Local Active Directory Domain
- How to Join Windows 10 PC to Local Active Directory Domain
- How to Clear All Event Logs in Event Viewer in Windows 10
You can subscribe to our RSS, follow us on Twitter or like our Facebook page to keep on consuming more tech.