Last Updated on December 26, 2022 by Mat Diekhake
You can change the menus text size in Windows 10 while still keeping the same screen resolution for your monitor.
In the old days, you could have changed the screen resolution to make things appear larger, but it isn’t recommended that you change the computer’s display from its default DPI with today’s types of screen technology. Plus, the better solution is to keep the resolution as high as possible and making the text larger at the same time when you need it.
When you follow the guide below, it will change the text size for the following menus: all, drop-down menus, all context menus, any menu bars around the operating system, the Ribbon menu at the top of the File Explorer window, as well as the Win+X Quick Links menu.
The Windows 10 operating system sets a default size for all text that you see around the operating system. If you’re finding that you have to move your face too close to the screen to read these menus, then you are a candidate for the type of person who should consider changing the size of the text in the menus. If you have your eyes too close to the screen on a consistent basis, it can result in more eye strain than you otherwise would have had.
Note: this option to change the text size from the Control Panel is longer available starting from Windows 10 build 15019.
How to Change Text Size for Menus in Control Panel
You can change the text size for the menus from the Control Panel in Windows 10.
1. Start off by typing “Control Panel” into the Cortana search field and then click on the “Control Panel” desktop application that comes up under the Best match section.
2. Click on the “View by” drop-down menu from Control Panel’s top right corner and select the “Small icons” so you are viewing the Control Panel with its classic view and then click on the “Display” link.
3. Look for the Change only the text size heading and click on the drop-down menu beneath it so that it is showing “Menus.” Then using the second drop-down menu a bit to the right, select the size that you would like the menus to be. (You can choose anywhere between size 6 and 24 for the menus. If you want to go back to the default menu size, then select the number 9 from the menu).
4. You’ll see a “Bold” checkbox to the right of the size that you can check or uncheck depending on if you would like the menus to appear in bold text or not.
5. When you’ve made the changes, click on the “Apply” button that is available a bit further to the right again.
Microsoft taking away this feature to be able to adjust the size of menus hasn’t sat well with many users, and there’s a chance they bring it back again in future updates given how many people have complained. If you cant see the computer’s display without squinting, then you can try using the magnifying glass for now.
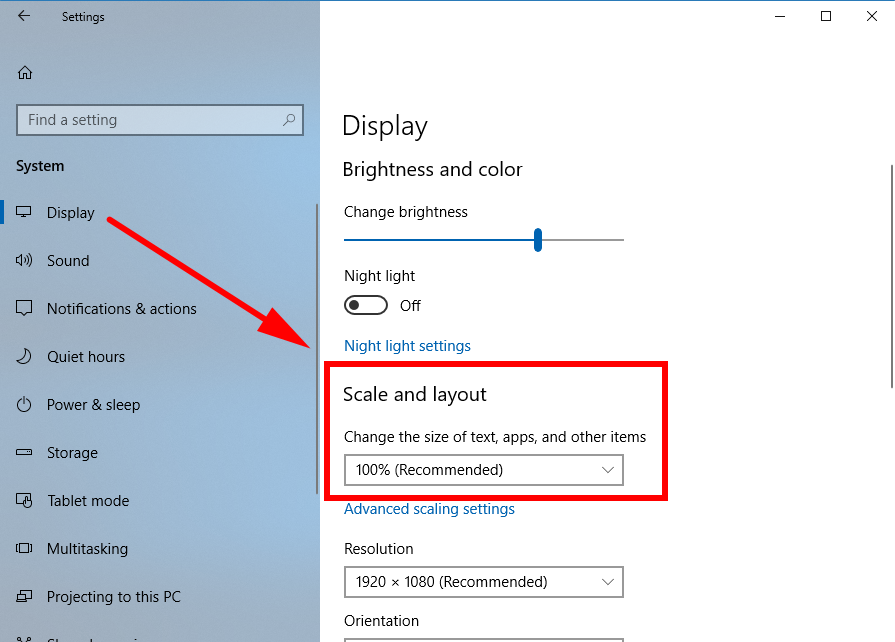
There’s also the Display section in the Settings application that you can venture into by heading to the Start > Settings > Display and then click the drop-down menu in the right side pane for the Scale and layout. By default, it’s set on 100%, which is the default size, and if you want text to appear larger, you can up this setting to 125%.
Earlier versions of Windows 10 made it possible to change the text size and the menu text size from the Control Panel. Those options have been taken away, and nothing close to the equivalent is now available to take their place. You can venture into the Settings application and adjust the Scale and layout settings or use the magnifier until something else becomes available.
You might also be interested in:
- Enable/Disable Log Event when Disk Quota Warning Level Exceeded in Windows
- Change Magnifier View in Windows 10
- Change Default Audio Playback Device in Windows 10
- Enable/Disable Shutdown Event Tracker in Windows 10
You can subscribe to our RSS, follow us on Twitter or like our Facebook page to keep on consuming more tech.