Last Updated on February 25, 2024 by Mathew Diekhake
I love using the Sticky Notes app; however, I must admit trying to use the settings is a bit difficult. Moreover, it doesn’t have as many features as I would like. For instance, there doesn’t seem to be any way to backup the sticky notes. If the Sticky Notes app itself doesn’t offer a backup solution, perhaps there is a workaround still by using the folders and File Explorer. Resolution:
Sticky Notes has been a desktop note-taking application since it arrived as a gadget in Windows Vista, and it continues to be Windows’ only dedicated note-taking app still in Windows 10. The earlier stages of Sticky Notes for Windows 10 changed from a desktop app to a Windows Platform (UWP) app. This change is only understood by advanced users—it has always been and still remains an app that you use from a desktop computer—but the addition of UWP means Sticky Notes can now be connected to powerful UI and advanced asynchronous features that are ideal for devices that are connected to the internet.
In Windows 10, Sticky Notes is a cross-platform app. That means it can run on other operating systems and not just Windows—including mobile operating systems such as Android and iOS. For most people, note-taking definitely has more value when used on desktop computers, but by being a cross-platform app, it manages to keep up with the strong competition, such as what Google offer for free with Google Keep. To make use of the cross-platform integration with Sticky Notes, though, you must be using Microsoft OneNote. This added complication makes it less appealing than Google Keep for casual users, but still worthwhile for those who already have notes taken on Windows devices that they want to get access to from elsewhere. There is also a web client for editing sticky notes via the Microsoft OneNote website which can be accessed from this web address: onenote.com/stickynotes.
While the Sticky Notes app comes with a decent number of features and it easy enough to use once you get used to it, one thing it doesn’t offer is an easy backup option. Thankfully though you can use the Sticky Notes folders manually via File Explorer to backup and restore your settings.
An example of the Settings menu when using the Sticky Notes app (signed out and signed in):
Part One: How to Backup Settings You have Changed in Sticky Notes via the App Itself
You can backup your Sticky Notes settings so any changes you have made to the default settings get saved for future use directly from the Sticky Notes Settings itself. Here is how you can do that:
1. Close any currently opened Sticky Notes otherwise you risk losing the data attached to that particular sticky note.
2. Do steps 3 or 4 depending on the method you would like to end tasks in Task Manager.
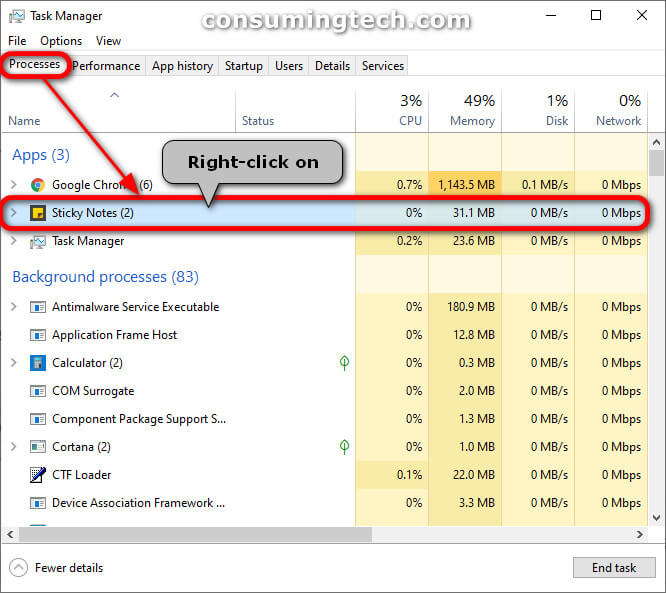
3. Open the Task Manager by right-clicking on the taskbar and then clicking on the Task Manager link from the menu, and then close any Sticky Notes running processes such as Sticky Notes under the Apps heading by right-clicking on the Sticky Notes entry and then clicking on End task from the context menu. (Click to enlarge the screenshot below.)
Note: This step closes the Sticky Notes app but does not delete any of your sticky notes.
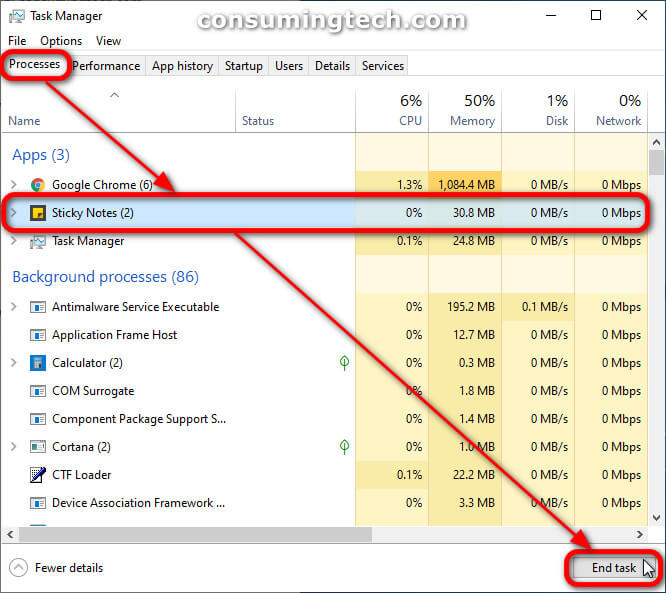
4. Open the Task Manager by right-clicking on the taskbar and then clicking on the Task Manager link from the menu, and then close any Sticky Notes running processes such as Sticky Notes under the Apps heading by clicking on the Sticky Notes entry so that it is highlighted and then clicking on the End Task button at the bottom of the Task Manager window. (Click to enlarge the screenshot below.)
5. Do steps 6 or 7 depending on the method you would like to end tasks in Task Manager.
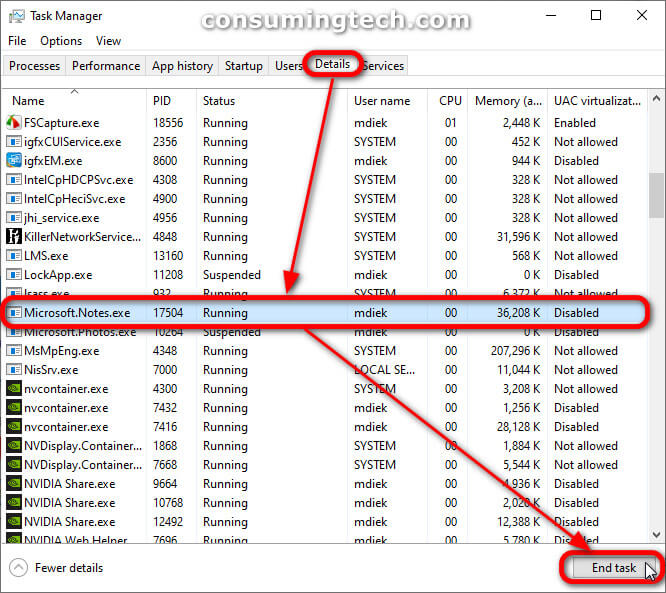
6. Open the Task Manager by right-clicking on the taskbar and then clicking on the Task Manager link from the menu, and then close any Sticky Notes running tasks from the Details tab such as Microsoft.Notes.ex by right-clicking on the entry and then clicking on End task from the context menu. (Click to enlarge the screenshot below.)
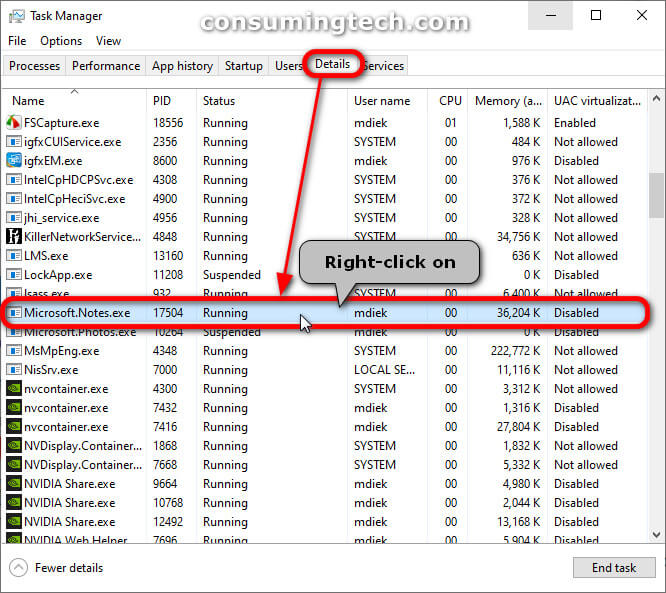
7. Open the Task Manager by right-clicking on the taskbar and then clicking on the Task Manager link from the menu, and then close any Sticky Notes running tasks from the Details tab such as Microsoft.Notes.ex by clicking on the Microsoft.Notes.ex entry once so that it is highlighted and then clicking on the End Task button at the bottom of the Task Manager window. (Click to enlarge the screenshot below.)
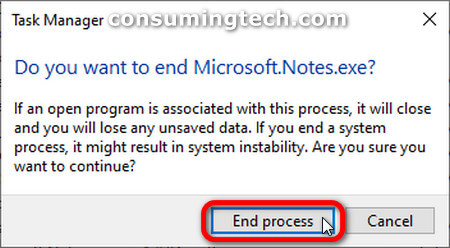
8. Click on the End process button when you get the Do you want to end Microsoft.Notes.exe dialog. (Click to enlarge the screenshot below.)
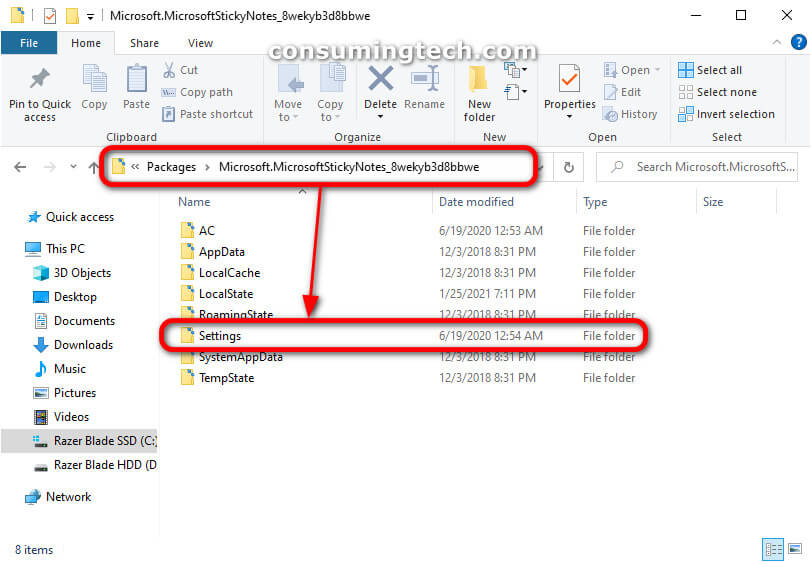
9. Open File Explorer, and in the address bar at the top of the File Explorer window, type the following and press the Enter key on your keyboard: (Click to enlarge the screenshot below.)
%LocalAppData%\Packages\Microsoft.MicrosoftStickyNotes_8wekyb3d8bbwe
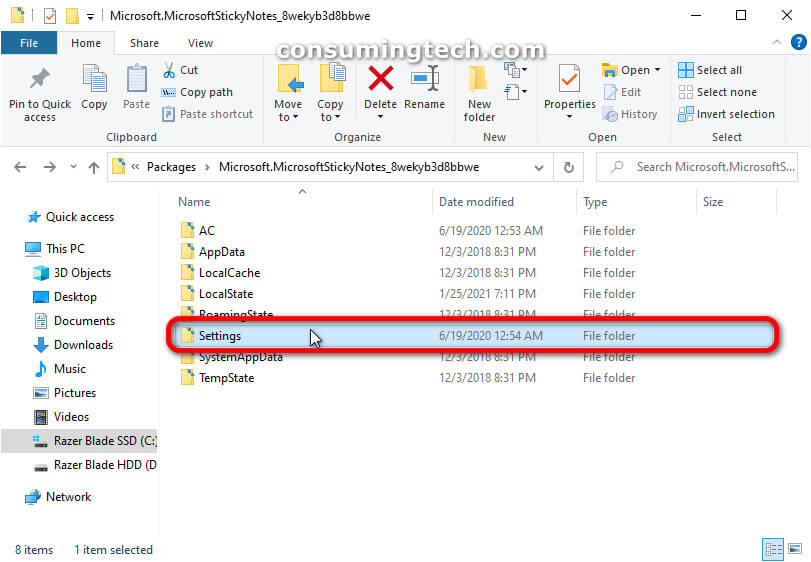
10. Copy the Settings folder to the location on the computer that you would like to store the backup. This is the folder that will always contain your settings. You can copy it to the desktop if you are not confident of being able to find it again in File Explorer; you may also copy and paste it to a USB stick if you prefer. (Click to enlarge the screenshots below.)
You can now close the Task Manager, File Explorer, and continue using the Sticky Notes application if you like.
Part two: How to Restore Settings to Sticky Notes app
If you have previously manually backed up your Sticky Notes settings, you can restore those settings to any account on computers that are running on any version of the Windows 10 operating system. Here is how you can do that:
1. Close any currently opened Sticky Notes otherwise you risk losing the data attached to that particular sticky note.
2. Do steps 3 or 4 depending on the method you would like to end tasks in Task Manager.
3. Open the Task Manager by right-clicking on the taskbar and then clicking on the Task Manager link from the menu, and then close any Sticky Notes running processes such as Sticky Notes under the Apps heading by right-clicking on the Sticky Notes entry and then clicking on End task from the context menu. (Click to enlarge the screenshot below.)
Note: This step closes the Sticky Notes app but does not delete any of your sticky notes.
4. Open the Task Manager by right-clicking on the taskbar and then clicking on the Task Manager link from the menu, and then close any Sticky Notes running processes such as Sticky Notes under the Apps heading by clicking on the Sticky Notes entry so that it is highlighted and then clicking on the End Task button at the bottom of the Task Manager window. (Click to enlarge the screenshot below.)
5. Do steps 6 or 7 depending on the method you would like to end tasks in Task Manager.
6. Open the Task Manager by right-clicking on the taskbar and then clicking on the Task Manager link from the menu, and then close any Sticky Notes running tasks from the Details tab such as Microsoft.Notes.ex by right-clicking on the entry and then clicking on End task from the context menu. (Click to enlarge the screenshot below.)

7. Open the Task Manager by right-clicking on the taskbar and then clicking on the Task Manager link from the menu, and then close any Sticky Notes running tasks from the Details tab such as Microsoft.Notes.ex by clicking on the Microsoft.Notes.ex entry once so that it is highlighted and then clicking on the End Task button at the bottom of the Task Manager window. (Click to enlarge the screenshot below.)
8. Click on the End process button when you get the Do you want to end Microsoft.Notes.exe dialog. (Click to enlarge the screenshot below.)
9. Open File Explorer, and in the address bar at the top of the File Explorer window, type the following and press the Enter key on your keyboard:
%LocalAppData%\Packages\Microsoft.MicrosoftStickyNotes_8wekyb3d8bbwe\Settings
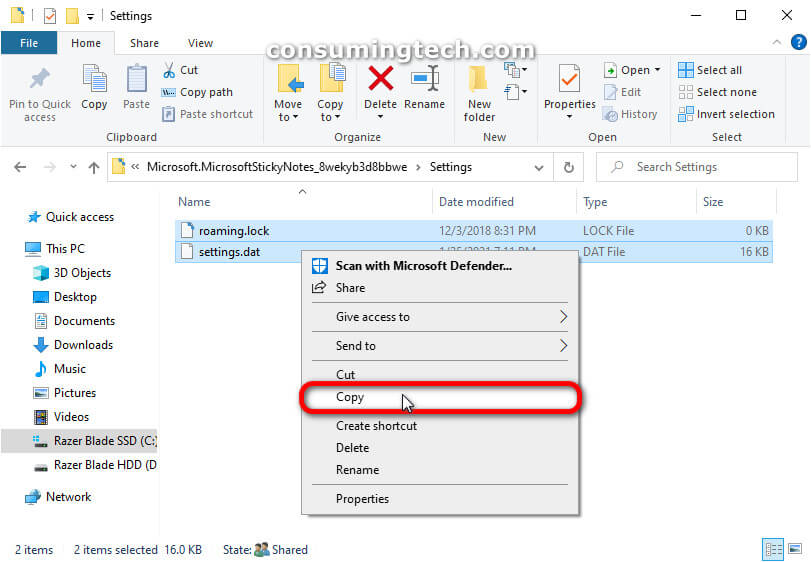
10. Copy the files within the folder by right-clicking on them and clicking on Copy from the context menu. (Click to enlarge the screenshot below.)
11. Open a second File Explorer window and open the original location from the first part of the tutorial when you were backing up the settings:
%LocalAppData%\Packages\Microsoft.MicrosoftStickyNotes_8wekyb3d8bbwe
12. Paste the files you copied into this Settings folder. (Click to enlarge the screenshot below.)
You shouldn’t get shown a message that the destination folder already contains the same file names because the copied versions mention that they’re copied in the file names. However, it is possible to completely replace the old files, either by choosing to replace the existing files if you see that dialog or by deleting the original files once you have replaced them with the copied versions. Before deleting anything, though, you should open the Sticky Notes app and check that your saved settings have merged correctly.
That’s all
Related Tutorials
- How to Exclude Folders from File History in Windows 10 [Tutorial]
- How to Backup and Restore with Macrium Reflect [Tutorial]
- How to Backup and Restore Sticky Notes in Windows 10 [Tutorial]
- How to Change Windows Backup Settings in Window 10 [Tutorial]
- How to Automatically Create System Restore Point on Schedule in Windows 10 [Tutorial]
- How to Reset Sticky Notes in Windows 10 from System Settings [Tutorial]


