Last Updated on December 26, 2022 by Mat Diekhake
The most powerful place in the File Explorer is “This PC.” It is the home to your libraries, and you should think of it as your hub. The context menu from This PC also reflects this, where you’ll see some additional options there compared to right-clicking on any of the other links within File Explorer, one of which is the “Manage” option.
If you click on the “Manage” link from the This PC context menu you get directed through to the Computer Management section where you can then find options such as System Tools, Storage and Services, and Applications.
You get the option to manage This PC by default in all versions of the Windows 10 operating system, but it’s also possible to remove this option from the context menu if you were to no longer want it there.
How to Add/Remove “Manage” on “This PC” Context Menu in Windows 10
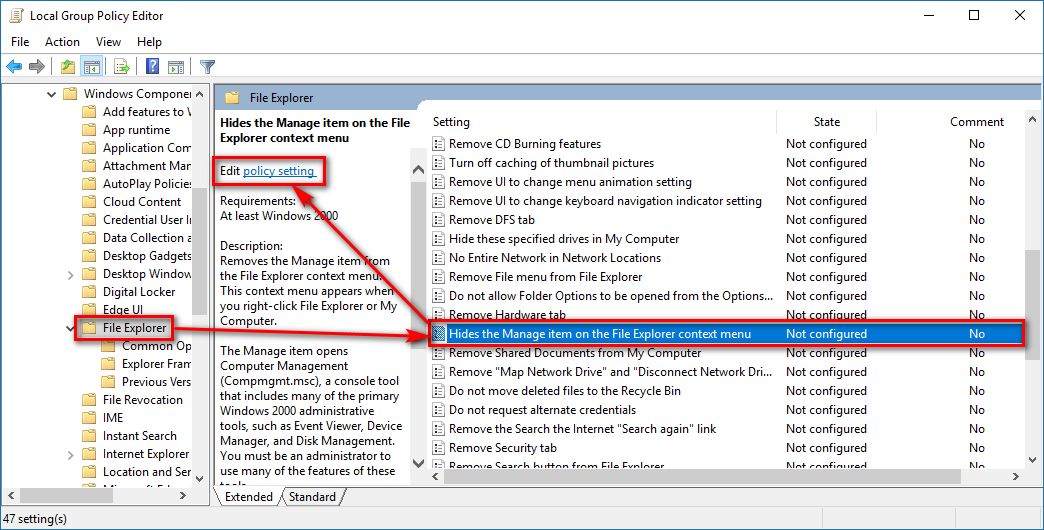
Windows 10 really wants you to be able to manage the This PC area from File Explorer because it’s an integral part of the OS for some people. For that reason alone you won’t find any way to remove it from the Settings app or Control Panel, but you can open up the Local Group Policy Editor and do it that way instead. To get started, open up the Local Group Policy Editor and then navigate to the User Configuration > Administrative Templates > Windows Components > File Explorer folder paths by using the left side pane. You’ll then see the “Hides the Manage item on the File Explorer context menu” setting that you need to click on once and then click on the “Edit policy setting” link from the middle column.
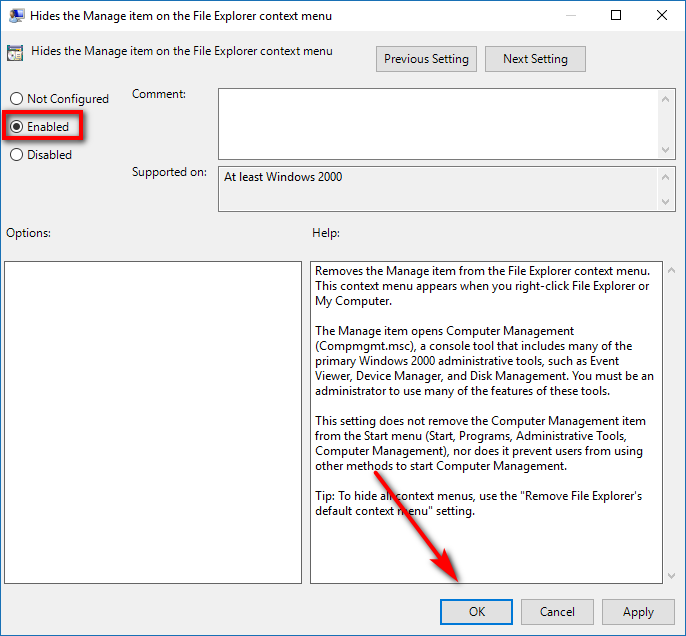
By default, the option is set to be not configured. Click on the “Enabled” checkbox instead so the checkmark moves over to the enabled position and then click on the “OK” button at the bottom of the window.
Windows has a Multiple Local Group Policy to help manage computers that are not part of a domain. There are four Local Group Policy Objects (LGPOs) that make up the Multiple Local Group Policy. They are the Local Computer Policy, Administrators Local Group Policy, Non-Administrators Local Group Policy, and a User-Specific Local Group Policy.
All users: The Local Group Policy Editor for all users can be opened by using the Run dialog box, the search field from the taskbar, the Command Prompt and from the PowerShell by using any of the methods available in this guide.
Specific users or groups: The User-Specific LGPO applies user policy settings to specific local users. To do it, you need to press the Windows logo + R keys on your keyboard and then type “MMC” into the field and clicking on the “OK” button. Click “Yes” when prompted by User Account Control. Now in Microsoft Management Console, click on “File,” followed by “Add/Remove snap-in” from the menu. Choose the “Local Group Policy Editor” and click on the “Add” button. From the Select Group Policy Object window, click on the “Browse” button. Next, click on the “Users” tab and then choose the account name from the list, followed by the “OK” button. You’ll then be directed back to the Group Policy Wizard where you can click on the ‘Finish” button.
All non-administrators: The Non-Administrators LGPO applies user policy settings to anyone who is not an administrator/included in a group of administrators. To do it, you need to press the WIndows logo + R keys on your keyboard and then type “MMC” into the field and clicking on the “OK” button. Click “Yes” when prompted by User Account Control. Now in Microsoft Management Console, click on “File,” followed by “Add/Remove snap-in” from the menu. Choose the “Local Group Policy Editor” and click on the “Add” button. From the Select Group Policy Object window, click on the “Browse” button. Next, click on the “Users” tab and then choose the “Non-Administrators” group and click on the “OK” button. Lastly, click on the “Finish” button from the Group Policy Wizard screen.
Administrators: The Administrators LGPO applies policy settings to users who are members of the administrator’s group. To do it, you need to press the Windows logo + R keys on your keyboard and then type “MMC” into the field and clicking on the “OK” button. Click “Yes” when prompted by User Account Control. Now in Microsoft Management Console, click on “File,” followed by “Add/Remove snap-in” from the menu. Choose the “Local Group Policy Editor” and click on the “Add” button. From the Select Group Policy Object window, click on the “Browse” button. Next, click on the “Users” tab and then choose the “Administrators” group and click on the “OK” button. You’ll then be directed back to the Group Policy Wizard where you can click on the “Finish” button.
Having the chance to use the Manage link from the This PC context menu isn’t something that really matters for most people around the home, so even if you don’t use it or have never heard of it, you can keep it there, and no one will know any different. That said, there will be at least a few times where businesses might want to remove the option from certain users, and the administrators can get that done by using the guide above.
You might also be interested in:
- How to Create a Password Reset Disk on USB Flash Drive in Windows 10
- How to Delete Windows10Upgrade Folder in Windows 10
- How to Open Context Menu for Taskbar Icons in Windows 10
- How to Add/Remove Locations for Search Index in Windows 10
You can subscribe to our RSS, follow us on Twitter or like our Facebook page to keep on consuming more tech.