Last Updated on December 26, 2022 by Mathew Diekhake
There are a few avenues you can take if your eyesight isn’t what it might have been anymore. You can change what the default font is and pick a new one that you find easier to read, change the icon text size, and even change the size of the scrollbars if you like so trying to make contact with them via the mouse becomes easier to do.
But sadly due to the nature of the complexities in the way that the operating system is built, there are no universal means to change everything at the flick of a switch, so all text becomes larger or smaller, which is kind of a bummer for people with bad eyesight and who have forgotten their glasses.
Windows does a pretty good job at having large text in the Settings application and throughout most places without it taking away from the overall design too much, like having large text can often do, so most of you should be able to navigate well enough.
That said, I’ve also shared a computer with a father who pulls the computer’s monitor across from the other side of the desk so that the screen is only a few inches from his face—he does this so he can read what’s on the computer’s screen. If you or anyone you know is struggling with using Windows 10 like my father was/still does, you can try out the magnifying glass to see if that helps.
The magnifying glass feature that Windows 10 has gives you an instant zoom on the computer’s display, so you get things much larger. You also have the option of just zooming in on a particular area instead of the full screen if you prefer. It isn’t going to be as efficient as putting on a pair of glasses, but the magnifying glass is the best solution we’ve got at the moment for dealing with unreadable text and areas of the operating system for those who need some extra assistance.
How to Turn On/Off Magnifying Glass in Settings Application
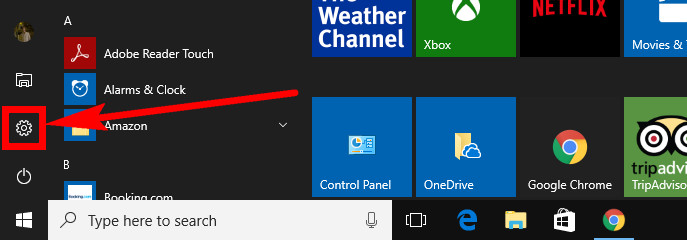
1. You can turn on the magnifying glass from the Settings application on Windows 10. To do it, click on the Start menu > Settings gear icon in the Start menu’s left side pane.
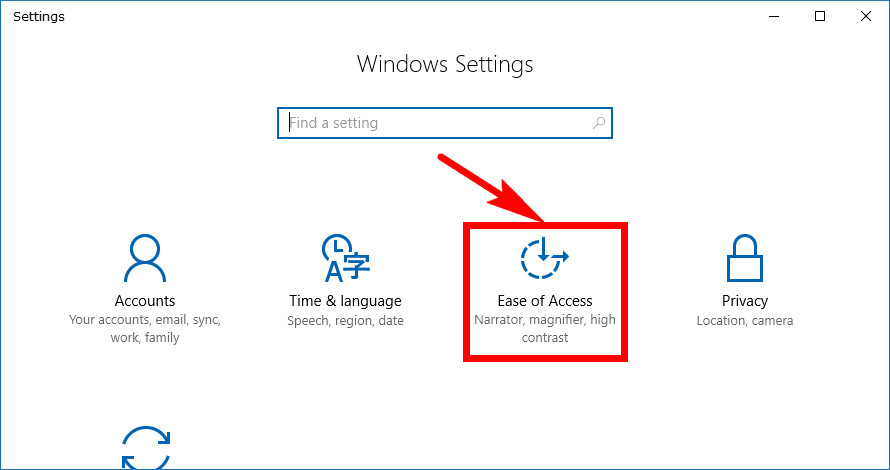
2. Now click on the “Ease of Access” link from the Windows Settings window.
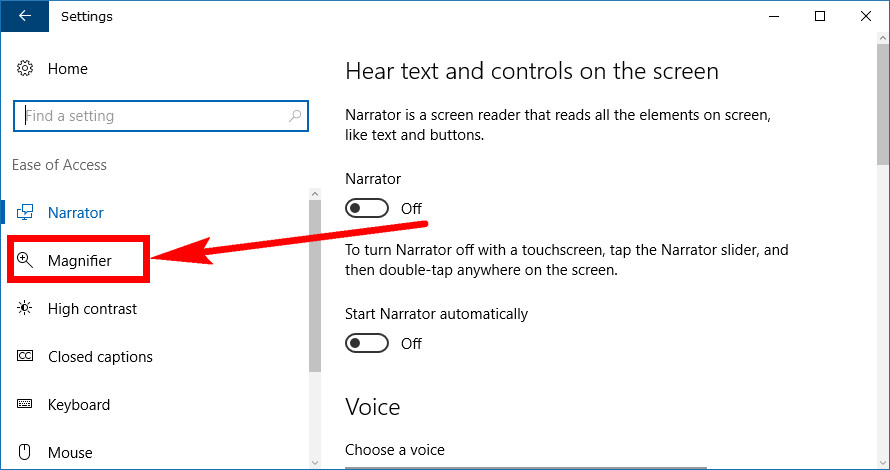
3. Choose the “Magnifier” from the left side pane.
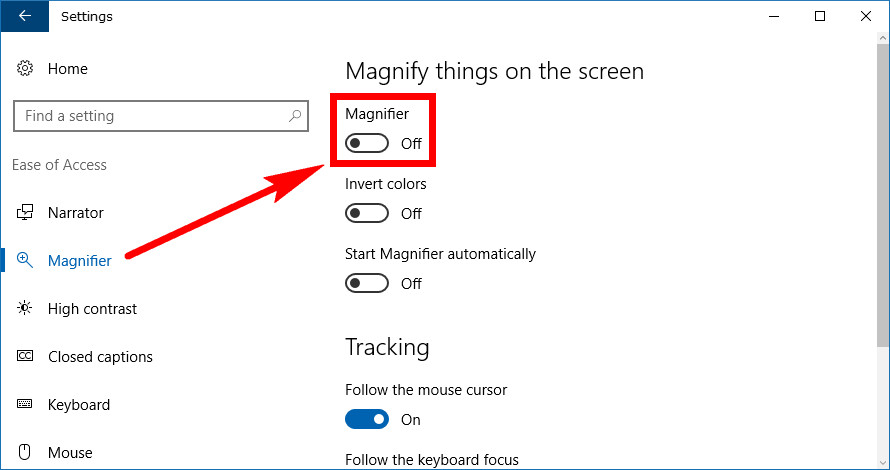
4. And then in the right side pane, you get everything that is related to the magnifying glass settings. The top toggle is the one that runs the magnifying glass on or off. By default it’s off, so you’ll need to toggle it on if you want it on. The same toggle is what you need to turn it back off again when you’re finished with zooming in and want to use the Windows 10 operating system like normal again.
How to Open and Close Magnifier using Keyboard Shortcuts
1. You can press the Windows logo key + “+” + “+” on your keyboard to bring up the magnifier.
1. You can press the Windows logo key + Esc on your keyboard to bring up the magnifier as well.
How to Open Magnifier from Control Panel
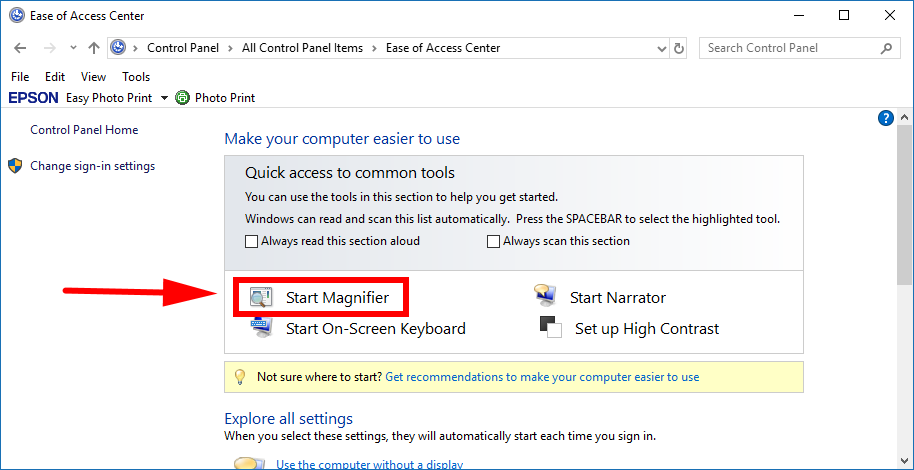
1. You can open the magnifier from the Control Panel from Windows 10 if you like. To do it this way, you need to open the Control panel so that it is showing it’s more classic view with the small icons. Then from the list of all Control Panel icons, click on the Ease of Access Center link.
2. The magnifying glass makes it very easy to see text thanks to its zoom. There’s also another toggle available from the same area that allows you to keep a floating transparent magnifying glass. Select it if you need to use the magnifying glass more often than not.
3. One of the links available on your screen will now be to “Start magnifier.”
How to Open Magnifier from Cortana Search Field
1. You can open the magnifier from the Cortana search field that’s available in the taskbar also. To do it this way, start typing “Magnifier” into the search field and then click on the “Magnifier” desktop application that shows up under the Best match section.
How to Open Magnifier from Run Dialog Box
1. You can open the magnifier directly from the Run dialog box if you want as well. To do it this way, press the Windows logo key + R to bring up the Run dialog and then type “Magnifier” into the available text field, and the hit the “OK” button.
2. You’ll then see the magnification on the computer’s display.
How to Open Magnifier from All Apps in Start Menu
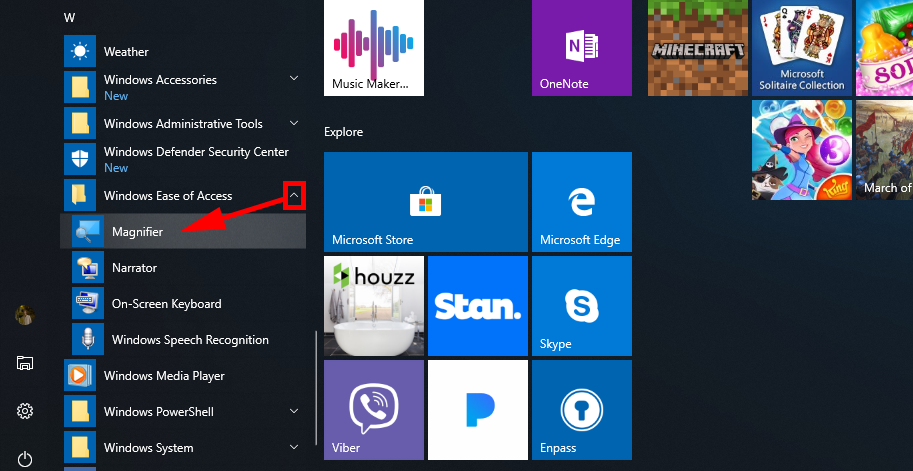
1. You can open the magnifier by using the All Apps list from the Start menu too if you like. To find it, navigate to the Start menu > All Apps and then scroll all the way down until you get to the “Windows Ease of Access” and click to expand it.
2. One of the options you get within Windows Ease of Access is the “Magnifier” that you can click on to open it up.
Related Tutorials

