When it comes to being creative with Photoshop, one of the fundamental things you will need to learn is how to use and create a Photoshop Layer Mask. It is an essential element to Photoshop and thankfully, doesn’t require you to have a PhD in Computer Science to use. For those of you that aren’t completely sure what exactly Photoshop Layer Masks is, quite simply it is a tool which allows users to control the level of transparency for a layer.
The difference between using this tool or the Opacity option within Photoshop is that with Opacity, you are only able to change the entire layer. For example say you want to lower the transparency of a specific layer by 20%. Well the whole layer will be lowered to 20% transparency. If you only want to lower certain parts of the layer, unfortunately the Opacity option is just not going to work for you, and that’s where Photoshop Layer Masks come into play.
So, how do you use and create a Photoshop Layer Mask?
Before you begin, it is important to note that you need Version 3.0 or higher, as previous versions didn’t include Layers. For the sake of this guide, it is based on Photoshop V 3.04 for Windows. In this walk through, we will be looking at a colour photo and a drawing that we will blend. If you want to try a similar effect, you can create a drawing from the original colour photo simply by using the Gallery Effects Plug-ins.
Step 1. First off you need to open up a graphic file (colour photo for the sake of this walk through).
Step 2. Next you need to ‘All Select’ the image using select. One selected, press ‘Edit’ > ‘Copy’ followed by ‘Edit’ > ‘Paste Layer’.
Step 3. Now we are going to create our drawing. You will need to set the colour of the foreground and background first then run the ‘Graphic Pen’ tool from the Gallery effects on the new layer we created previously. Black and white are the colours of choice for this drawing.
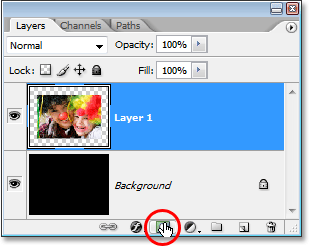
Step 4. When you have run the ‘Graphic Pen’ tool and have been presented with your new drawing, you can proceed to merge your layers. To do this, press the small black triangle (the layer options button which you will find in within the ‘Layers Palette’ in the top right-hand corner).
Step. 5 Next you need to press ‘Add Layer Mask’. A new thumbnail will populate once the layer mask is active.
Step 6. From within the ‘Tools Palette’, select the ‘Gradient Tool’. You will need to put your cursor in the middle of the image, hold ‘Shift’ and drag the cursor towards the right until you reach the image edge.
This will allow our original layer (colour photo) to blend through a mask to the top layer (drawing).
Congratulations, that’s it. The best way to learn is through trial and error, play around with it and see how you go, we hope this tutorial has shed some light on how to use and create Photoshop Layer Masks.