Last Updated on November 15, 2019 by Mat Diekhake
What root brings for you is the ability to install root-requiring apps and flash a custom recovery on your device. The latter one brings for you the opportunity to flash a custom ROM on your device. A custom ROM is usually developed by independent developers with tweaks and customizations that the users have long been requesting for. If you’re one of those users, here’s how to install a custom recovery on your device to get started with flashing custom ROMs:

Files You Need
- You must be rooted before you can do this tutorial. Please head to our how to root the ZTE Nubia Z9 Mini tutorial and root your device, and then come back here and do this tutorial.
- This should install TWRP — a well-known custom recovery on your device.
- This only works on Windows based computers, so make sure you’ve access to one.
- Download One Click Tool to your computer. It’s the toolkit that’ll help you flash a recovery on your device.
Installing a Custom Recovery on the ZTE Nubia Z9 Mini
- Right-click on One Click Tool archive and select Extract here to extract the files.
- Head to Settings followed by About phone on your device. Tap on Build number for 8 times and it should say you’re a developer.
- Head to back to Settings and tap on Developer options. Turn on USB debugging.
- Connect your phone to your computer using a USB cable.
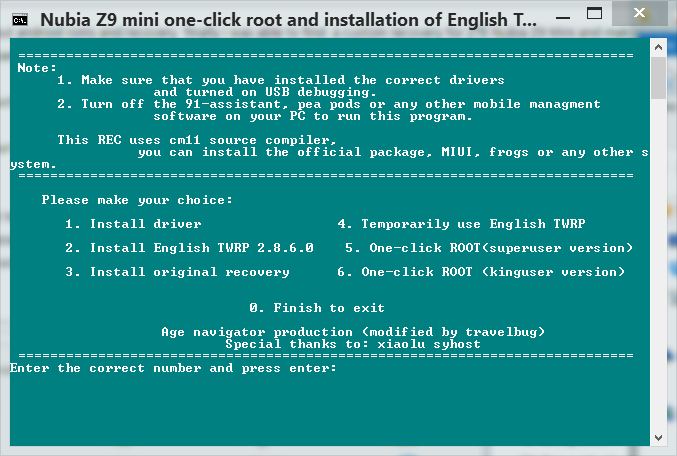
- Double-click on ThemePush.bat available on your computer to launch the toolkit.
- When the toolkit launches, press 2 on your keyboard and hit Enter. It’ll install TWRP Recovery on your phone.
- Follow the on-screen instructions for installing a recovery on your phone.
- When it’s done installing the recovery, reboot your phone
- You’re done!
Your phone’s now equipped with a custom recovery! Feel free to load-up your phone with your favourite custom ROMs!