Last Updated on December 26, 2022 by Mathew Diekhake
One of the cool new features that made its way onto Windows 10 was the new lock screen that comes with high-quality images of landmarks from around the world. Microsoft called this the Windows Spotlight lock screen, and it helps keep things fresh by showing new pictures each time you log on, as well as make it more appealing to want to log in your Microsoft or local user accounts.
Another thing you can do once you are logged into your account to spice things up a bit with pictures if you want is to enable the desktop background slideshow. This means the desktop also shows a different picture, along with the lock screen.
Windows developers have made it possible to set a time interval for the slideshow to change. So, if you set it to 30 minutes, a new picture will be on the desktop for you to view every 30 minutes of the day that passes. You can choose to add your own images to be displayed on the desktop, or you can keep the same images that automatically display from the Windows 10 Spotlight lock screen feature by Microsoft.
If you aren’t fussed with what you look at, we recommend using the picture that Microsoft has managed to use in Windows 10 because the resolution of these pictures, coupled with the photo taking skills, makes all Microsoft chosen images look incredibly professional. It can be challenging finding images that look as good just by browsing the web.
The following tutorial demonstrates how to enable the desktop background slideshow when you’re using a version of the Windows 10 operating system.
How to Turn on Desktop Background Slideshow in Windows 10
You can turn on the desktop background slideshow from the Settings app in Windows 10. Here is how to do that:
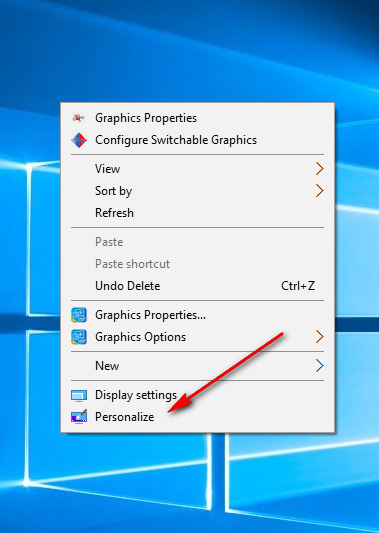
1. Close any web browser that you might have open so you can see the desktop and right-click anywhere on the desktop that has an empty area. Click on the Personalize option from the menu you get.
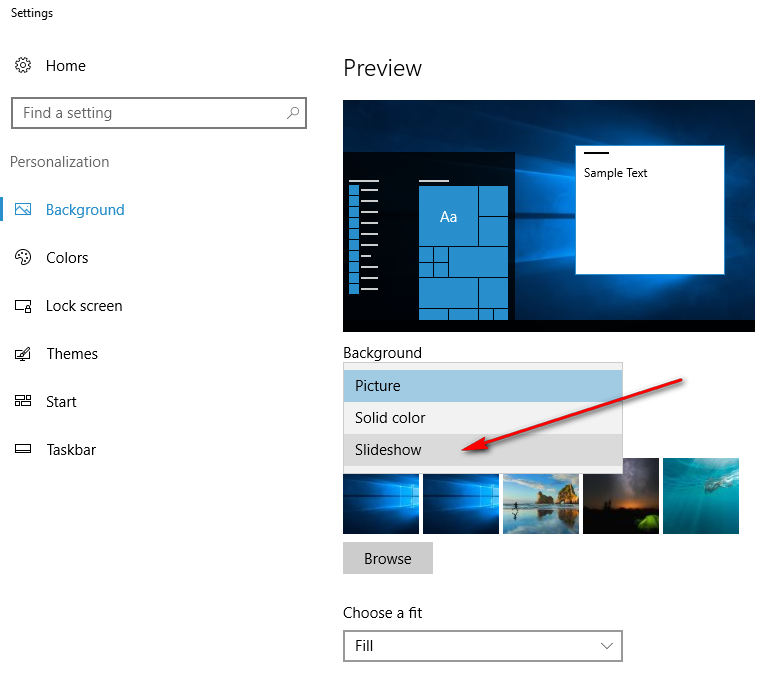
2. Click on Background from the left-hand side pane and then look over at the options available on the right-hand side of the screen. Click where it says Background so that the drop-down menu opens and then click on the Slideshow option from the list.
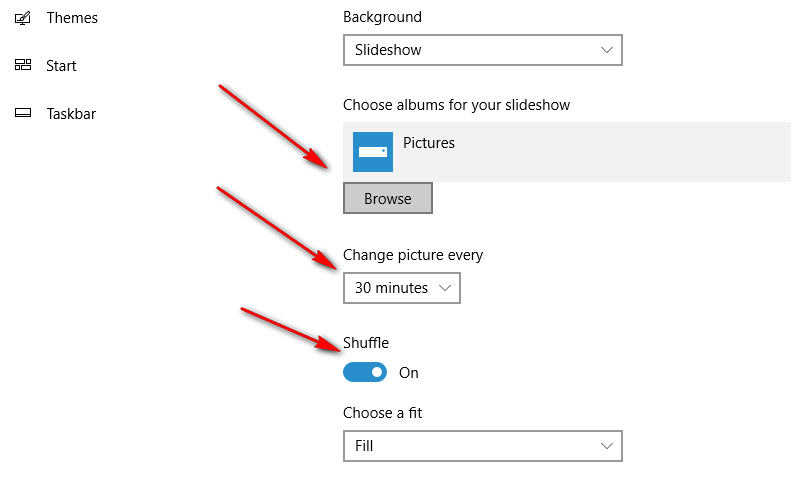
Directly beneath the Background heading is the rest of the options that you need to choose. The first option available is the Browse button. You need to click on that Browse button to find the pictures that you want to set as the slideshow. As we’ve already mentioned, we recommend using the same images used for the Windows 10 Spotlight lock screen feature that you see before logging in to the computer. However, you can pick any pictures that you want to use. It doesn’t matter if the pictures are saved in a folder or if you still need to rely on a search engine like Google to help find the images you need. Just click on the Browse button again and then open the folder where you saved the images. If you don’t recall choosing the location for the saved images, it is probably the Downloads folder that has acquired the new images that you saved—the Downloads folder is the default folder for all downloads to end up when using the Windows operating system.
Once you’ve got that done, it’s time to focus your attention on the timing. Under the Change picture every heading is another drop-down menu for you to play with. Click on it and choose the period that you want the pictures to change. For example, if you set it to 10 minutes, a new background picture will be on the desktop every 10 minutes, and so forth.
If you don’t want the pictures to play in the order that you have saved them in the folder that they are stored in on the computer, you can instead turn on the Shuffle option which works the same way Shuffle would work for your music. Instead of picking the pictures in order from the folder, they start showing at random. Those random times are chosen by the Windows 10 operating system and are not within your can control.
The desktop background slideshow is now going to be playing when you close the Windows settings page from the personalization options. Like most modern operating systems that focus on you being able to do things as quickly as possible, there is no button that you need to press to confirm your actions. Just close down the Settings screen, and it remembers your preferences.
This article was last updated on May 28, 2019.
Related Tutorials


May 27, 2019 @ 18:33
Thanks, Mathew.
I tried using the desktop slideshow but changed my mind after a few weeks. It can be a bit much seeing a different picture every day on the desktop background and the lock screen. Plus, I think the default image looks the best on the desktop, and the rotating pictures looks best on the lock screen.
Perhaps if I disable the lock screen in future, I will reconsider my desktop strategy. But for now, I think the default picture is the only way to go.