Last Updated on December 26, 2022 by Mat Diekhake
Jump Lists were first introduced as a feature in versions of the Windows 7 operating system and had since been featured in every version of Windows since right up until the last major update we have gotten in Windows 10 which is the Anniversary Update.
The point of the Jump List is to give people the chance to “jump” over to frequently visited places quickly—the same way as a shortcut would help people out to do the same thing.
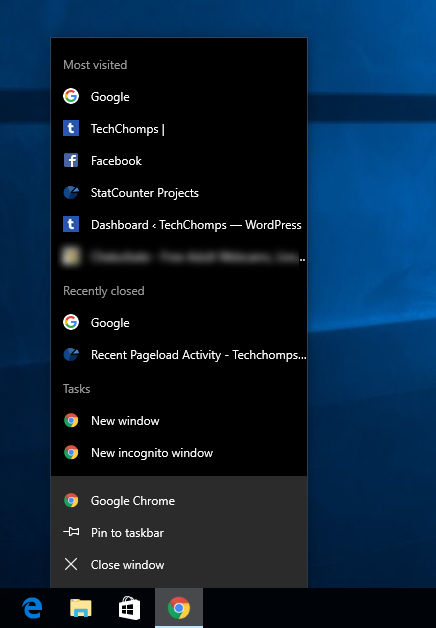
You get a different Jump List for each app, program or browser. For example, if you right-click on the Microsoft Word icon from your Start menu, you can get a Jump List of all the recent files you have had when using the Microsoft Word program. Likewise, if you right-click on the web browser icons that are available in your taskbar, they show you a Jump List of the recently opened pages.
I’ll be the first to admit that I don’t use the Jump List feature as often as I should. Typically speaking, I always just click on my Google Chrome web browser icon from the taskbar because it is instilled in my brain that it is the direction I need to head to open up the web page that I wanted. If most people experience the same, we might see a reshuffle of the way the Jump List feature works in future versions of Windows.
For now, though, there isn’t much use getting rid of Jump Lists altogether because the Windows 10 operating system has an option from the Windows Settings that allows people to turn off the Jump Lists completely. That gives all of the people who didn’t want Jump Lists appearing to use the computer without them.
What Windows developers have not done, however, is give people the chance to keep the Jump Lists on and then delete the history of those Jump Lists from the Windows Settings with a dedicated button, so it is completely refreshed.
There is something you can do to get around this problem and completely delete the history of the Jump Lists if that’s what you want to do—and you can find out how that is done by using the guide below.
How to clear Jump Lists in Windows 10
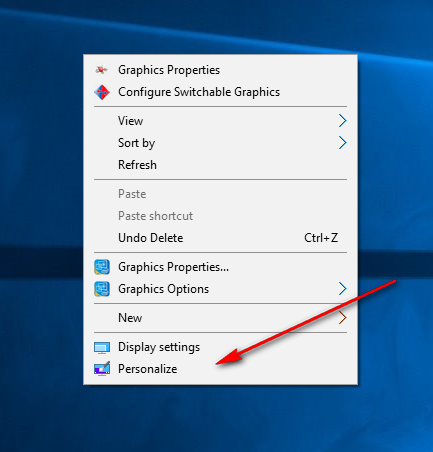
Right-click the mouse or touchpad on the desktop background and then click on the “Personalize” option available at the bottom of the menu. Those preferring to use the Start menu can click on the “Settings” gear icon from the Start menu and then click on the “Personalization” button from the Windows Settings page to get to the same place instead.
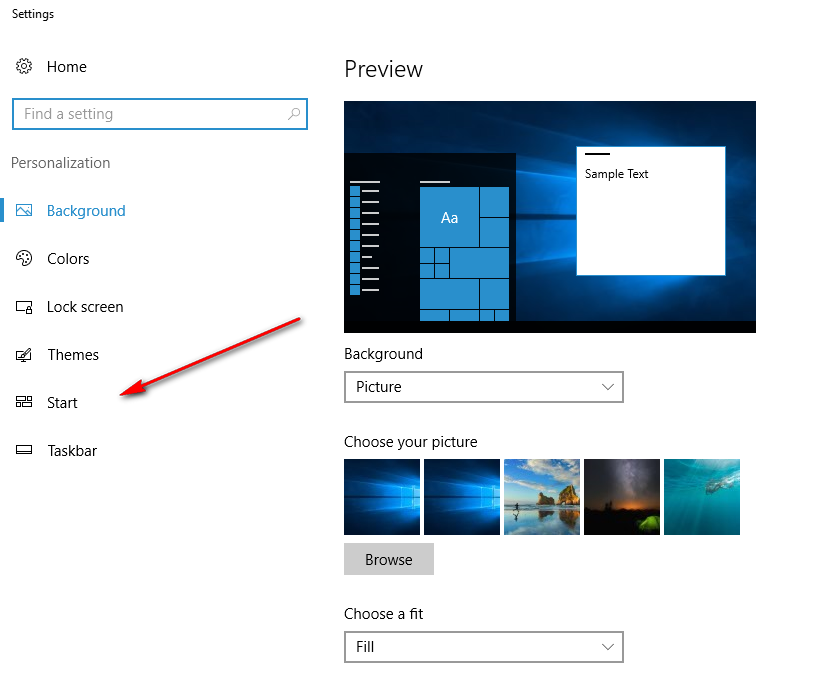
Click on the “Start” option from the menu available on the left-hand side of the screen.
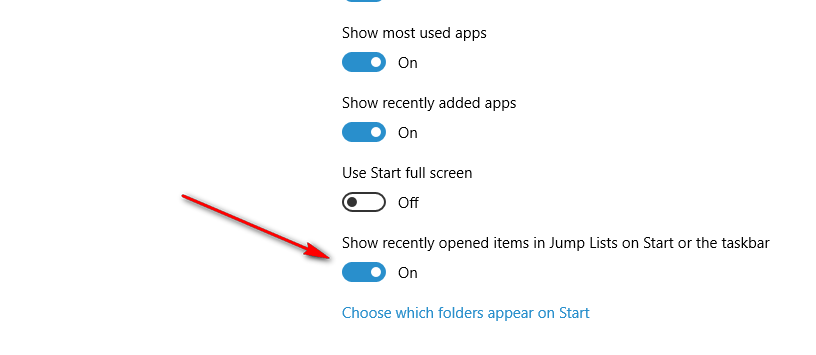
Under the “Preview” heading look where it has a toggle switch available for the “Show recently opened items in Jump Lists on Start or the taskbar” and turn it off. By turning off that switch, you have now deleted the history that was there before for the Jump Lists from the Start menu or the icons available for your things like web browser icons in the taskbar also.
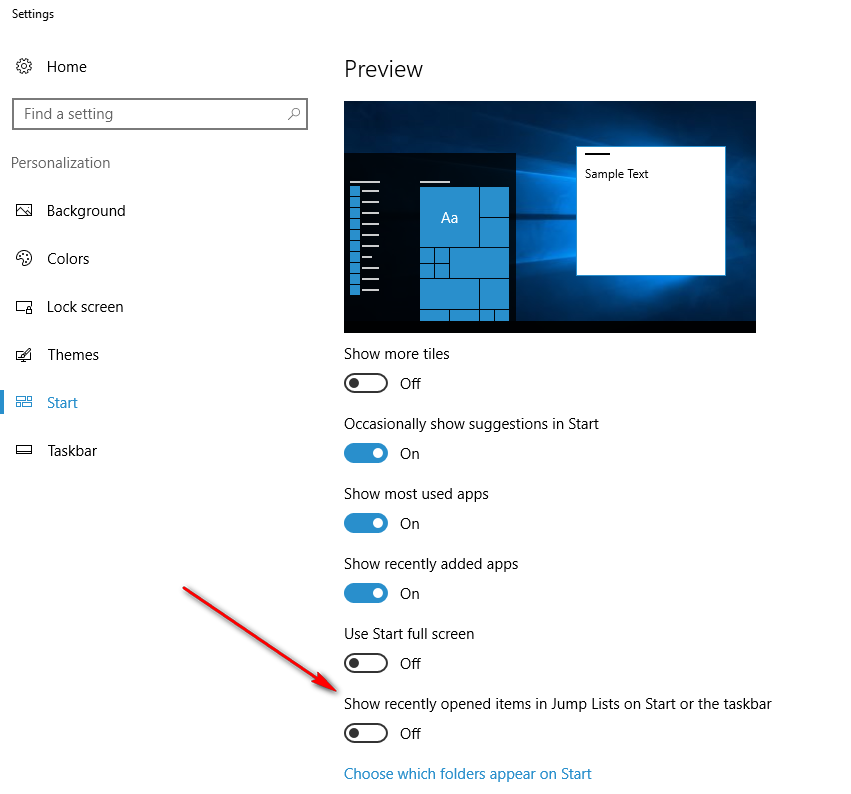
Turn on the same toggle switch so that the Jump List is turned on again so you can continue using the feature but without the history that would’ve been there before you turned it off.
If you want to try something that else that doesn’t just delete the history, you might be interested in checking out how you can change the number of items appearing in the Jump List. Doing so can help you with deleting the items that you sometimes visit occasionally, so they no longer show up on the list. For example, if you were to reduce the size of the Jump List only to show your top 3 results that you frequently visit, then it might always show the things you work on most and then skip past the things that you sometimes visit and wish did not show up on the Jump List.
You might also be interested in:
- How to Enable the Desktop Background Slideshow in Windows 10
- How to Reinstall Deleted Apps & Games from the Windows Store in Windows 10
- How to Reset the Microsoft Edge Browser to Default
- How to Make the Google Chrome Browser Faster in Windows 10
- How to Automatically Free Up Disk Space in Windows 10
Have something to say? You can contribute to this tech article by leaving a comment below.
February 20, 2017 @ 20:48
This is great article, but my jump lists in Windows 10 don’t work. I right-click on an app icon in the Taskbar, a jump list appears, but nothing happens (the list disappears like i’ve click on it, but nothing happens). Would really like to have this Windows 7 function, especially in opening Excel files.
Any suggestions? Thx.