Last Updated on February 25, 2024 by Mat Diekhake
The Windows 10 operating system offers people user accounts. You always have your own user account when you set up a Microsoft account.
These user accounts are excellent because it means each person who uses the computer now has a separate account with only their files that they have used available from their accounts. The result is a less cluttered and more organized user experience since you don’t have to deal with anyone else’s files.
Sometimes, when there is a problem with your user account, Windows 10 may sign you in to a temporary user account when it can’t log you in to your own. When you use a temporary user account everything you do within the session will not be saved. You also won’t be able to get access to any of your files that are still sitting in your old user account.
A temporary user account is better than nothing because it still allows you to use the Windows 10 operating system and all its features such as the internet. However, you’ll want to fix this problem as soon as possible and get your old account working again.
Here is what you need to fix the “You’ve been signed in with a temporary profile” error when using a version of the Windows 10 operating system.
How to Fix “You’ve been signed in with a temporary profile” Error in Windows 10
1. Sign in to the temporary user account again and then open up a Command Prompt window by typing CMD into the Cortana search field and then clicking on the Command Prompt desktop application in the results under the Best match section.
If your account is not one that has the administrative permissions assigned to it then you’ll need to sign in to one that does instead or else the guide won’t work.
Note: If you do not have the chance to get access to an account with the administrative permissions, then you can reboot the computer into Safe Mode and then turn on the built-in administrators account instead. All you would need to do then is sign out and then sign back into the administrator’s account.
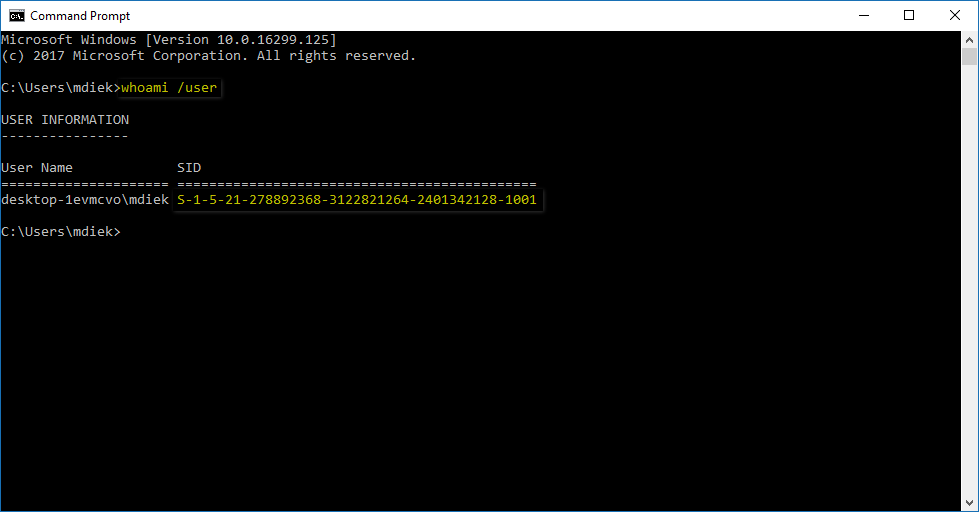
2. Next, type the whoami /user command into the command line and the hit the Enter key on your keyboard to execute it. When you get the results, you should now have a SID (Security identifier) number in the window. Keep that SID because you’ll need it for later.
3. Press the Windows logo key + R on the keyboard to bring up the Run dialog and then type Regedit and hit the OK button at the bottom of the dialog to open the Registry Editor.
4. You might get prompted by User Account Control (UAC); if so, just click on the “Yes” button to continue.
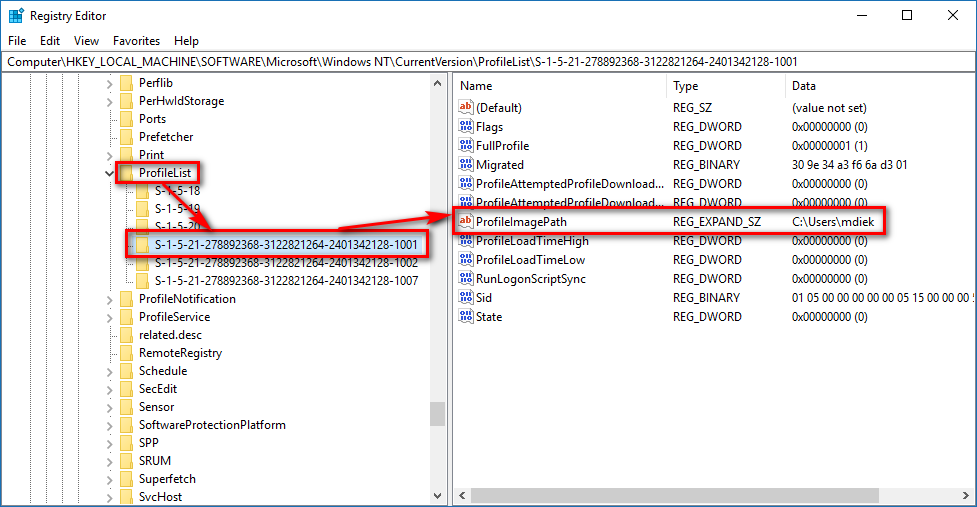
5. Now using the left side pane, navigate through to the following keys:
HKEY_LOCAL_MACHINE\SOFTWARE\Microsoft\Windows NT\CurrentVersion\ProfileList
6. Now in the right side pane, click on the ProfileImagePath once to highlight it.
Note: You will notice that in the data column, it shows the TEMP as the file path, such as C:\users\TEMP. That’s what you’re looking to change now by editing the string value.
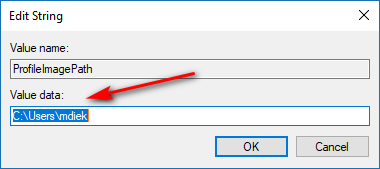
7. Right-click on the ProfileImagePath and then click on Modify to make the change you need.
8. You’ll now have the chance to edit the string. Where it says Value data is where you want to replace the TEMP name with the real name of your user account.
9. If you don’t know the location of your user account, you can open File Explorer and then type C:Users into the address bar at the top of the File Explorer window. It’ll then show you the results of all the user account, one of them being yours.
That’s all most of you will need to do to fix the “You’ve been signed in with a temporary profile” error and to have you getting signed back in to your normal user account. If, however, you are seeing a “.bak” extension at the end of your SID in the Registry Editor, then the steps you need to follow are a bit different.
SID listed with .bak at the end
1. If you have an ID that has “.bak” listed at the end of it, then right-click on the SID, choose to Rename the SID and then remove the “.bak” from the digits.
2. You can then double-click on the ProfileImagePath entry from the right side pane to modify its value, using the same steps as above.
SID listed twice without and with .bak at the end
It’s also possible that you see the SID twice and with “.abk” at the end.
1. This time you want to right-click on the SID and then choose to Delete the duplicated SID.
2. Then right-click on the remaining SIOD and select Rename and remove the “.bak” from the SID.
You can then follow the same steps as above to finish the guide.
That’s all.
This article was last updated on May 21, 2019.


