Last Updated on February 25, 2024 by Mat Diekhake
Potentially unwanted programs have plagued the Windows operating system for some time. To no fault of Microsoft’s, people create these programs as applications, and there is no way of stopping you from downloading it if that is what you want to do.
A Potentially Unwanted Program (PUP) is a program that you might want to remove rather than definitely want to remove because it is very difficult to distinguish between a real program that is trying to help you and one that is only wanting your money.
Most Potentially Unwanted Programs claim to be registry cleaners. There are many registry cleaners such as CCleaner that do a good job of cleaning up your registry; however, there are also plenty of others that only show you false positives in order to get you to pay to fix problems that do not really exist. It’s the latter that has given registry cleaners such a bad name, and now most associate them with malware rather than programs that try to help you.
Microsoft’s PUP protection is not enabled by default; instead, you will need to enable it from PowerShell or the Local Group Policy Editor before Windows 10 prevents you from downloading the PUAs as well as detects them in scan results.
The following tutorial demonstrates how to enable and disable the Windows Defender PUP protection when you are using a version of the Windows 10 operating system. Microsoft once wrote that PUP protection was only available for Enterprise editions of Windows 10, but it seems that is no longer the case as we have enabled it on Home and pro versions of the operating system as well.
Note: Microsoft refers to Potentially Unwanted Programs (PUPs) as Potentially Unwanted Applications (PUAs), but there is no difference between those two things. Most antimalware programs refer to them as PUPs. Perhaps Microsoft thought apps was a more updated term than programs, or perhaps they wanted to make a distinction between PUAs and malware. Whatever the case, the two terms are interchangeable when it comes to detecting the actual programs you might want to be removed. That does no, however, mean that each antivirus and antimalware protection will pick up all the same programs as PUPs/PUAs. That depends on the definition updates given to the unique antivirus/antimalware programs.
How to Configure Detection for Potentially Unwanted Programs in PowerShell
You can enable and disable Windows Defender’s Potentially Unwanted Program protection by modifying the DWORD value in the registry with Windows PowerShell commands. Here is how you can do that:
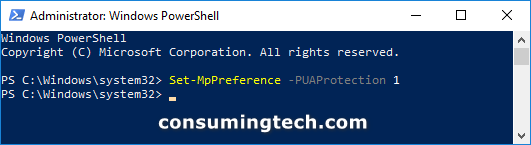
1. Open an elevated Windows PowerShell.
2. If you are prompted by User Account Control, click on the Yes button.
3. Type one of the following commands, depending on what you want to achieve, into the Windows PowerShell window and then press the Enter key on your keyboard to execute it.
To Enable Windows Defender PUA Protection:
Set-MpPreference -PUAProtection 1
or
Set-MpPreference -PUAProtection Enabled
To Disable Windows Defender PUA Protection (Default):
Set-MpPreference -PUAProtection 0
or
Set-MpPreference -PUAProtection Disabled
Audit Mode – detects PUPs, but does not block them:
Set-MpPreference -PUAProtection 2
or
Set-MpPreference -PUAProtection AuditMode
4. Restart the computer before attempting to run a new Windows Defender antivirus scan that searched for extra PUPs.
You can now close the Windows PowerShell window and continue using your computer if you like.
Method Two: How to Enable/Disable Windows Defender Potentially Unwanted Programs (PUPs) Protection in Local Group Policy Editor
Notes:
- You can only use this option from the Local Group Policy Editor starting from Windows 10 version 1809.
- The Local Group Policy Editor is only available in Pro, Enterprise, and Education editions of Windows 10.
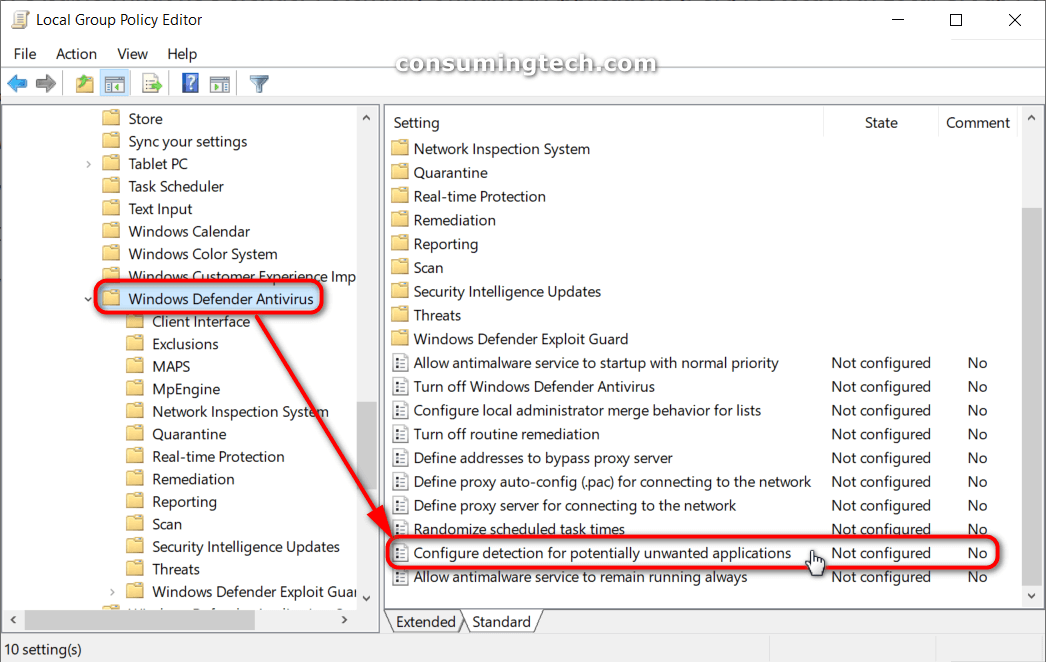
1. Open the Local Group Policy Editor.
2. Using the Local Group Policy Editor’s left pane, navigate through to the following location:
Computer Configuration\Administrative Templates\Windows Components\Windows Defender Antivirus
3. With Windows Defender Antivirus selected, click on Configure detection for potentially unwanted applications from the right pane.
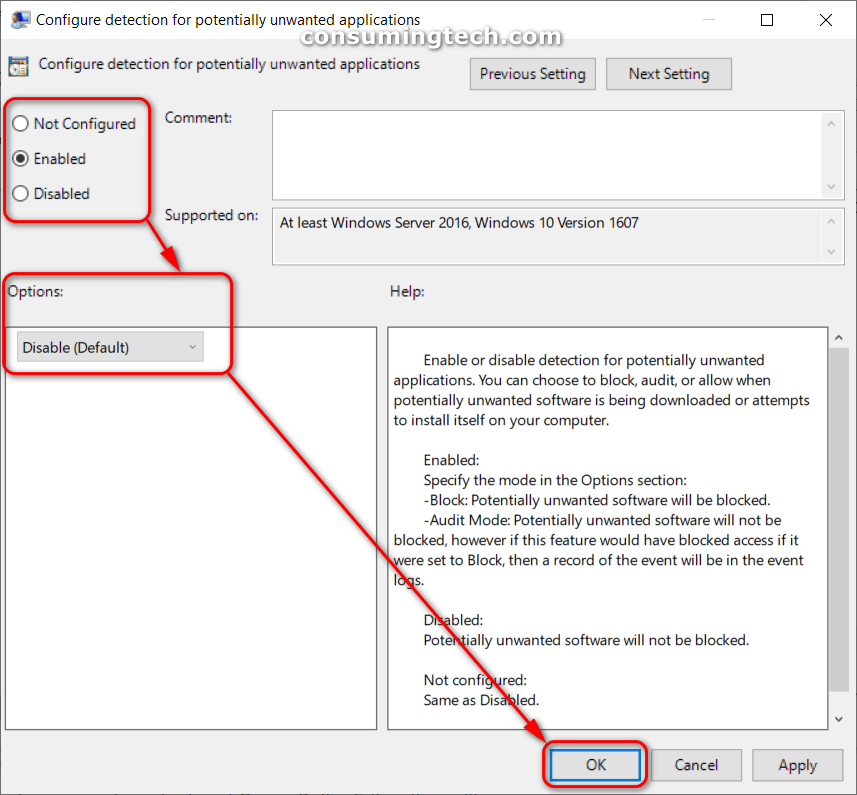
4. From the Configure detection for potentially unwanted applications policy, select either Not Configured (to turn off Windows Defender PUP protection), Enabled (to turn on Windows Defender PUP protection), or Disabled (to turn off Windows Defender PUP protection).
Note: If selecting Enabled, a drop-down menu appears in the Options window that offers additional options to configure the group policy if you like. For example, from the drop-down menu, you can select Blocked which means the Configure detection for potentially unwanted applications policy will be enabled, and the potentially unwanted programs will be blocked from being downloaded onto your computer. It is suitable for most people to select Blocked from the drop-down menu in the Options window to stop PUPs getting onto your computer in future.
You can now close the Local Group Policy Editor and continue using your computer if you like.
That’s all.