Last Updated on December 18, 2024 by Mat Diekhake
File Explorer, the location in Windows where you pluck out your files that have been saved, would naturally get a bit messy if there wasn’t anything in place to help sort your files.
You might not know it yet just by looking at it, but your files are ordered in numerical order should multiple numbers exist. In other words, the file name “2” would appear after file name “1” since the number two comes after 1 in our wonderful world of numbers.
Like with just about anything else, that’ll be helpful to many but it won’t suit all people, and some would prefer it not to be displayed in numerical order. Windows 10 makes it possible for you to achieve that by making a change in the Local Group Policy Editor.
Note: You can only use the Local Group Policy Editor on a computer that runs on an edition of Windows 10 above that of Windows 10 Home such as Windows 10 Professional, Enterprise or Education. There is no such thing as a group policy on the Home edition, and that’s why you can’t open the editor with that edition of Windows to date. You can upgrade from Windows 10 Home to Windows 10 Pro by heading to the Settings application if you want to be able to make changes to group policies.
How to Enable or Disable Numerical Sorting in File Explorer in Windows 10
You can enable or disable the numerical sorting in the File Explorer by opening the Local Group Policy Editor. There’s no other method available from the Settings application, Control Panel or anything else at this time. To get started, open the Local Group Policy Editor. There are multiple ways to do that. The quickest is by typing “gpedit.msc” into the search field found in the taskbar and then clicking on the result that appears under the Best match section.
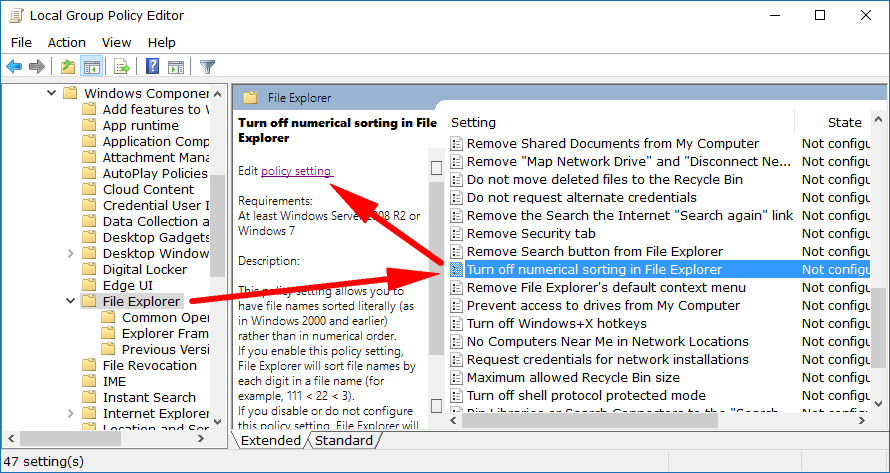
Now that the Local Group Policy Editor is open, navigate to the Computer Configuration\Administrative Templates\Windows Components\File Explorer path by using the left side pane. Next, look in the right side pane and scroll down until you get to the “Turn off numerical sorting in File Explorer” and highlight it by clicking on it once. You’ll now see the link to edit the “policy settings” available in the middle column that you need to click on next.
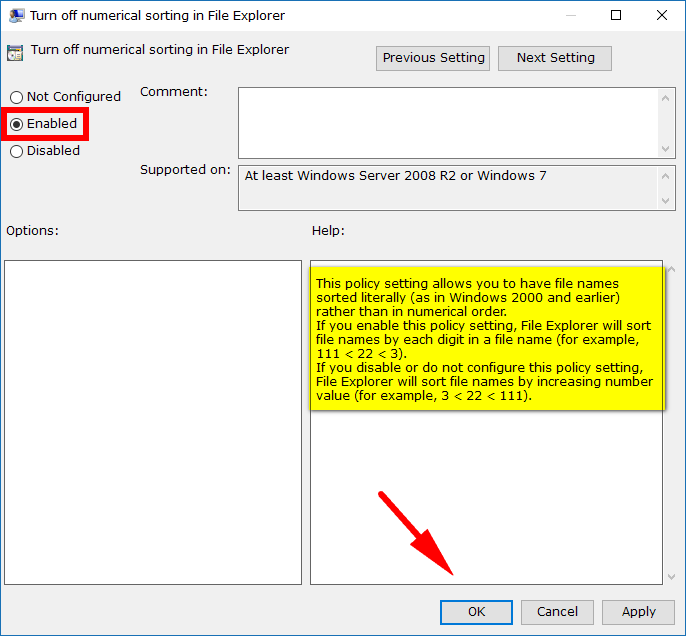
You’ve now got the “Turn off numerical sorting in File Explorer” policy window open. By default it’s set to be “Not configured, ” and when you apply that logic to the name of the policy, you’ll understand why that means it’s currently on and not off. So to change that, you need to select the “Enabled” option instead by clicking on that and moving the checkmark to that location. When done, click on the “OK” button at the bottom of the policies window.
People have been sorting worksheets in Microsoft Excel in alphabetical order for years, and the same philosophy has been carried over to the File Explorer: put things in order, so it becomes easier to sift through. But not all things people are doing will prefer the numbers being in order from smallest to largest, so you can turn it off whenever you like if you have a version of Windows 10 that has the Group Policy.
You might also be interested in:
- How to Add or Remove Libraries in Navigation Pane of File Explorer in Windows 10
- How To Disable “Set Up OneDrive” Popup In Windows 10
- How to Show/Hide Pop-Up Description for Folders and Desktop Items in Windows 10
- How to Show Encrypted or Compressed NTFS Files in Color in Windows 10
Is this article up to date? You can add more information using the comment section.


