Last Updated on February 25, 2024 by Mat Diekhake
Disk quotas help administrators make sure that the server doesn’t go down or the maximum file storage space isn’t all used up so employees can continue doing their jobs. It does this by no longer allowing everyone to just use up whatever amount of storage space they want or by giving a warning notification to those who are using up more space than was intended for them.
The Windows operating system has an event viewer where administrators can keep track of system logs. Viewing events is helpful for troubleshooting because it offers warnings, errors that have happened and informational events about what has taken place on the server.
The Windows operating system allows administrators to mesh the disk quota feature with the log events should they choose so administrators can check the Event Viewer for these disk quota warnings when they happen.
Note: It is always optional to have warnings for disk quotas. The warnings are sometimes just referred to as soft quotas. The alternative is having the hard limit where instead of a warning notification the user simply runs out of space and can no longer use any of the servers hard drive space for uploading of files until they get in contact with their administrators.
How to Enable or Disable Log Event when Disk Quota Warning Level Exceeded for Individual NTFS Drives in File Explorer
You can turn the log events for when disk quota warnings levels have been exceeded on or off by using the Properties for a drive from the File Explorer. To find out how, navigate to the File Explorer icon to be found in the taskbar, near where you can see Edge, and then click on the “This PC” link from the File Explorer navigation pane down its left side of the window.
With This PC open you’ll be able to see all your drives down the bottom of the window on the right side. Right-click on the drive you want and then select “Properties” from the menu.
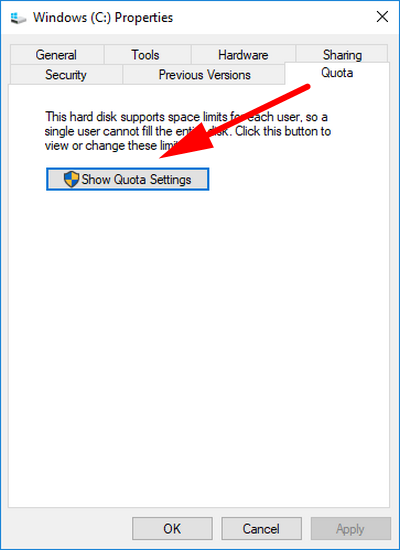
You’ll now have the drive’s properties dialog box open. Select on the “Quota” tab and then click on the “Show Quota Settings” button.
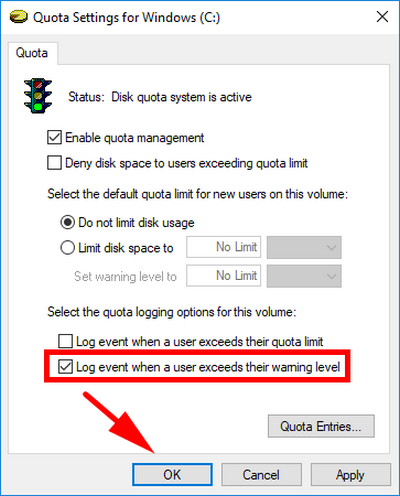
Put a checkmark in the “Log even when a user exceeds their warning level” if you want to turn on the log event when the disk quota warning level is exceeded or leave it unchecked if you don’t.
How to Enable or Disable Log Event when Disk Quota Warning Level Exceeded for All NTFS Drives in Group Policy
You can turn the log event for disk quota warning level after it’s been exceeded for all NTFS drives on and off by using the Local Group Policy Editor. To find out how, open the Local Group Policy Editor by pressing the Windows logo key + R to bring up the Run dialog and then type “gpedit.msc” and hit the “OK” button.
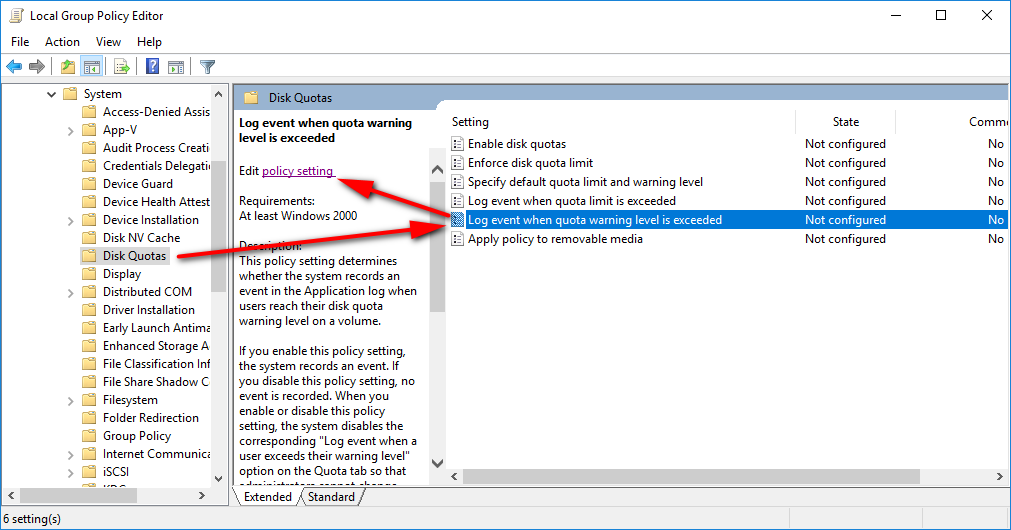
You’ll now have the Local Group Policy Editor window open. Using the left side pane, navigate to the Computer Configuration\Administrative Templates\System\Disk Quotas folder path and then click on the “Log even when quota warning level is exceeded” policy once and then click on the “Edit policy setting” link from the middle column.
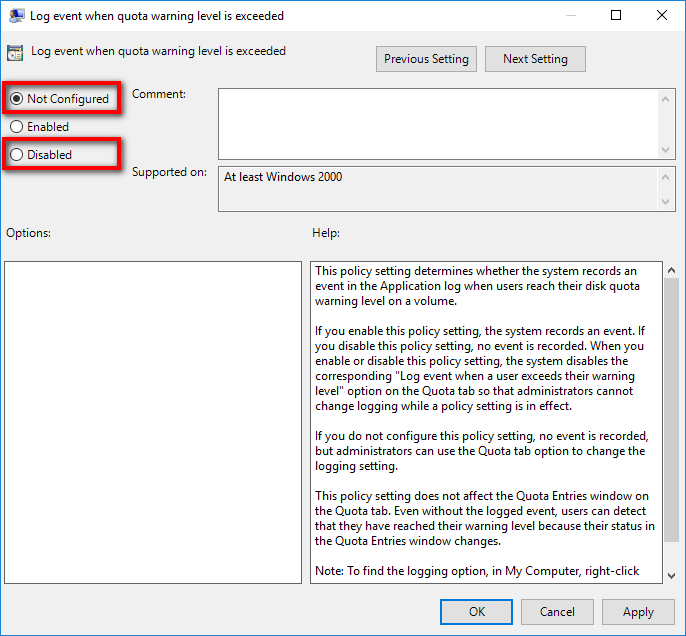
Select the “Enabled” position when you want to enable the log event when the quota warning level has been exceeded. Click on the “OK” button at the bottom of the policy window to apply the changes and continue using the computer.
Select either “Not configured” or “Disabled” if you don’t want Windows to be logging an event when the disk quota warning level has been exceeded.
That’s all the administrators will need to be able to check event logs for how many times people have exceeded the warning level and now run the risk of not being able to use anymore hard drive space.
You might also be interested in:
- Change Magnifier View in Windows 10
- Change Size of Text in Menus in Windows 10
- Change Default Audio Playback Device in Windows 10
- Enable/Disable Shutdown Event Tracker in Windows 10
You can subscribe to our RSS, follow us on Twitter or like our Facebook page to keep on consuming more tech.


