Last Updated on August 15, 2024 by Mat Diekhake
BitLocker is the name for the disk encryption that comes with some editions of Microsoft’s Windows 10 operating system. Windows 10 Home does not come with BitLocker encryption because Microsoft keeps it reserved for the business and education editions, but you can find it starting from Windows 10 Pro. If you have a computer that runs on Windows 10 Home and you want to it have BitLocker encryption, you’ll need to upgrade the computer to Windows 10 Pro; there’s no way you can add the encryption feature by itself.
Computers equipped with BitLocker have a handy advantage with preventing the theft or exposure of information that you have stored on your drives. This includes if your computer has been lost or stolen, as when someone else tries to use the computer, they won’t be able to access the information that was being protected by BitLocker on the drive/drives.
While computers that have BitLocker encryption currently operating have a very low chance of something going wrong, one of the reasons Microsoft might not offer it to Home users just yet is because it can be a double-edged sword and prevent you from getting access to your drives if something goes wrong. Thus, it is currently best reserved for people who have extremely sensitive data such as businesses transactions and information.
The following tutorial demonstrates how to deny write access to removable drives not protected by BitLocker disk encryption.
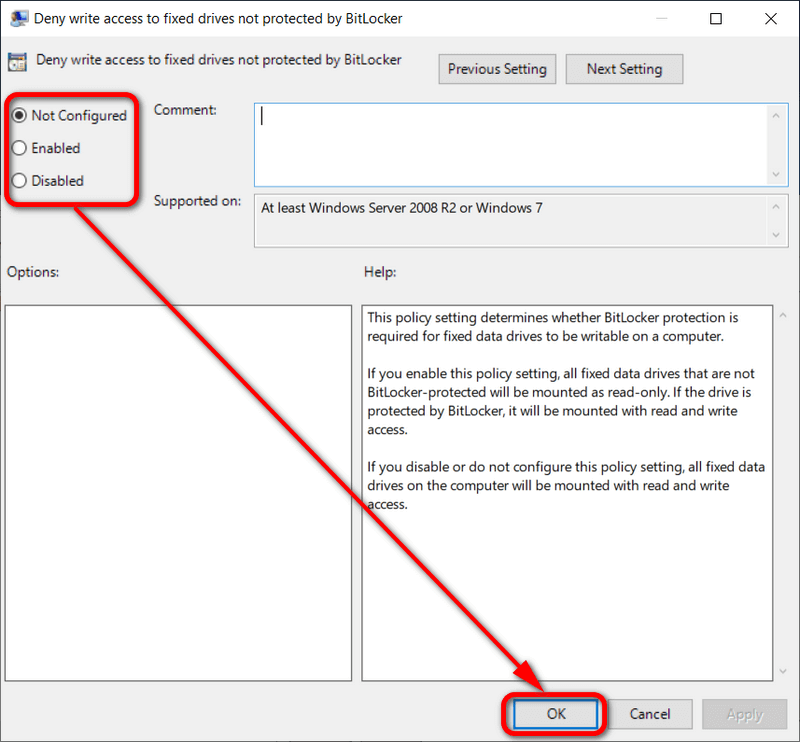
How to Allow or Deny Write Access to Fixed Data Drives Not Protected by BitLocker in Local Group Policy Editor
You can allow or deny write access to removable drives that aren’t protected by BitLocker from the Local Group Policy Editor in Windows 10.
Notes:
- Windows 10 BitLocker drive encryption is only available for Windows 10 Pro, Windows 10 Education, and Windows 10 Enterprise editions.
- You need to be signed into an administrators Microsoft account to allow or deny write access to removable drives not protected by BitLocker.
1. Open the Local Group Policy Editor.
2. If the Local Group Policy Editor interface doesn’t automatically open on your computer’s display, click on the Local Group Policy Editor’s icon that’s now in the taskbar.
3. In the console tree of the snap-in, navigate through the following policy folders:
Computer Configuration\Administrative Templates\Windows Components\BitLocker Drive Encryption\Fixed Data Drives
4. In Fixed Data Drives’ right pane, double-click on the Deny write access to fixed drives not protected by BitLocker policy.
5. From the Deny write access to fixed drives not protected by BitLocker policy window, Choose between Non configured (to allow write access), Enabled (to deny write access), or Disabled (to allow write access), and then click on the OK button at the bottom of the policy window to save the changes.
That’s all.