Last Updated on December 26, 2022 by Mat Diekhake
Personally, I found the Windows Desktop Connection—that allows you to remote desktop connect—difficult to set up correctly so that it was ready to use. I then went looking around the web for other solutions instead of trying to work out how to use it and came across something called Team Viewer. I’ve always continued to use Team Viewer instead of the built in Windows feature that allows remote connections.
Due to Windows 10 being notably easier to use and an incredibly well revised operating system over its predecessors, I decided I would try giving the built in Windows Desktop Connection feature another go just to see if things had gotten better over the years. The result I found was that it still lags behind Team Viewer—at least in my opinion—because you can’t just connect to any computer that your friends might have like you can with Team Viewer. You can only use the Windows Remote Desktop to connect to other computers on the same network. To get on the same network, you want to research how to create and join a homegroup. If you are worried about setting up a homegroup so you can remote connect, but don’t want to keep the homegroup forever, you can also follow our other guide that demonstrates how to leave the homegroup that you created.
Before getting started with the homegroup to join a networked PC, you also need to understand that you won’t be able to connect to a computer unless it is running on the Windows 10 Professional or Windows 10 Enterprise editions. A lot of computers out there are running on Windows 10 Home—you’ll likely be running on Windows 10 Home if you were buying a budget desktop, for example—so that further restricts the number of people who can successfully set up the remote connection even more and is often the cause of confusion as to why people can’t get it working.
Now that we have known Windows for a long time, there’s no question that they would have made Remote Desktop available for all computers if it were possible to do. There must be a reason why they won’t (or can’t do it.) So if you only plan on ever having Windows 10, then you should get to know Team Viewer or any other third-party applications for connecting to other computers, because I don’t think things are going to get any better shortly for Remote Desktop that is built into Windows PCs. On the other hand, if you know you will likely have a copy of Windows Professional since you buy expensive laptops or are a professional who needs that edition of Windows, you might prefer getting to know how to use Remote Desktop, so you don’t need to install anything else on top of your existing programs. That’ll at least save you some hard disk space.
However, once you understand that, things are pretty easy to set up. The guide below is using Windows 10, but you can also follow the same steps using Windows 8/8.1, and Windows 7 if you like. If you are still running on a version of Windows that is older than Windows 7, then you should update it to at least be on Windows 7 since that’s the earliest version still supported by Microsoft. (And if you were going to buy something, you might as well make it Windows 10 since that’s the latest version of Windows currently out, so you get your money’s worth).
How to Turn on Remote Desktop in Windows 10
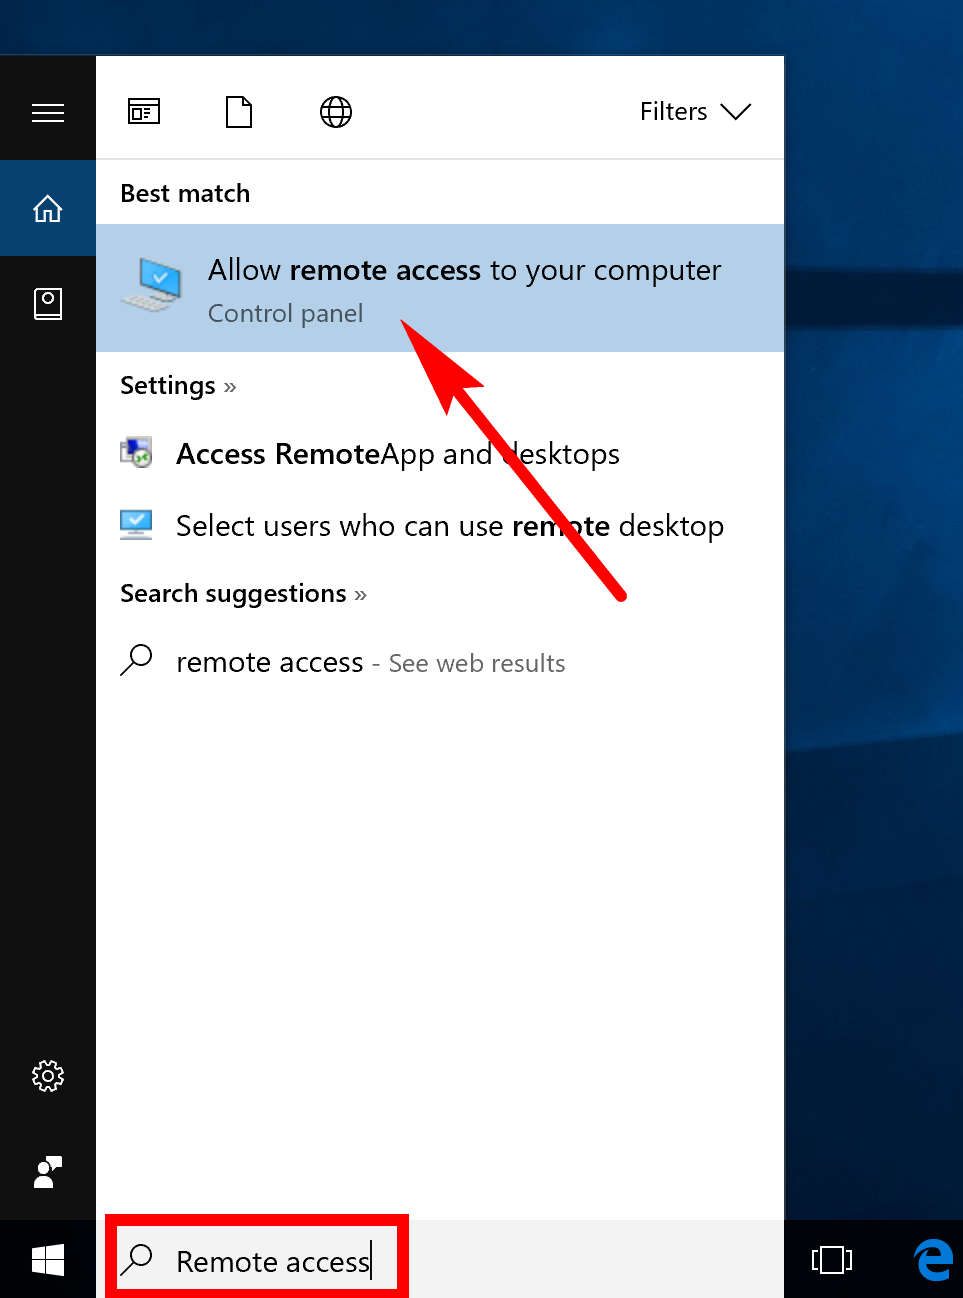
You can connect remotely to a PC running Windows 10 by using the Remote Desktop Connection program that is built into Windows, but first you need to turn on Remote Desktop before it works. To get started with that, type “Remote access” into the search field that’s available in the taskbar at the bottom of the computer’s display.
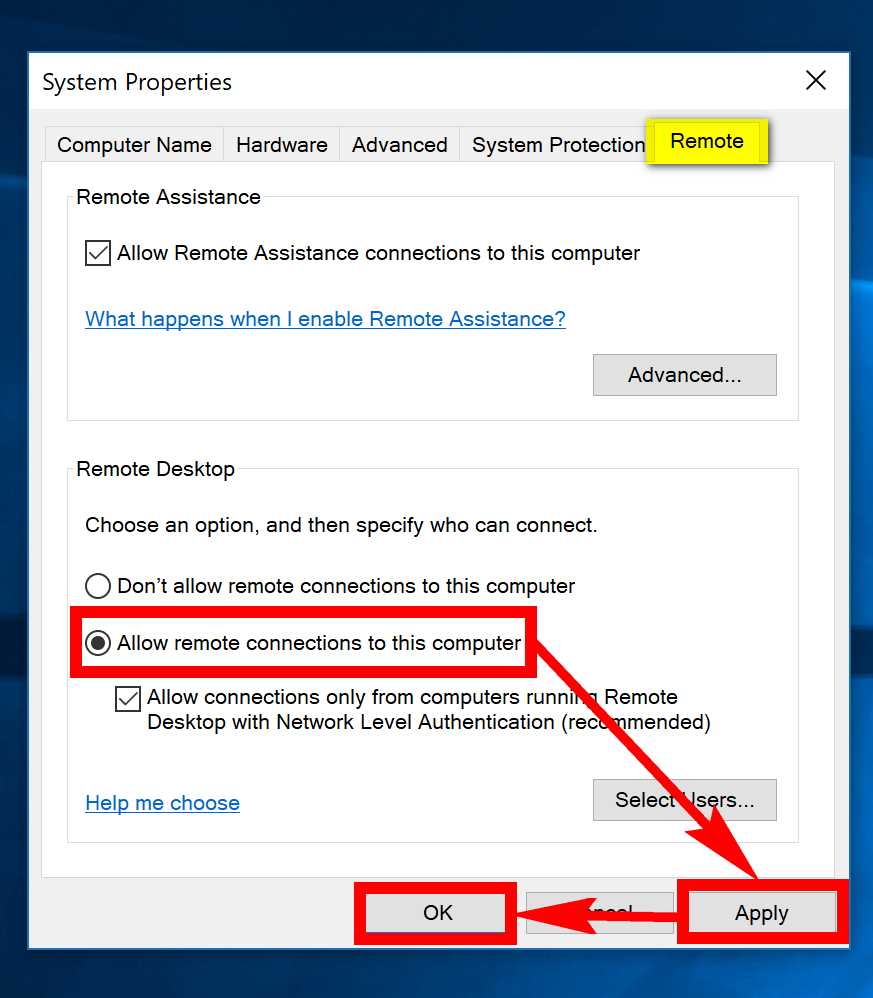
From the System Properties dialog box, make sure that the “Remote” tab is selected at the top of the box and then click on the “Allow remote connections to this computer” under the remote Desktop heading. Once the checkbox is marked for allowing that, click on the “Apply” and “OK” buttons at the bottom of the box to apply the changes and then close the box.
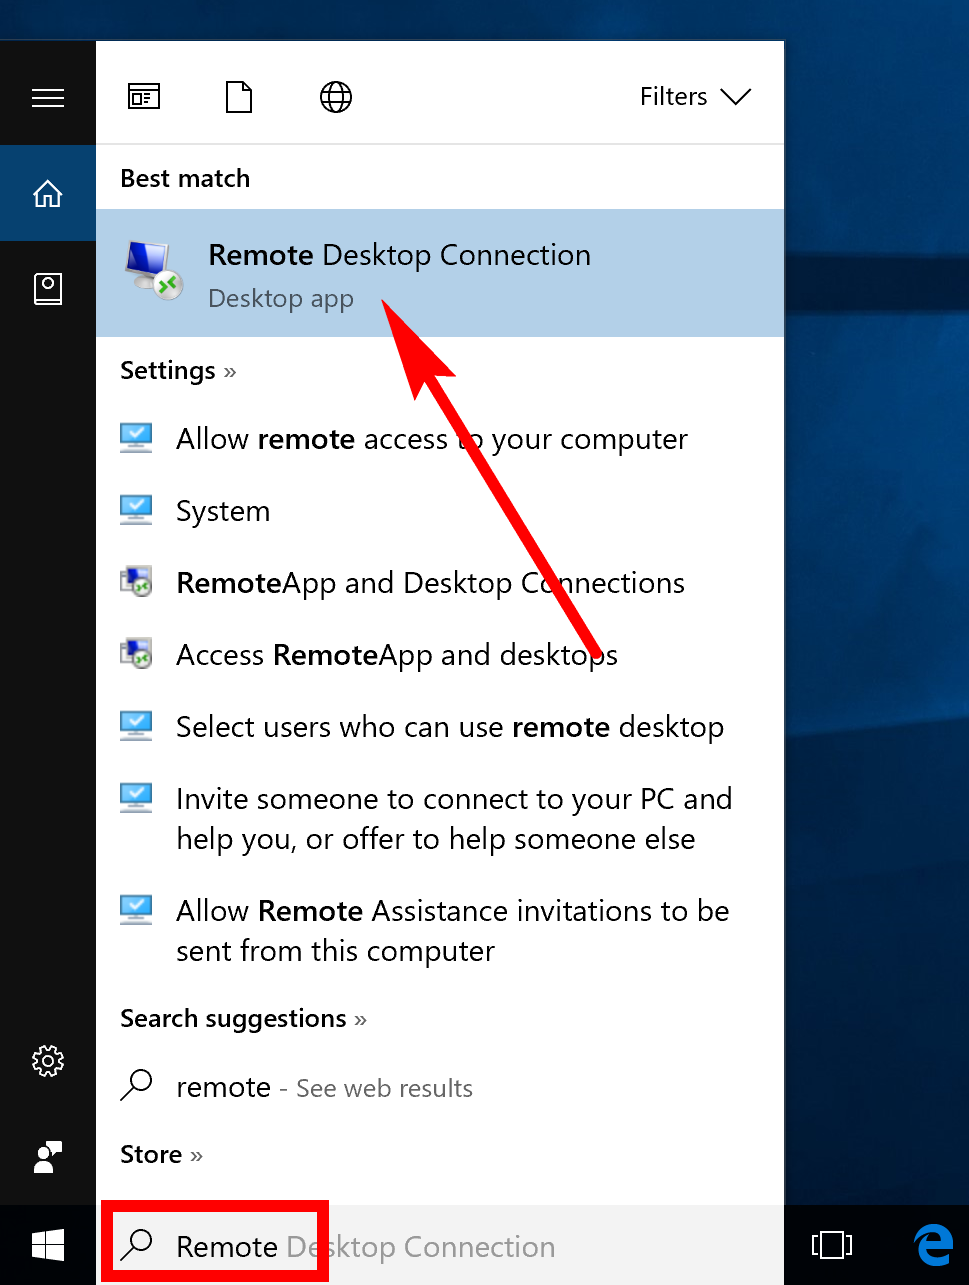
The Remote Desktop Connection tool is now ready to use. Head back to the search field and this time type “Remote” to bring up the “Remote Desktop Connection Desktop app” that you need to click on at the top of the window under the Best match section.
You’ll need to know the computer’s name that you are trying to connect to. Since you are the one trying to connect to it, you likely won’t be able to see the name, so you’ll need to get the person on the computer you are trying to connect to find out its name. To get them to do that, they’ll need to know where they can find the name of the computer in Windows 10 from from the Settings application. They can change the name to something simpler and then give you the new name they changed it to, or they can leave it on the existing name. If they do change the name, you might want to get them to reboot the computer just to make sure it isn’t an issue.
The next thing you need is to know the other computers user name associated with the account that is currently logged in. So you need to know the user who is logged in to the computer on the other end that you are trying to connect to remotely. If that person doesn’t know where to look, you can direct them to how to find out where the username is for a Microsoft account or a local user account and then they can share that information with you.
Once you’ve entered the computers name and the username, click on the “Connect” button at the bottom of the window. If everything is set up correctly, it will now connect to the other computer, and you’ll be able to see it on your computer’s screen. If things haven’t gone well, it’s usually because you don’t have both computers connected to the network correctly so go back to that guide and make sure you have followed it correctly for getting both computers—the one you have now and the other one you are trying to connect to remotely—on the same network. Without that, the Remote Desktop Connection will never work.

Having to connect to the computers on the same network is a bit of a bummer, but as long as you are on the same network, not much can go wrong. The Windows operating system will automatically create a firewall exception for the person who is doing the remote connecting, so you don’t need to worry about anything there. If you are still finding it impossible to connect—even after making sure the network is set up—we recommend checking out something like the Team Viewer app instead. It doesn’t need computers to be on the same network or anything like that; as long as you install Team View on both computers wanting to be involved with the remote connecting, then it just logs you in after you give a password.
Remote Connect using Windows 10’s New Quick Access Feature
We spent a lot of time going into detail about why Remote Desktop Connect isn’t an ideal solution for everybody, and how Team Viewer was a great alternative for anyone who couldn’t get it to work. Starting from the Windows 10 Anniversary Update, there is now a new feature called “Quick Access” that all editions of Windows 10 have available to use. The Quick Access feature is very similar to Team Viewer where it allows you to connect to another computer just by entering a code shared between the two computers. Nothing else is required, including anything to do with networks like Remote Desktop Connect needs before it can work. If you’re interested, you can find out how to remotely troubleshoot another Windows PC using the Quick Access feature if you like.
You might also be interested in:
- How to Change Account Username in Windows 10 When Signed In to Microsoft Account or Local Account
- How to Change System Unattended Sleep Timeout in Windows 10
- How to Allow/Prevent Devices to Wake Computer in Windows 10
- How to Enable/Disable Always Boot to Advanced Startup Settings in Windows 10
You can subscribe to our RSS, follow us on Twitter or like our Facebook page to keep on consuming more tech.