Last Updated on December 26, 2022 by Mathew Diekhake
Every half decent web browser is going to have a browser cache system in place. This is because gathering data from your hard drives is quicker than from the internet.
As soon as you visit a web page at least once, that browser then begins to store data from webpages on your computer just in case they are needed again. When you visit the same webpage a second time, the browser cache then collects the data it has stored on your computer instead of loading it from the internet purely for the sake of creating a faster loading webpage.
You don’t have to worry about the cache taking up too much space on your hard drive because there is a size limit for how much data it can store (you can also usually configure this yourself for most web browsers if you wanted to change it from its defaults). Once the cache is full, it discards the old data that hasn’t been used for a while and begins collecting the new data from more recent webpages that you visit.
If you’re experiencing problems with the webpages that you visit, you may be asked to delete your browser cache. You may also wish to clear the cache anytime you need to make sure that what you see on your computer’s display is up to date with what is being shown on the webpage that you’re visiting.
Cache Is Not Just About Making Pages Load Quicker
Clearing the cache in Google Chrome isn’t just about clearing a memory of webpages. There will be some browser changes that happen as well. For instance, if you were to be viewing Chrome with the zoom level from settings different than the default settings (100%), then you will find that the default setting is restored after clearing the cache. This means that clearing the browser cache can also be a troubleshooting method for many minor issues you might come across, one of them sometimes being the ERR_SPDY_PROTOCOL_ERROR which can happen when trying to update webpages.
This tutorial demonstrates how you can clear the browser cache when you’re using the Google Chrome web browser.
How to Clear Cache in Google Chrome
Here is how you can clear the cache from the Google Chrome web browser so you can start seeing the updated version of the webpages that you visit:
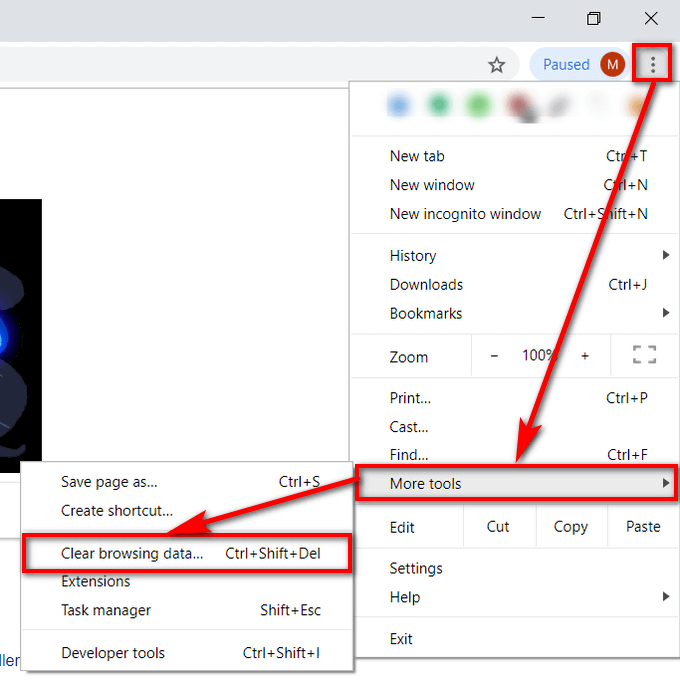
1. With the Google Chrome web browser open, click on the More (three dotted) menu link in the top right side of the window and then hover over More tools and click on Clear browsing data….
2. From the drop-down box, select the amount of time that you would like Chrome to delete the browser cache for.
For example, if you only wanted to clear the cache that built up over the past 24 hours, then choose the Last 24 hours option and so forth.
3. Click on the checkbox for Cached images and files so you can see a blue tick and then click on the Clear data button at the bottom of the window.
4. Now that you’ve cleared the browser cache, you should begin to see the up to date versions of the webpages that you visit.
That’s all.
Related Tutorials
- How to Reset DNS Cache in Windows 10
- How to Show Hidden Files in Windows 10
- How to Open Folder Options in Windows 10
- How to Create Bootable USB Flash Drive to Install Windows 10
- How to Move Location of Game DVR Captures Folder in Windows 10
- How to Create System Information File in Windows 10
- How to Exclude Folders from File History in Windows 10
- How to Turn Windows Features On/Off in Windows 10
- How to Turn On/Off ‘Show All Folders’ in Windows 10 Navigation Pane
- How to Open Control Panel in Windows 10


