Last Updated on December 26, 2022 by Mathew Diekhake
Everyone who runs a version of Windows 10 on a computer has to have created a user account. That account is automatically assigned the administrative permissions that then allow you to do things like install additional applications that the operating system doesn’t have yet, as well as get access to the things that Windows deems appropriate for people with admin level permissions only.
There’s nothing you can do to change the permissions for that original account that was created; it needs to stay as the admin account. However, each account you create from that moment on can either be assigned admin permissions as well or standard user account permissions. What’s more, you don’t have to stick to what you choose for that account either. For example, if you created a second user account for someone else and gave it admin permissions but have now wished you hadn’t, you can change the setting, so it has the standard user account permissions instead. You don’t need to delete the account and then create a new one as many people assume.
How to Change Account Type Using Settings Application
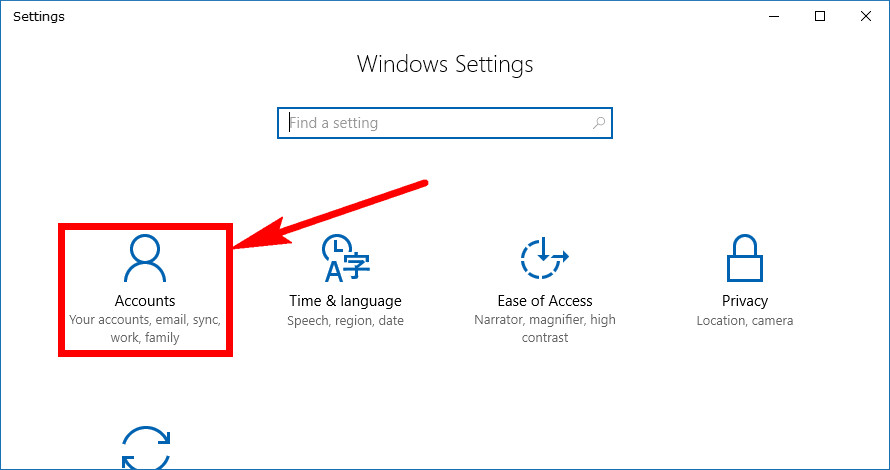
You can change the account type directly from the revamped Settings application that Windows 10 has. To get there, navigate to the Start menu > Settings and then click on the “Accounts” link from the Windows Settings window.
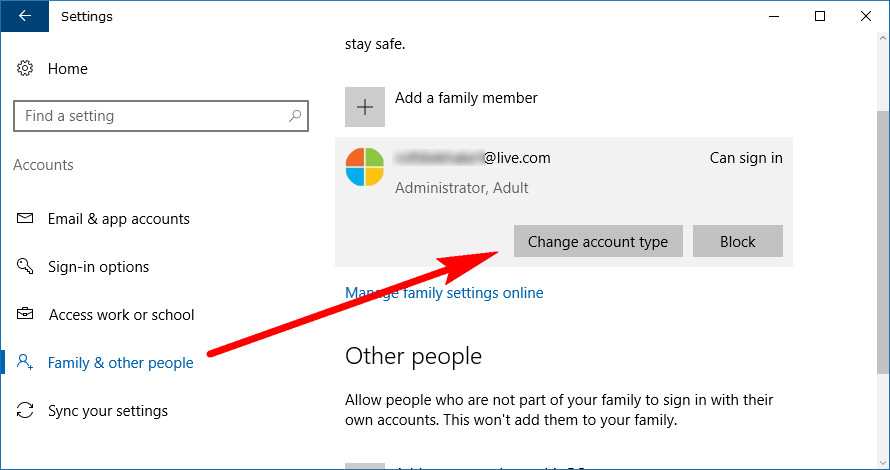
Now select the “Family and other people” from the left side pane and then click once near the account name in the right side pane. Doing so means it opens up and a button becomes available where you can click on the “Change account type.”
Note that you only get to change the other accounts that aren’t the first account that you used to set up Windows with because that first account must remain with administrative permissions. Without at least one account with the administrative permissions you would be shooting yourself in the foot because it would mean you would no longer be able to do administrative things should a time ever come when you need to use them.
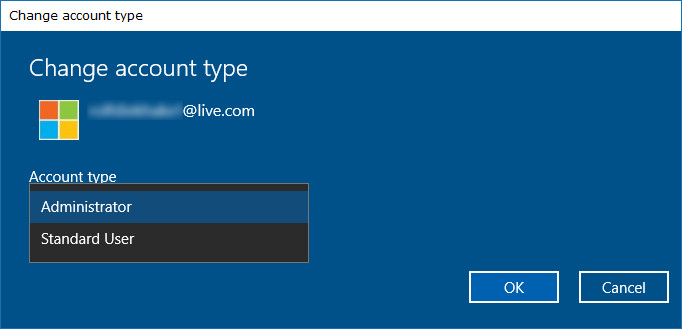
You then get presented with the Change account type box and in it is a drop-down menu where you can choose between the admin and standard user account. Select the one you want and then click on the “OK” button to save it.
How to Change Account Type Using Control Panel
You can also change the user account type from the Control Panel in Windows 10. To do that, open up the Control Panel so you can see all of the Control Panel items with it in the classic view that has the smaller icons. Then just click on the “User Accounts” link.
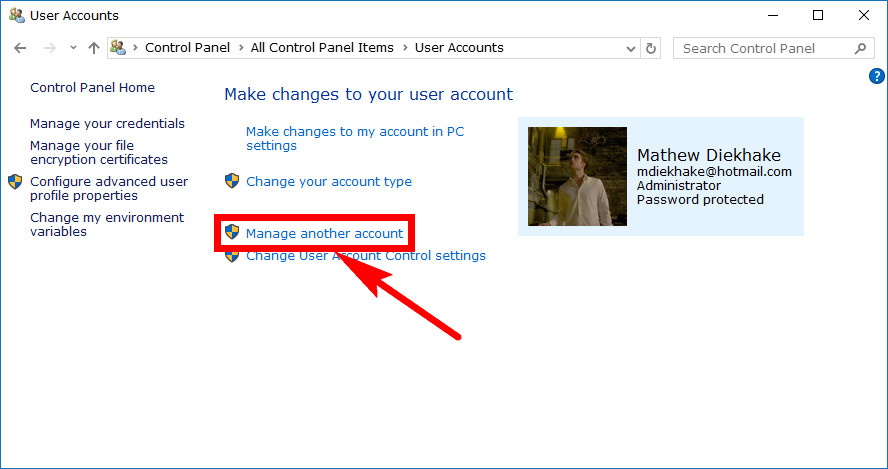
Click on the “Manage another account” link.
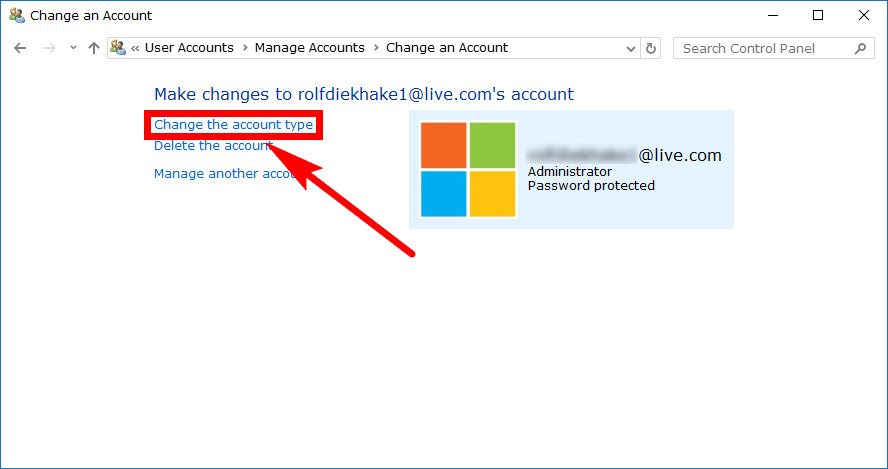
Click on the “Change the account type” link.
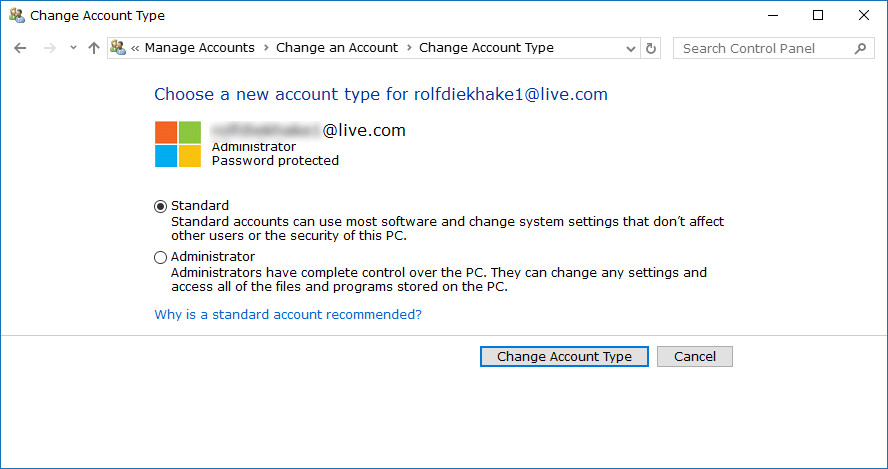
You now have the chance to change between the standard user account and the administrators account by clicking in the appropriate box for that. When done, click on the “Change Account Type” button at the bottom of the window to save your preferences, so it does end up changing them.
How to Change Account Type Using User Account Dialog Box
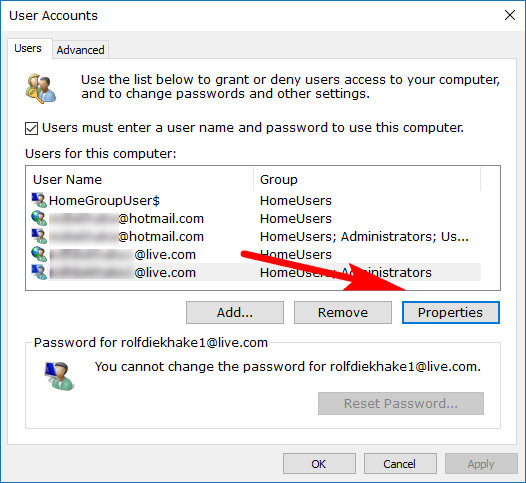
Windows 10 does have such a thing called a User Accounts dialog box that you can open and change the account type from there also. To do it this way, type “netplwiz” into the search field and then click on the “netplwiz Run Command” entry from the Best match section when it becomes available. Now that you have the User Accounts dialog box open, highlight the user account you want to change the permissions of by clicking on it once and then click on the “Properties” button.
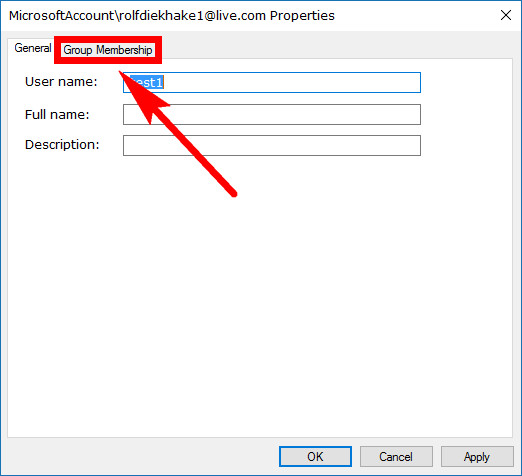
The dialog box opens up showing you the General tab and everything inside it by default. You’ll need to click on the “Group membership” tab at the top of the dialog box.
Then just click on either the standard user account or administrators account checkbox to select those permissions. Once done, click on the “OK” button at the bottom of the window.
Windows 10 makes it easy to carry out a variety of different tasks all relating to user accounts: deleting user accounts, reverting a Windows 10 account to a local user account, creating new local user accounts and Microsoft accounts, as well as the simplicity that comes with changing the account type. It’s best to limit the amount of administrators that you have instead of giving everything the admin access, particularly if you have people who don’t know what they’re doing or that you can’t trust using the same computer as you.
Related Tutorials
- How to Switch User Accounts in Windows 10
- How to Add and Manage New User Accounts in Windows 10
- How to Automatically Sign-in After Restarting Windows 10
- How to Change Your Account Picture in Windows 10
- How to Turn On/Off Sync Settings for Microsoft Account in Windows 10
- How to Change Account Username in Windows 10 When Signed In to Microsoft Account or Local Account
- How to Change PIN for Account in Windows 10
- How to Change Password of Account in Windows 10
- How to Remove Old User Account Pictures in Windows 10

