Last Updated on February 25, 2024 by Mat Diekhake
OneDrive is a cloud-based storage service where you can save your files to the cloud so you can access them anywhere and share them with anyone. Before you can save documents online with OneDrive, you need to sign in to Office.
The files you save online are located at the OneDrive.com domain which you can access by entering that web address directly into the web browser’s address bar or from a search engine such as the Microsoft-owned, Bing. Any saved files while online are also saved to the OneDrive folder which you can access from File Explorer in Windows 10.
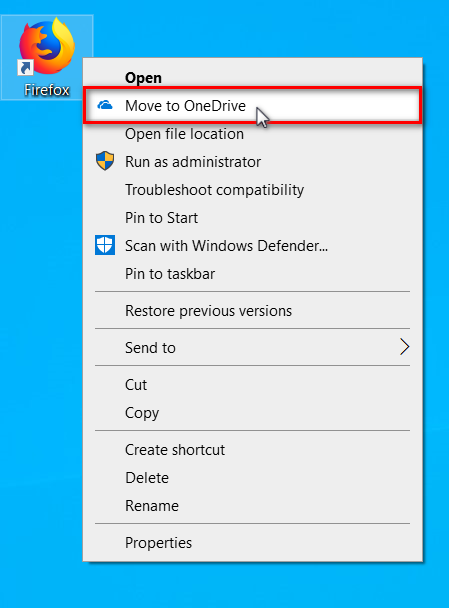
When OneDrive is running, you get a “Move to OneDrive” command in the context menu for files available from certain locations, one of which is the desktop. You can use “Move to OneDrive” command to move a file to the OneDrive folder.
The following tutorial demonstrates how to add or remove the “Move to OneDrive” command in the context menu when you’re using a version of the Windows 10 operating system.
Warning: If you remove the “Move to OneDrive” command from the context menu, it also removes all associated OneDrive options from the context menu items when you right-click on them from within the OneDrive folder. Those options include “More OneDrive sharing options,” “View online,” “Always keep on this device,” and “Free up space.”
Note: You must be logged in as an administrator to add or remove the Move to OneDrive context menu.
An example of the Move to OneDrive context menu command:
Method One: How to Add/Remove “Move to OneDrive” Context Menu for Current User Only
You can add and remove Move to OneDrive for all users from the Current User key in the Registry Editor app. Here is how you can do that:
1. Open the Registry Editor app by typing Regedit into search in the taskbar and clicking on the Registry Editor app in the list of results, or by opening Run (Win+R) and typing Regedit into Run and clicking OK.
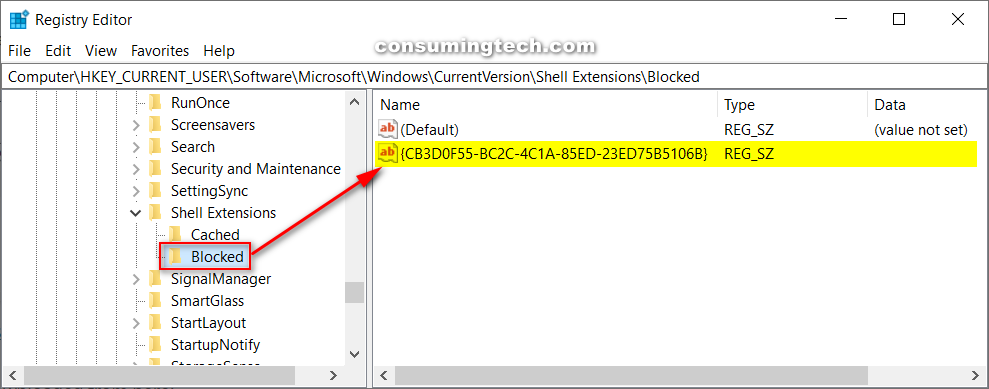
2. Using the Registry Editor’s left pane, navigate through to the following registry keys:
HKEY_CURRENT_USER\Software\Microsoft\Windows\CurrentVersion\Shell Extensions\Blocked
3. With Blocked selected, add the following string value into the right pane by right-clicking the white area and selecting New > String Value:
{CB3D0F55-BC2C-4C1A-85ED-23ED75B5106B}
You can now close the Registry Editor app and continue using your computer if you like.
Method Two: How to Add/Remove “Move to OneDrive” Context Menu for All Users
You can add and remove Move to OneDrive for all users from the Local Machine key in the Registry Editor app. Here is how you can do that:
1. Open the Registry Editor app by typing Regedit into search in the taskbar and clicking on the Registry Editor app in the list of results, or by opening Run (Win+R) and typing Regedit into Run and clicking OK.
2. Using the Registry Editor’s left pane, navigate through to the following registry keys:
HKEY_LOCAL_MACHINE\SOFTWARE\Microsoft\Windows\CurrentVersion\Shell Extensions\Blocked
3. With Blocked selected, add the following string value into the right pane by right-clicking the white area and selecting New > String Value:
{CB3D0F55-BC2C-4C1A-85ED-23ED75B5106B}
You can now close the Registry Editor app and continue using your computer if you like.
That’s all.