Last Updated on August 15, 2024 by Mathew Diekhake
Updating the Windows 10 operating system to a new build requires you to sign back in to the computer before the update process is complete. This means you’ll notice the update downloading before the computer shuts down and then installing once the computer is booted back up again and you’re signed into your user account.
Starting from Windows 10 build 14291, Microsoft has added an option to the settings in Windows 10 that allows you to turn on or off the option to use your sign in info to automatically finish setting up your device after an update. The option is turned on by default which is why you mightn’t notice your PC having to sign in for an update to complete.
The Windows 10 software update process often consists of part of the update happening before your computer shuts down and then taking time to complete the update the next time the computer is booted back up. The option to allow Microsoft to automatically finish installing updates means a token is created whereby Windows will automatically sign-in to your user account to complete the update, so as to not rely on you coming back to the computer and turning it on again before the update could complete. Windows 10 locks the computer once the update is done so nobody nearby can continue using your user account once the update is complete.
The following tutorial demonstrates how to use the sign-in info to automatically finish after an update or restart when you’re using a version of the Windows 10 operating system.
Method One: Turn On or Off Use Sign-in Info to Auto Finish Setting Up Device and Restart Apps after Update or Restart in Settings
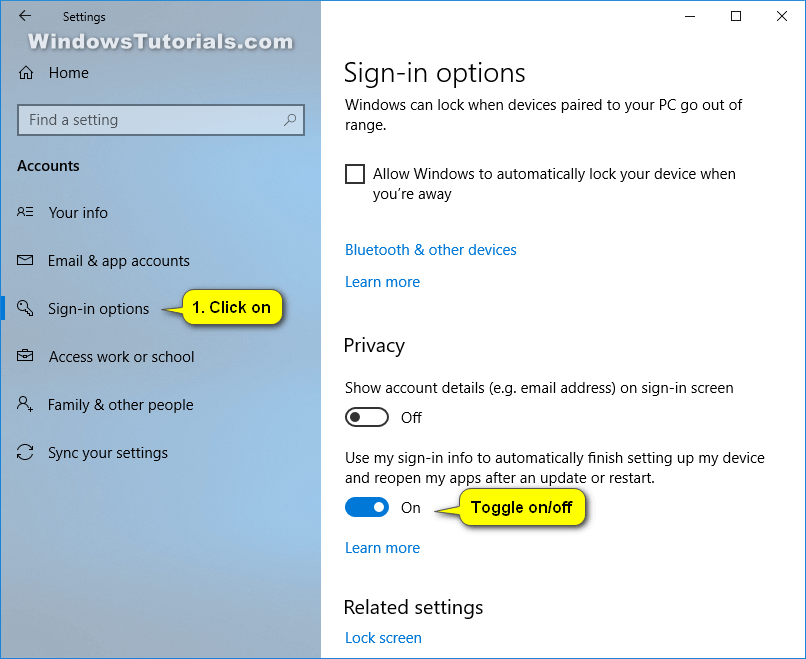
You can use your sign-in information to automatically finish after an update or restart from the Settings application. Here is how you can do that:
1. Open the Settings app.
2. Click on Accounts from the Windows Settings menu.
3. From Accounts’ left side, click on Sign-in options and then use the toggle next to where it says Use my sign-in info to automatically finish setting up my device and reopen my apps after an update or restart to turn it on or off. (click to enlarge screenshot below)
You can now close the Settings app.
Method Two: Turn On or Off Use Sign-in Info to Auto Finish Setting Up Device and Restart Apps after Update or Restart in Registry Editor
You can turn on or off the option to use your sign-in information to automatically finish setting up the device and restart applications after an update by using the Registry Editor. Here is how you can do that:
1. Open the Command Prompt window.
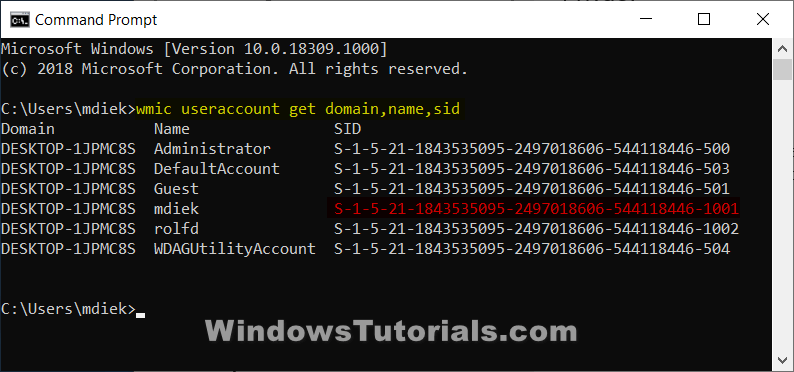
2. Type the command belie into the command line and then press the Enter key on your keyboard. Make a note of the SID number that is shown next to your user account. (click to enlarge screenshot below)
wmic useraccount get domain,name,sid
3. Open the Run dialog by pressing the Windows logo key + R keys on your keyboard and then type regedit and click OK, or type regedit into Search to open the Registry Editor.
4. Using the Registry Editor’s left pane, navigate to the following key:
HKEY_LOCAL_MACHINE\SOFTWARE\Microsoft\Windows NT\CurrentVersion\Winlogon\UserARSO
5. With the ARSO key open, click on the key that matches your SID.
6. In the right side pane of your SID ID, click on the OptOut DWORD to modify it.
7. Where it says value data, type 0 and then click on OK to save the changes and close the DWORD value.
You can now close the Registry Editor.
Method Three: Enable or Disable Use Sign-in Info to Auto Finish Setting Up Device and Restart Apps after Update or Restart in Local Group Policy Editor
You can enable or disable the option to use your sign-in information to automatically finish setting up a device and restart the applications after updates or restarts from the Local Group Policy Editor. Here is how you can do that:
Note: You need to be logged in as an administrator to use this option. There are two ways you can log in with an administrator’s account on a Windows 10 computer: either by (a) using your Windows account that already has the administrator privileges or (b) logging in to someone else’s account that has the administrator privileges. The account that was created first is automatically assigned the administrator privileges and it can pass it on to other accounts; other administrator accounts can also remove the administrator privileges from the original account.
1. Open the Local Group Policy Editor.
2. In the console tree of the snap-in, navigate to the following path:
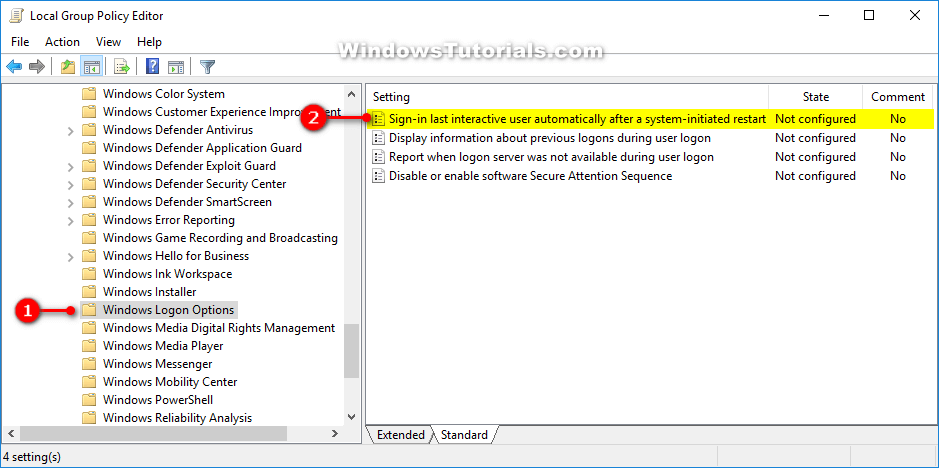
Computer Configuration\Administrative Templates\Windows Components\Windows Logon Options
3. With the Windows Logon Options expanded, click on the Sign-in and look last interactive user automatically after a system-initiated restart to open its policy window. (click to enlarge screenshot below)
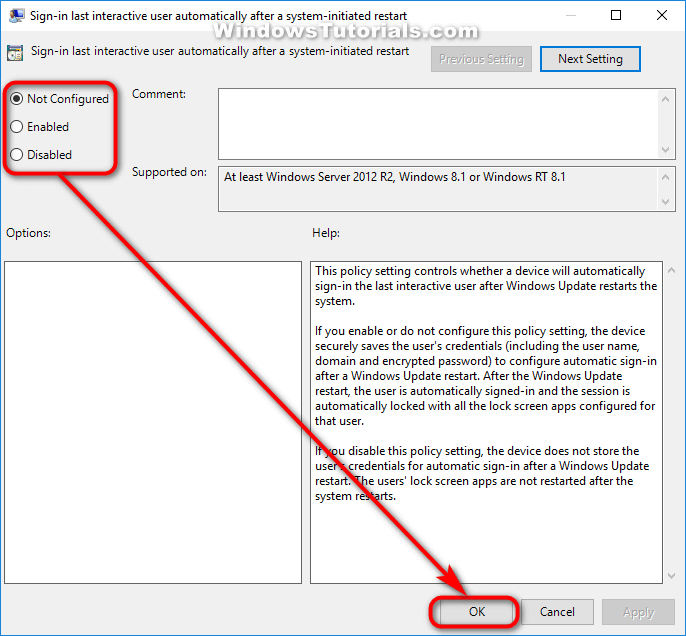
4. From the Sign-in and lock last interactive user automatically after a restart policy window, choose between Not configured (to enable), Enabled (to enable), or Disabled (to disable).
That’s all.


