Last Updated on December 26, 2022 by Mathew Diekhake
If you’re online, your computer will have either a static or dynamic IP address assigned to it. The IP address is how people can identify where your computer is located, just like your letterbox is helping people discover your physical address. This IP address will keep you in check because if you step out of line, the local authorities will be able to track it down and see where you are.
Host or network interface identification and location addressing are the only reasons for you needing an IP address. Most people are assigned dynamic IP addresses when they connect a device to an internet connection, but you can also choose to make your IP address static instead of you prefer.
There are some instances when some users may prefer a static IP address. For example, if you’re planning on using a VPN anytime soon, then you’ll probably want to have a static IP address for that so you can whitelist the same IP address and keep it whitelisted. There might be other occasions that you’ll want a static IP also, and they’ll always be related to an external website or device preferring it be static like when you need to whitelist it.
Here are all the different ways you can set up and use a static IP address when you’re using a version of the Windows 10 operating system.
How to Set Static IP Address in Windows 10
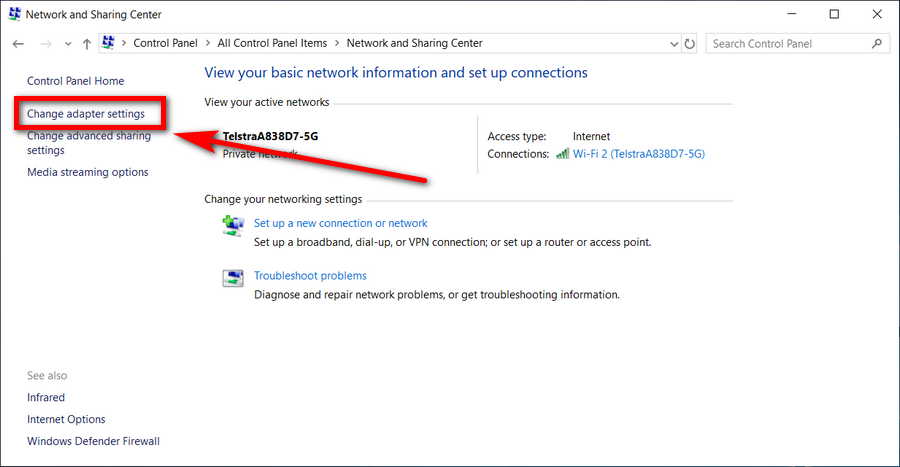
1. Open the Control Panel and head to Network and Sharing Center > Change adapter settings.
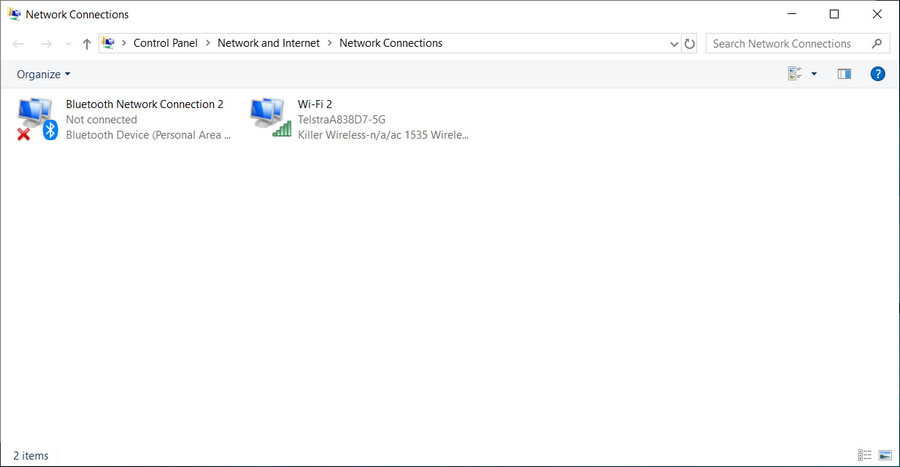
2. You’ll now see the network connections that are available for your computer. Double-click on the one that you want or the one that you’ve got operating.
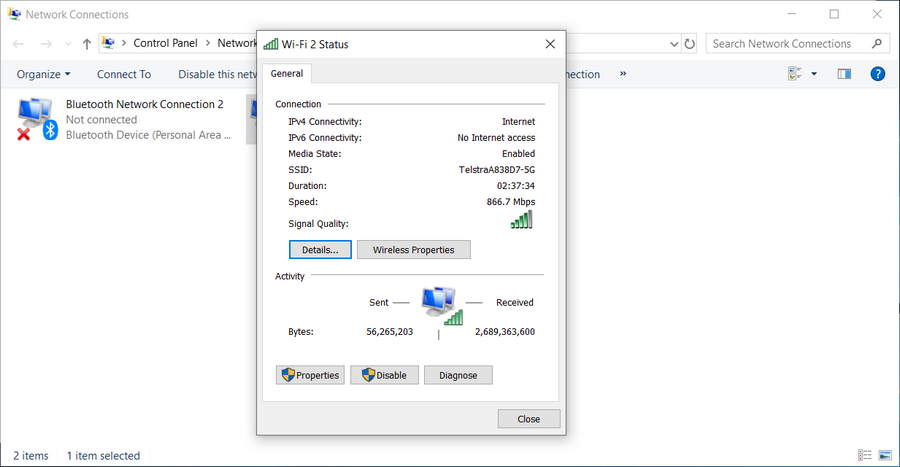
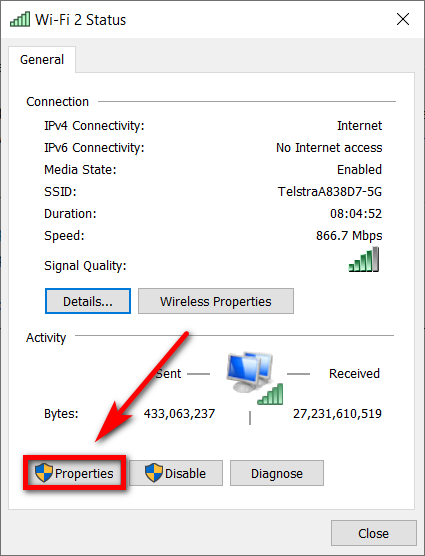
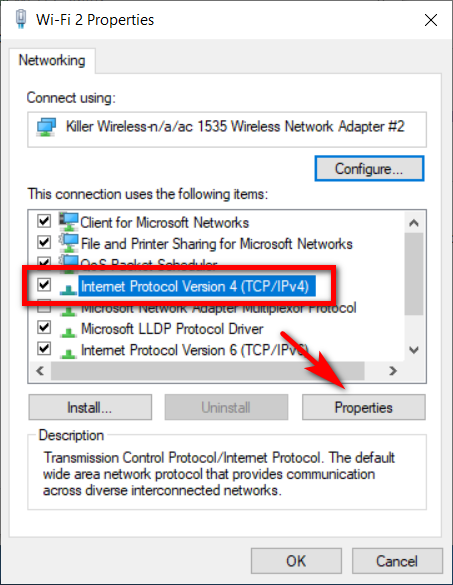
3. You’ll then see the WiFi dialog pop up on your computer’s display.
4. Click on the “Properties” button.
5. Highlight by clicking once the “Internet Protocol Version 4 (TCP/IPv4)” and then click on the “Properties” button at the bottom of the dialog.
6. Select the “Use the following IP address” and then insert the details to your new static IP address. This includes the IP address itself, plus the subnet mask and the default gateway. (If you’ve signed up to a service (i.e., you’ve signed up to a paid VPN), ask your provider for these details, and they’ll let you know what they are for your account if you’re unable to work out what they are.
Note: A subnet mask is a number that defines the range of addresses that can be used for a network. You typically won’t have to adjust this information yourself. Once you’ve entered the correct IP address, Windows should fill in the subnet mask for you.
7. The default gateway is a device that initiates the communication between the networks you’re using. Leaving the default gateway blank is possible. If you do that, Windows shows it as an unidentified network.
That’s it.
As mentioned, the only thing you need is the static IP address itself. Assuming you want a static IP because you’ve signed up to a service, you should be able to get in contact with the people running that service to find out what the IP address is if you get stuck. Most services these days online, especially ones where you pay a considerable amount of money as you do with VPNs, also provide excellent service if ever you have a question for setting things up the right way.
Related Tutorials
- How to Find Your IP Address in Windows 10
- How to Easily Connect to Another PC and Use It in Windows 10 without Needing IP Address
- Windows 10 Insider Preview Fast/Skip Build 17046 for PC Announced
- How to Zip and Unzip Files in Windows 10
- How to Fix Windows Modules Installer Worker High CPU & Disk Usage in Windows 10
- How to Remove Details Tab from File Properties in Windows 10
- Is Your Windows 10 Search Not Working? Here’s What You Can Do to Solve It
- How to Fix “You’ve been signed in with a temporary profile” Error in Windows 10


September 20, 2018 @ 23:28
I didn’t think much of this site when I first came across it but now that I’ve been here a few times I’m starting to realize how good it is.
The only suggestion I would have is some of the screenshots are too small to see. I had only just realized that you can click on the pictures to enlarge them.
September 20, 2018 @ 23:29
Hello Thomas,
Thanks for the feedback.
The site is simple but hopefully effective. Since this is predominantly a site where people come for information, we try to keep things laid out as simple as possible.
We understand what you mean about some screenshots being a bit small to see from a desktop without enlarging them, but when you make a website that is wide enough to fix that problem, we find that it creates some other problems, so it’s a bit of a trade-off. The way things are now we feel gives the best user experience, and when you need to enlarge the images you can.