Last Updated on December 24, 2022 by Mat Diekhake
The following tutorial demonstrates how to view and set the number of days that it’s possible to to go back to the previous version of Windows after having installed another Windows update when using a version of the Windows 11 operating system.
You don’t always get a lot of space on a hard drive to support a lot of video files, but one of the reasons you can’t have a hard drive that is too small in its capacity size is because the Windows operating system needs to take up a considerable amount of space not just for the software that runs the OS but for storing copies of backups as well.
To make things as simple as possible for the end-user, Windows puts space on the hard drive aside all by itself and uses some of that space daily for backing up your operating system without you needing to know or do a thing. The backup of your operating system is stored in File Explorer and can be found by navigating to the Windows.old folder in the root directory of the Windows 11 drive. This backup is only stored for 10 days after a new software update has been installed, which is deemed enough time for anyone experiencing some obvious problems to troubleshoot and go back to the previous version.
Though 10 days doesn’t sound like a considerable amount of time, one must look at the frequency of these Windows updates before determining whether or not the time the backups are held needs changing. But should you ever wish to change the time period the backups are stored from the default 10 day period, you can do that from the Command Prompt or Windows PowerShell in Windows 11.
Part One: How to View Current Number of Days after Upgrade It’s Possible to Go Back to Previous Version of Windows
You can view the current number of days that you can go back to a previous version of Windows after having installed another update from the Command Prompt or Windows PowerShell window. Here is how to do that:
1. Open the elevated Windows Terminal app and open a new tab for either the Command Prompt or Windows PowerShell. See this tutorial for all the different ways in which you can open the elevated Windows Terminal when using a version of the Windows 11 operating system: How to Open Elevated Windows Terminal as Administrator in Windows 11 [Tutorial].
2. Type the following command into the command line and then press the Enter key on your keyboard to execute the command:
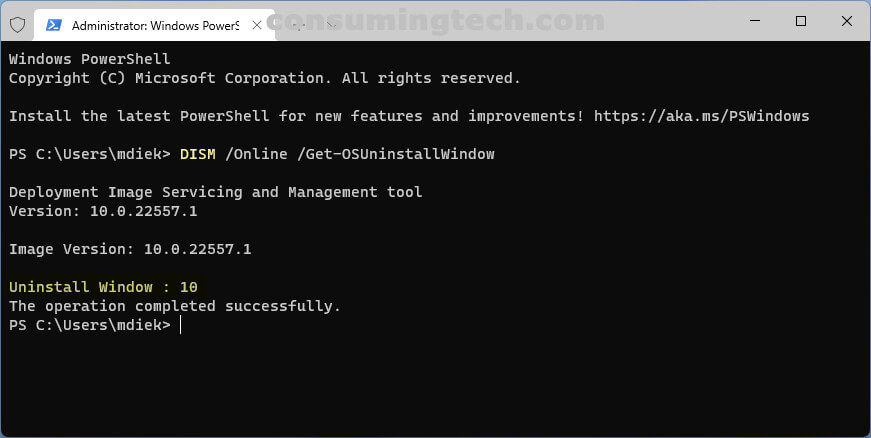
DISM /Online /Get-OSUninstallWindow
3. In the same command window it will now return the results of the number of days that Windows 11 is set to store the previous update.
Part Two: How to Set Number of Days after an Upgrade It’s Possible to Go Back to Previous Version of Windows
You can set the current number of days that you can go back to a previous version of Windows after having installed another update from the Command Prompt or Windows PowerShell window. Here is how to do that:
1. Open the elevated Windows Terminal app and open a new tab for either the Command Prompt or Windows PowerShell. See this tutorial for all the different ways in which you can open the elevated Windows Terminal when using a version of the Windows 11 operating system: How to Open Elevated Windows Terminal as Administrator in Windows 11 [Tutorial].
2. Type the following command into the command line and then press the Enter key on your keyboard to execute the command:
DISM /Online /Set-OSUninstallWindow /Value:<days>
Note: You need to substitute the <days> part of the command with the actual number of days — which can be between 2 and 60 — in this location. For example: DISM /Online /Set-OSUninstallWindow /Value: 20.

In conclusion, that’s how to view and set the number of days that it’s possible to go back to the previous version of Windows after having installed another Windows update in Windows 11.
Related Articles
- How to Enable/Disable Website Access to Language List in Windows 11 [Tutorial]
- How to Enable/Disable Reload in Internet Explorer Mode in Microsoft Edge [Tutorial]
- How to Disable Modern Standby in Windows 11/10 [Tutorial]
- How to Enable/Disable Suggested Content in Settings in Windows 11 [Tutorial]
- How to Add/Remove Internet Explorer Mode Button on Toolbar in Microsoft Edge [Tutorial]
- How to Change Maximum Number of Items in Jump Lists in Windows 11 [Tutorial]
- How to Turn On/Off Show Accent Color on Title Bars/Windows Borders in Windows 11 [Tutorial]