Last Updated on December 26, 2022 by Mathew Diekhake
The DNS cache, aka the DNS resolver cache, found in Windows 10 is a temporary database that is, in most cases, managed and maintained by the Windows operating system. There may be times, however, when you need to flush the DNS cache to resolve issues such as “website not found” errors or not being able to view up to date versions of webpages.
Why the DNS Cache Exists
Each website has its own IP address. The Domain Name System (DNS) stores an index of all public sites and their IP addresses, so you don’t have to remember these yourself manually. Without knowing the IP addresses your network would not be able to communicate with the websites or get them to load.
Storing the DNS information is done automatically by your web browser when you surf the Web. And for most people, they’ll never need to know anything about the cache. For others, it’ll take some flushing now and then to make sure that what you see on your computer’s display is the same version of the website that the website owners have currently up and running—most notably if you’re running a website yourself, you may find your web host asking you to flush your DNS cache to make sure everything looks in perfect working order on your side of the fence before they make a new web server go live to the world.
The following tutorial demonstrates how to reset the DNS cache when you’re using a version of the Windows 10 operating system.
How to Flush and Reset DNS Cache from Run Dialog Box
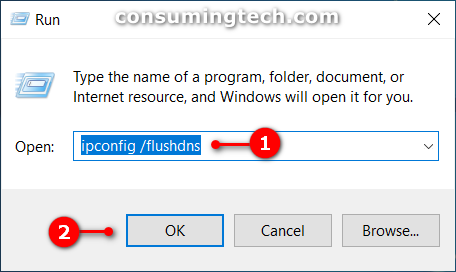
Here is how you can flash and reset the DNS cache from Run in Windows 10:
1. Press the Windows logo + R keys to open the Run dialog and then type ipconfig /flushdns and tap/click on the OK button. (click to enlarge screenshot below)
The DNS cache is now flushed.
Flush and Reset the DNS Cache from Command Prompt
1. Open a Command Prompt window.
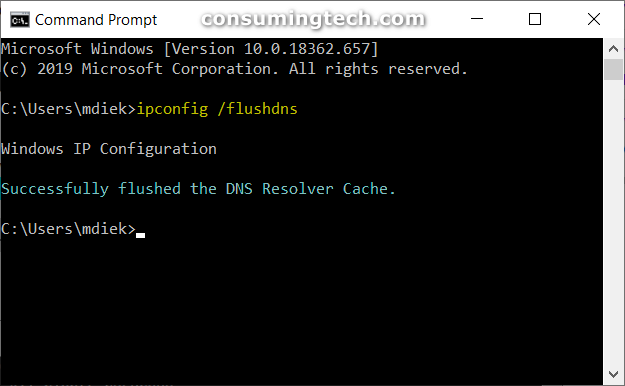
2. Type the ipconfig /flushdns command into the command line and then press the Enter key to execute it. (click to enlarge screenshot below)
The DNS cache is now flushed. If you get an error, such as the “Could not flush the DNS Resolver Cache: Function failed during execution” error, make sure that the DNS Client service is enabled and running.
You can now close the Command Prompt window and expect to find the DNS cache flushed.
That’s it.
Related Tutorials
- How to Clear Cache in Google Chrome
- How to Show Hidden Files in Windows 10
- How to Open Folder Options in Windows 10
- How to Create Bootable USB Flash Drive to Install Windows 10
- How to Move Location of Game DVR Captures Folder in Windows 10
- How to Create System Information File in Windows 10
- How to Exclude Folders from File History in Windows 10
- How to Turn Windows Features On/Off in Windows 10


