Last Updated on October 2, 2024 by Mat Diekhake
The most obvious reason you may want to rename a PC is because you have more than one of them and you want to easily identify which one it is that are you currently using or about to use. Other people simply want to rename their computers after themselves rather than letting them keep their automatically assigned names which are more the equivalent of R2-D2 than a typical human name.
To rename your PC in Windows 11, follow these steps:
Method 1: Using Settings
1. Open Settings: Press Windows + I or click the Start button and select Settings.
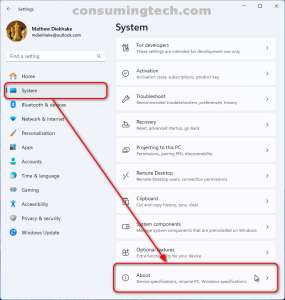
2. Go to System: In the left-hand menu, select System.
3. Select About: Scroll down and click on About at the bottom of the list.
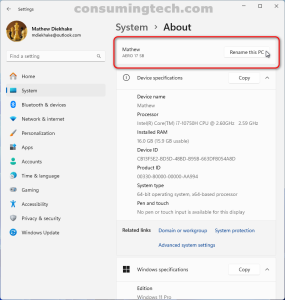
4. Rename your PC: In the Device Specifications section, click on the Rename this PC button.
5. Enter New Name: A dialog box will appear asking you to enter a new name for your PC. Type the desired name and click Next.
6. Restart to Apply: You will be prompted to restart your PC. Click Restart Now or Restart Later.
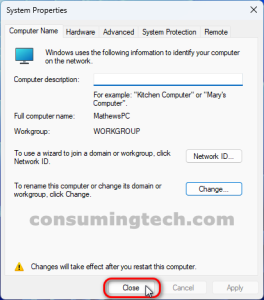
Method 2: Using System Properties
1. Open Run: Press Windows + R to open the Run dialog box.
2. Type sysdm.cpl: Enter sysdm.cpl and press Enter to open System Properties.
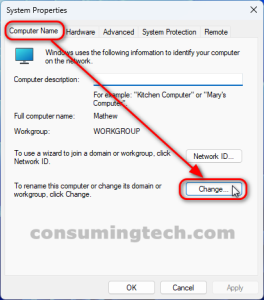
3. Go to Computer Name Tab: In the System Properties window, go to the Computer Name tab.
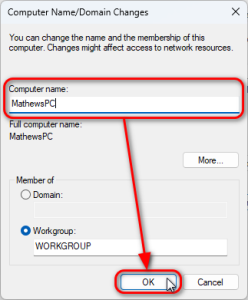
4. Rename the PC: Click on the Change button, then enter the new name in the Computer Name field.
5. Apply Changes: Click OK and you will be prompted to restart your computer.
In conclusion, that is how to rename your PC in Windows 11.

