Last Updated on September 23, 2022 by Mathew Diekhake
The Local Group Policy Editor is a simplified version of the Group Policy that you can use for standalone and computers that are not associated with domains. The Local Group Policy Editor has been available for all the business versions of the Windows operating system since Windows XP.
The following tutorial demonstrates how to open the Local Group Policy Editor in all version of the Windows 10 operating system. You can follow this guide to find out how to open the Local Group Policy Editor for all users, specific users and groups, and all users except for administrators.
Method One: How to Open Local Group Policy Editor in Windows 7 (All Users)
You can open the Local Group Policy Editor from the Run dialog in Windows 7. Here is how to do that:
Note: You can use this method for all users aka this is the method you use when you’re just looking to open the Local Group Policy Editor without it needing to be for specific users or groups.
1. Open the Run dialog by typing Run into the search field in the Start menu and then click on the Run program in the list of results.
2. Type gpedit.msc into Run and click on the OK button.
3. If you get notified by User Account Control, click on the Yes button.
4. You can use the left pane in the Local Group Policy Editor to configure the Group Policies how you want them.
Method Two: How to Apply Local Group Policies to Specific User or Group in Windows
You can apply a local group policy for a specific user or group if you have a user or group that you want to have different permissions from the rest. Here is how to do that:
1. Open the Microsoft management Console by typing mmc.exe into the search field in the Start menu and then click on the mmc program that appears in the list of results.
2. If you get notified by User Account Control, click on the Yes button.
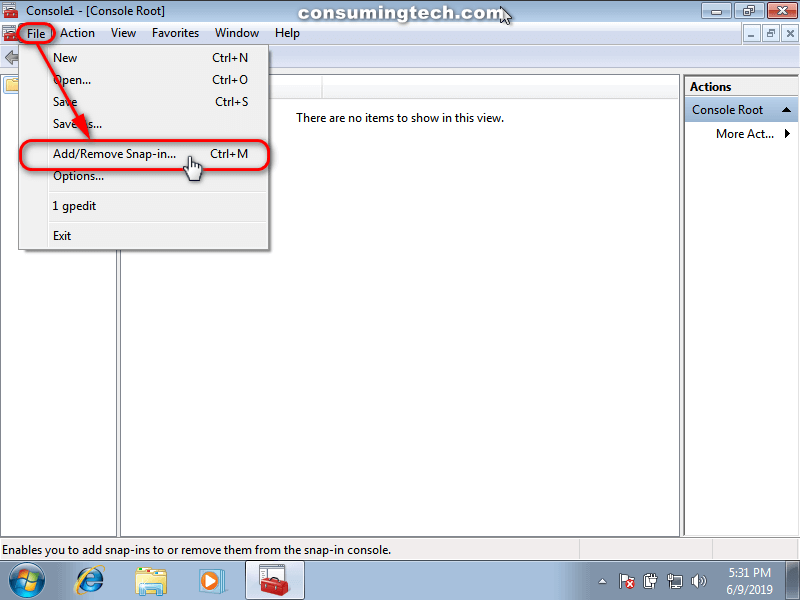
3. From the Microsoft Management Console window, click on File in the menu and then click on Add/remove snap-in.
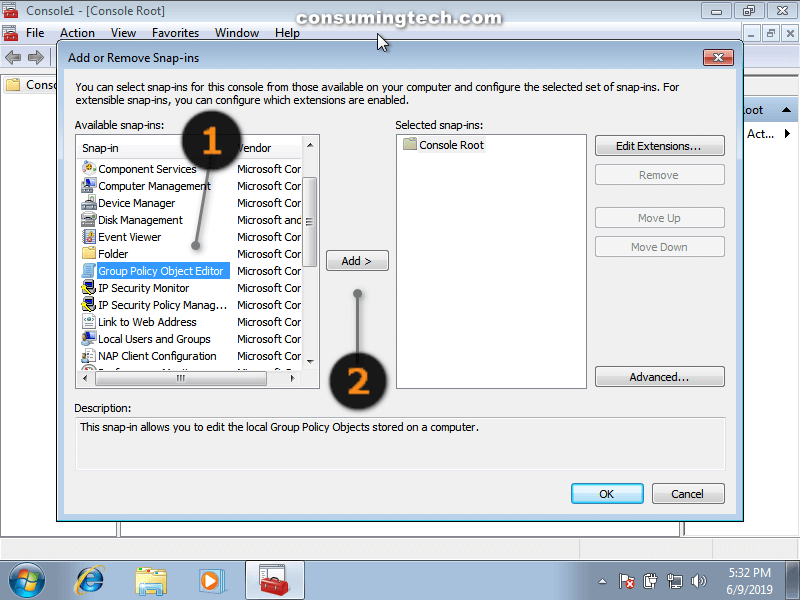
4. In the left field of the snap-in, scroll down the list and select Group Policy Object Editor, and then click on the Add button in the middle of the window.
5. From the Group Policy Object wizard, click on the Browse button.
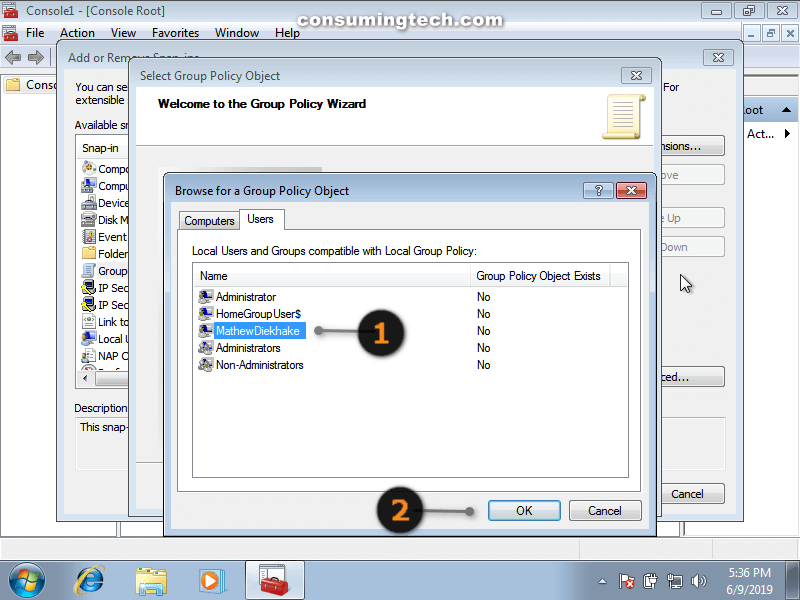
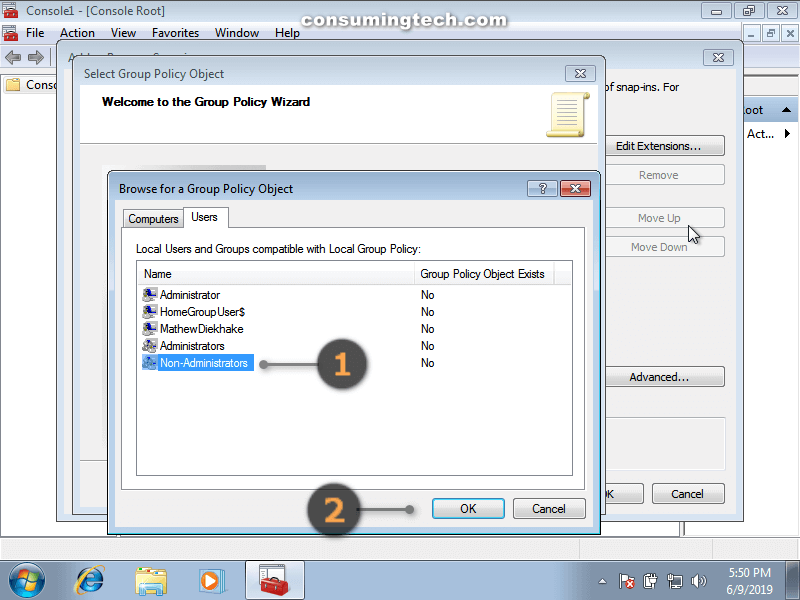
6. Click on the Users tab and then from the list of users and groups, select the user account or group you want to have the group policy applied for, and then click on the OK button.
7. Click on the Finish button.
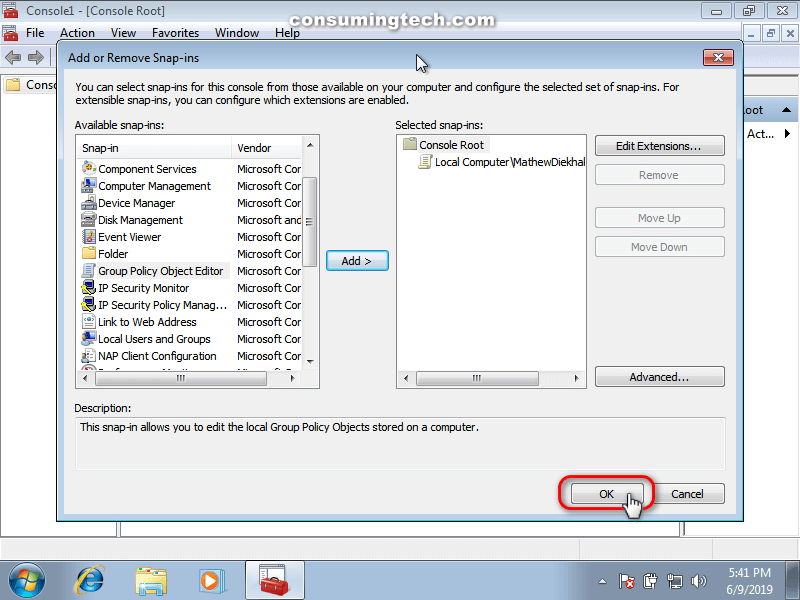
8. Click on the OK button.
9. From the main Microsoft Management Console window, click on File and then Save As.
10. Choose the location that you want to save your group policy on the computer.
Select the Desktop if you’re unsure. It will then save to the desktop so you don’t have to try finding it in Windows Explorer.
Now whenever you open that particular Group Policy, the changes will be made for the users or groups that you selected when you created it.
Method Three: How to Apply Local Group Policies to All Users Except Administrators
To help simply things, you can create a local group policy for all users with the exception of administrators. Here is how to do that:
1. Open the Microsoft management Console by typing mmc.exe into the search field in the Start menu and then click on the mmc program that appears in the list of results.
2. If you get notified by User Account Control, click on the Yes button.
3. From the Microsoft Management Console window, click on File in the menu and then click on Add/remove snap-in.
4. In the left field of the snap-in, scroll down the list and select Group Policy Object Editor, and then click on the Add button in the middle of the window.
5. From the Group Policy Object wizard, click on the Browse button.
6. Click on the Users tab and then from the list of users and groups, select the user account or group you want to have the group policy applied for, and then click on the OK button.
7. Click on the Finish button.
8. Click on the OK button.
9. From the main Microsoft Management Console window, click on File and then Save As.
10. Choose the location that you want to save your group policy on the computer.
Select the Desktop if you’re unsure. It will then save to the desktop so you don’t have to try finding it in Windows Explorer.
Now whenever you open that particular Group Policy, the changes will be made for the users or groups that you selected when you created it.
That’s all.


