Last Updated on February 25, 2024 by Mat Diekhake
Arguably the most dramatic change of all in Windows 11 compared to its predecessor is the taskbar and its associations. Gone is the symbolic left-aligned Start button Windows users have been accustomed to since Windows began with some brief exceptions—now it has been center-aligned to match macOS—though it is possible to customize it back into place.
Additionally, you can no longer click and drag the taskbar itself to the alternative three sides of the computer’s display as you could in previous versions of Windows. This feature change surprised me as I had just seen a working professional last year working from a 14-inch laptop, who needed the taskbar to be on the side of the screen or else it would eventually cause conflicts with the rest of her computer usage.
This tutorial demonstrates how to move the taskbar in a version of the Windows 11 operating system.
How to Move Taskbar Windows 11
There are two ways you can move the taskbar in Windows 11. The first and most obvious is to move the taskbar icons. Moving the icons is popular because the icons used to be left-aligned in Windows 10, which means many people want to go back to the left-aligned icons that they loved. The second way to move the taskbar is to move the entire bar itself to a different location. The taskbar used to shift with a click and drag on the corner of it, and you could move it around the computer screen, to all four sides. However (probably because so many people would accidentally move it and not know how to move it back), this feature has been removed. You can still move the taskbar, but it requires a registry change in the Registry Editor app. Here is how to do both of those taskbar tweaks in Windows 11:
Part One: Moving Taskbar Icons in Windows 11
You can change the location of the taskbar icons, as well as perform numerous other taskbar tweaks, from the Settings app in Windows 11. Here is how to do that:
1. Open the Settings app.
2. Click on the System category.
3. From System’s left menu, click Personalization. And then from the right side of the same window, click the arrow next to Taskbar behaviors. Here you will find various taskbar settings that can be tweaked, including the following:
- Taskbar alignment
- Optimize the taskbar for touch interactions
- Automatically hide the taskbar
- Show badges on taskbar apps
- Show flashing on taskbar apps
- Show task on all displays [when there are multiple]
- Show recent searches
- Share any window from the taskbar
- Select the far right corner to show the desktop when clicked

Part Two: Moving the Taskbar Itself around the Screen
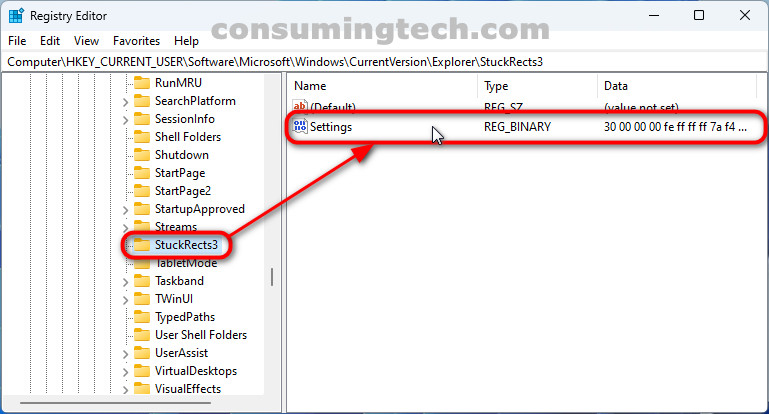
You can move the entire taskbar to one of the other three sides of the computer’s ddisplay instead of keeping it in its default location (the bottom of the screen) by making a registry tweak in the Registry Editor app. Here is how to do that:
1. Open the Registry Editor app.
2. Using the Registry keys in the left pane, click through to the following path:
HKEY_CURRENT_USER\Software\Microsoft\Windows\CurrentVersion\Explorer\StuckRects3
3. Double-click on the Settings binary key.
4. You now need to chnage the binary numbers to move the taskbar around the screen. Choose one of the following changes:
- To move the taskbar to the top: Change the second row and sixth column from 03 to 01
- To move the taskbar to the right: Change the second row and sixth column from 03 to 02
- To move the taskbar to the left: Change the second row and sixth column from 03 to 00
- To move the taskbar to the bottom: Change the second row and sixth column back to 03 (default)
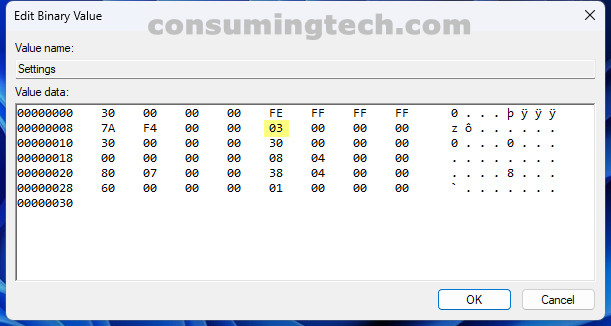
The Value data dialog, click OK to save the changes and then close the Registry Editor app.