Last Updated on April 1, 2017 by Mathew Diekhake
Just like with our smartphones, desktop computers, laptops and Surface RT + pro tablets can be factory reset. We usually apply a factory reset if we have underlying problems that we cannot find solutions for, or we don’t have time to mess around with finding them. If you are suffering from bugs within your Windows XP, Windows 7, Windows 8 or 8.1 operating system, you can apply a factory restore and fix the problem.
The only issue with taking the master reset option with Windows is you lose the data unless you back it up before applying the reset. if you do backup the data you can restore that same data and you don’t lose anything. However, failing to remember to backup will result in that data lost forever.
The excellent news here is the program we are using today called AOMEI OneKey Recovery gives us a backup option so you don’t need to learn how to backup your machine. Just start following the guide and backup the data when you get to that point.
In fact, the way it works is by restoring the Windows OS back to the backed up version and not by factory resetting like you would normally do with a smartphone. To be clear, smartphones need a backup made, followed by applying the factory reset button. A Windows computer need a backed up restore point that we can wind the clock back and use if our current operating system has a failure.
How to factory restore Windows 8.1, Windows 8 and Windows 7, Windows Vista and Windows XP with a system recovery partition
- Download the AOMEI OneKey Recovery tool.
- Extract the file (unzip the file) to the Windows computer that you want to create the factory restore partition.
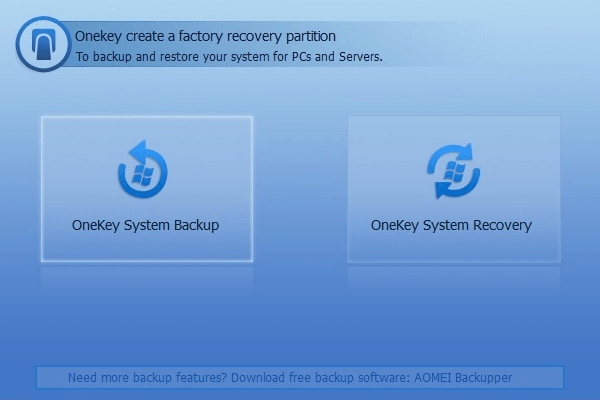
- Once you run the tool, you’ll be greeted with the screenshot below:

- Choose the Onekey system backup to backup your data before creating the reset.
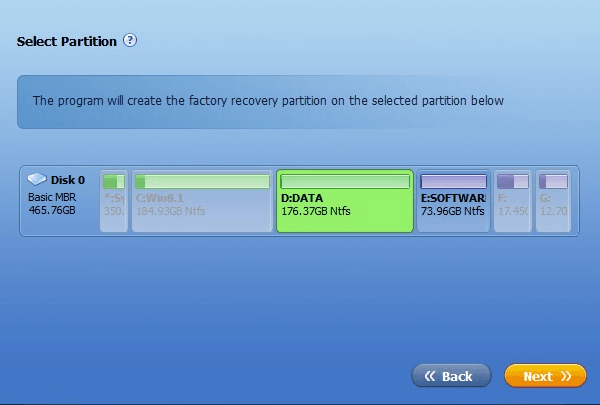
- Choose the partition where you want to create the factory recovery partition on your computer. You must have enough space on your disk for this step to work.
- Click the “Next” button from the bottom right right corner.

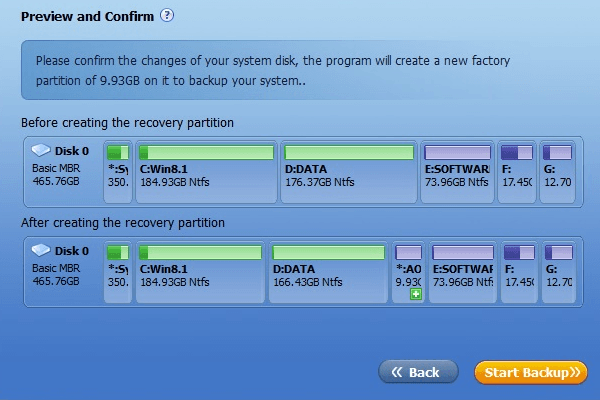
- The next screen requires you to confirm your choices. Once done, it will create the new factory partition and backup the current OS the way it is so you can restore the current version in the future if you need it.
- Click the “Start Backup” option from the button right corner of the screen.

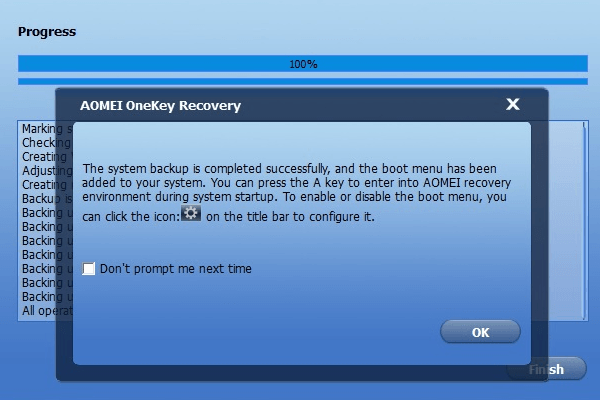
- Your backup is complete; thus allowing you to boot into the new partition and recover your computer when needed. Any future problems you have with Windows will still allow you to boot the computer. It;s during this booting process that you must key the “A” key on the keyboard and it will direct you through to restoring the AOMEI OneKey Recovery we just completed.
- You can see that in detail from the screenshot below:

