Last Updated on December 24, 2022 by Mathew Diekhake
If you want to browse the Web anonymously in Windows 7, you can do that from InPrivate browsing mode in Internet Explorer. InPrivate Browsing is a unique mode to Internet Explorer. If you are using a different web browser, the way to browse privately will be different. For instance, Google Chrome comes with an Incognito mode, which is by and large the same thing.
When you load a webpage in Internet Explorer’s InPrivate Browsing mode, the extensions are disabled by default. You won’t get any toolbars either. This is because InPrivate Browsing is often used to troubleshoot web browsers which can only be done with all add-on are disabled. Furthermore, InPrivate Browsing mode does not collect your history, but when you have toolbars and extensions, they do continue to collect data. If you want, though, you can still enable toolbars and extensions for your InPrivate Browsing habits if you want to use them.
The following tutorial demonstrates how to enable and disable toolbars and extensions when you are using the Internet Explorer web browser in InPrivate browsing mode.
Method One: How to Transfer All Extensions and Toolbars You Have Enabled in Internet Explorer for InPrivate Browser Mode
Using this method will transfer all the same browser extensions and toolbars that you were using in Internet Explorer without the InPrivate Browsing mode window so you can also have them within the InPrivate Browser mode window.
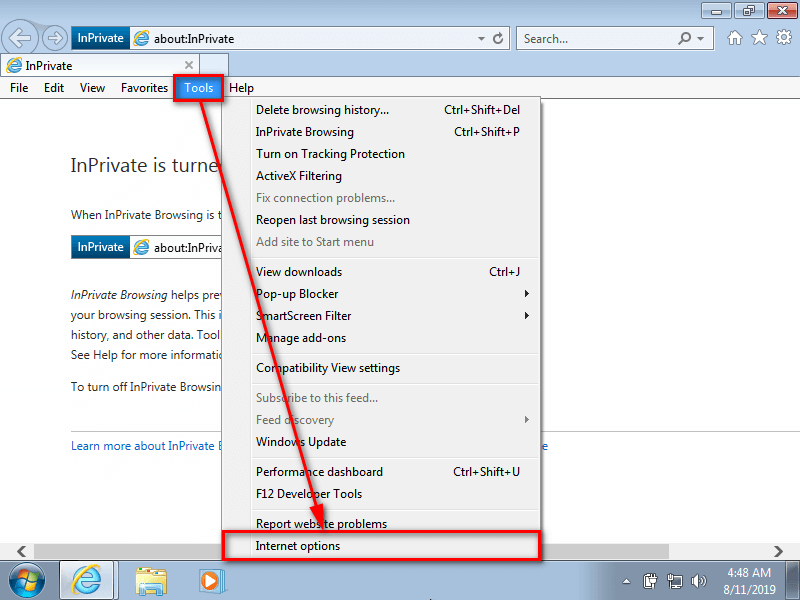
1. Open the Internet Explorer web browser and then click on the Tools link from the Menu bar.
You will need to enable the Menu bar if you have not enabled the toolbar already. To do that, press the alt key, and then click on View > Toolbars > Menu bar.
2. From the Tools drop-down menu, click on Internet Options to open the Internet Options dialog. (click to enlarge screenshot below)
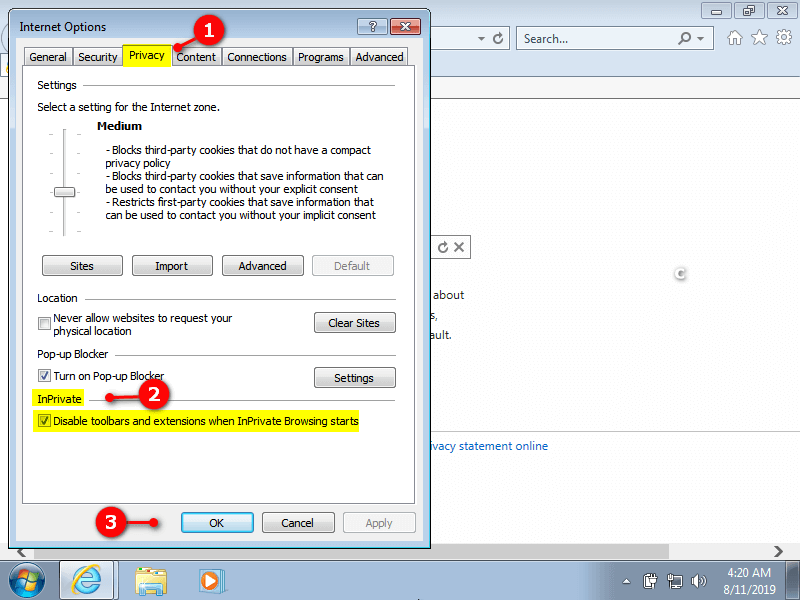
3. From the top of the Internet Options dialog, click on the Privacy tab.
4. Check or uncheck the box next to where it says Disable toolbars and extensions when InPrivate starts at the bottom of the Internet Options dialog depending on what you want to achieve.
5. Click on the OK button at the bottom of Internet Options to save the changes and close the dialog. (click to enlarge screenshot below)
You can now continue using your computer if you like.
Method Two: How to Enable and Disable Individual Extensions and Toolbars in InPrivate Browser Mode
Using this method allows you to enable and disable each individual browser extensions and toolbar to use in Internet Explorer’s InPrivate Browser mode.
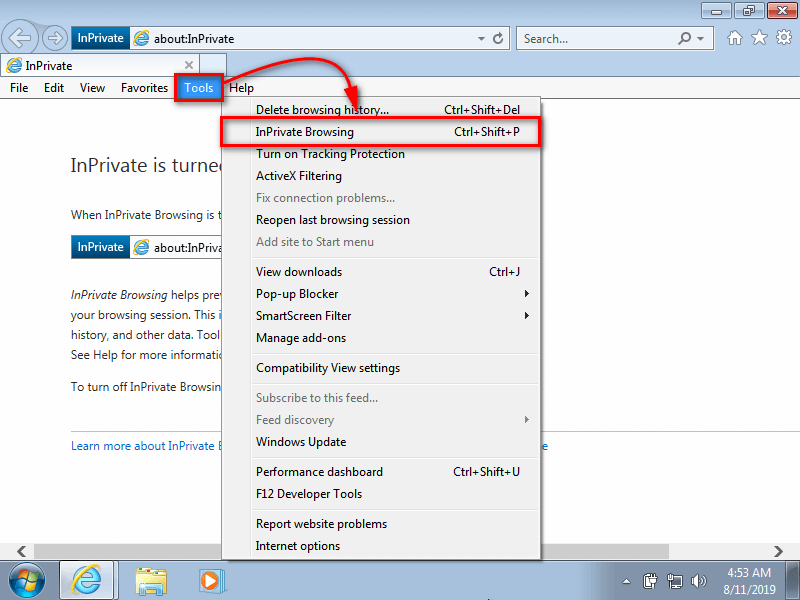
1. Open the Internet Explorer web browser and then click on the Tools link from the Menu bar.
You will need to enable the Menu bar if you have not enabled the toolbar already. To do that, press the alt key, and then click on View > Toolbars > Menu bar.
2. From the Tools drop-down menu, click on the InPrivate Browsing link. (click to enlarge screenshot below)
That’s all.
Related Tutorials
- How to Set Default Accelerator in Internet Explorer in Windows 7
- How to Fix Startup Repair Loop in Windows 7 without Reinstalling Operating System
- How to Install Windows 7 Using Unified Extensible Firmware Interface (UEFI)
- How to Turn On/Off Backup Files Schedule in Windows 7
- How to Create Bootable UEFI USB Flash Drive for Installing Windows 7, Windows 8, Windows 8.1
- How to Use ‘Find on this Page’ in Internet Explorer in Windows 7
- How to View Reliability and Problems History Details in Windows 7
- How to Change Windows Firewall Notification Settings in Windows 7
- How to Show Services Running Under svchost.exe in Windows 7
- How to Use Personal and Public User Folders in Libraries in Windows 7


