Last Updated on December 24, 2022 by Mathew Diekhake
The following tutorial demonstrates how to enable and disable pinned and unpinned items on Jump Lists when using a version of the Windows 11 operating system.
Jump Lists are a feature that has been with Windows well before Windows 10 came out. They’re certainly a niche feature but lots of Windows enthusiasts use them, including me.
Before Windows 10, you could change the number of items to show up on the Jump List. Once Windows 10 arrived, however, you could only make that tweak via the Registry Editor, aka Microsoft has clearly not intended for the average Windows user to choose their own Jump List numbers anymore. Windows 11 follows on from the Windows 10 tradition of not allowing much customization surrounding these Jump Lists, but one of the things you can do is pin as many items as you want to them. If you don’t want anyone to be able to pin or unpin items on the Jump Lists anymore, Microsoft has made it possible to take that ability away via the Registry Editor as well.
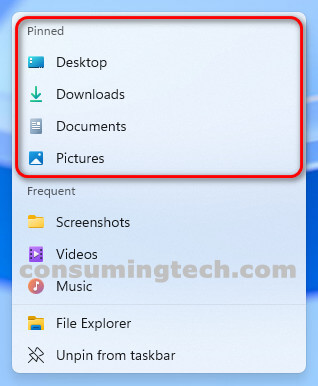
An example of a Jump List in Windows 11:
How to Enable/Disable Pinning Items on Jump Lists for All/Individual Users in Windows 11
You can enable and disable the option to pin and unpin Jump List items via the “Do not allow pinning items in Jump Lists” policy in the Local Group Policy Editor. Here is how you can do that:
1. Open the Local Group Policy Editor. See this tutorial for all the different ways in which you can open the Local Group Policy Editor in Windows 10/11: How to Open Local Group Policy Editor in Windows 10/11 [Tutorial].
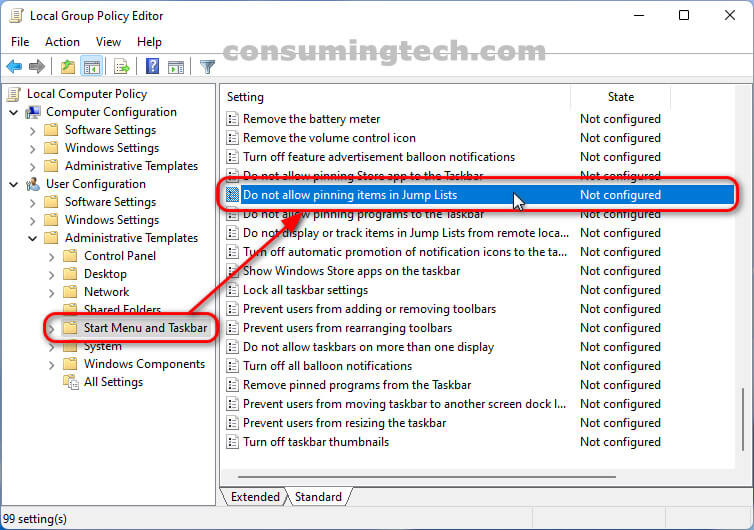
2. Using the Local Group Policy Editor’s left pane, navigate through to the following policy location:
User Configuration/Administrative Templates/Start Menu and Taskbar
3. With Start Menu and Taskbar selected, double-click on Do not allow pinning items in Jump Lists in the right pane of the same window.
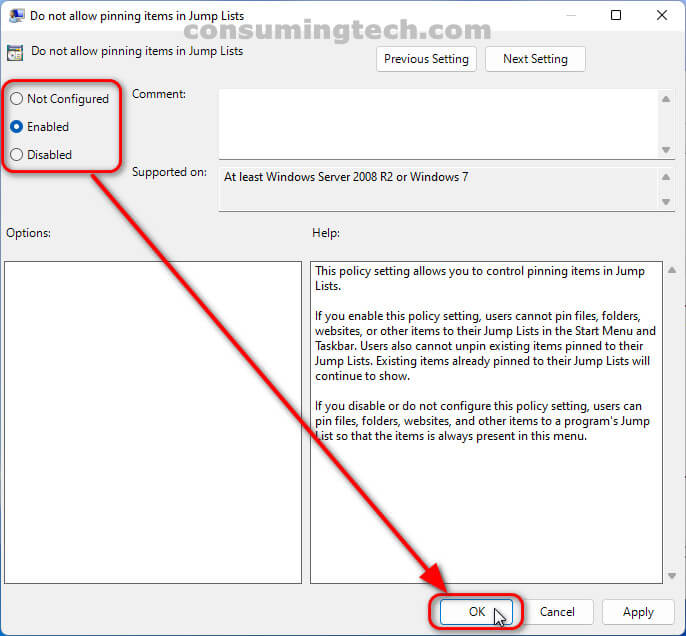
4. From the Do not allow pinning items in Jump Lists policy window, click on either Not Configured (to enable pinning items), Enabled (to disable pinning items), or Disabled (to enable pinning items), and then click on the OK button at the bottom of the policy window.
In conclusion, that is how to enable and disable the pinning and unpinning of items on Jump Lists in Windows 11.
Related Tutorials
- How to Open Settings in Windows 11 [Tutorial]
- How to Turn On/Off Tamper Protection for Microsoft Defender Antivirus in Windows 11 [Tutorial]
- How to Add/Remove Quick Access in Navigation Pane of File Explorer in Windows 11 [Tutorial]
- How to Open Elevated Windows Terminal as Administrator in Windows 11 [Tutorial]
- How to Open Windows Security in Windows 11 [Tutorial]
- How to Enable/Disable Periodic Scanning in Microsoft Defender Antivirus in Windows 11 [Tutorial]
- How to Enable/Disable Cloud-Delivered Protection for Microsoft Defender in Windows 11 [Tutorial]
- How to Open Quick Settings in Windows 11 [Tutorial]
- How to Set Up Fingerprint Recognition Sign-in for Account in Windows 11 [Tutorial]
- How to Open Power User Menu in Windows 11 [Tutorial]


