Last Updated on December 24, 2022 by Mathew Diekhake
The following tutorial demonstrates how to enable and disable the Notification Area system icons when using a version of the Windows Vista operating system.
The Notification Area in Windows Vista is the area that displays the time and date in the taskbar. After first starting to use Vista, the area is quite bland but can grow to show you all the different programs that are currently running on your computer once you have started installing them. By default, this extra section for currently running programs in the Notification Area shows nothing but Windows security alerts if there are any for your computers, and the rest of the icons will show up after you run the programs.
By default, there are four system icons in the Notification Area: the time and date, the volume, the power, and the network information. Vista allows you to turn on and off any of these four system icons via the Taskbar and Start Menu Properties dialog (shown in the example below), but you can also disable these system icons completely so they will be grayed out instead. With the system icons grayed out, no longer will a user be able to open the Taskbar and Start Menu Properties dialog and turn them on.
When you right-click on the Notification Area icons and select Properties from the context menu, you will see the option to manually turn on and off the individual system icons. It is not known why Vista refers to these as system icons still but it’s likely related to the fact that the Notification Area used to be known as the System Tray.
An example of the system icons that can be turned on and off from the Taskbar and Start Menu Properties.
How to Enable/Disable Notification Area System Icons via Local Group Policy Editor
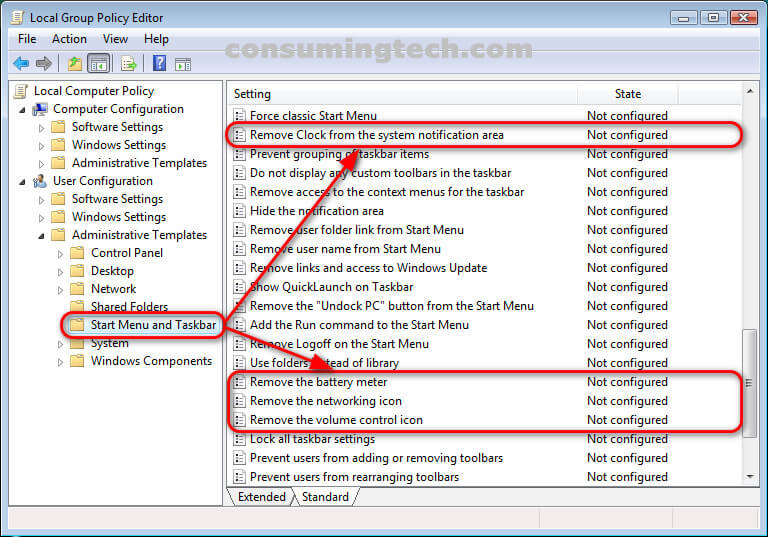
You can enable and disable the Notification Area system icons by changing the group policy for each which is done in the Local Group Policy Editor. Here is how to do that:
1. Open the Local Group Policy Editor.
2. Using the Local Group Policy Editor’s left pane, navigate to the following folders:
User Configuration\Administrative Templates\Start Menu and Taskbar
3. On the right side of the same window, click on each of the following policies and open them:
- Remove clock from the system notification area
- Remove the battery meter
- Remove the networking icon
- Remove the volume control icon
4. With each of the aforementioned policy dialog opens, select Enabled and then click on the OK button at the bottom of the policy window.
You can now close the Local Group Policy Editor and open the Taskbar and Start Menu Properties to check that each of the system icons is grayed out.
How to Enable/Disable Notification Area System Icons via Registry Editor
You can enable and disable the Notification Area system icons from the registry as well. Here is how to do it that way:
1. Open the Registry Editor.
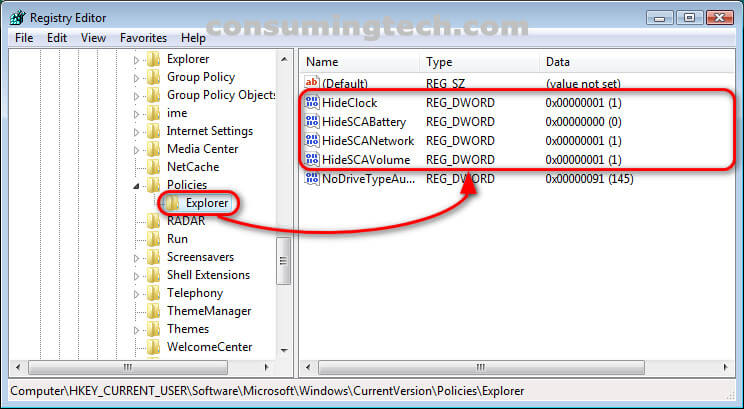
2. Using the registry keys in the Registry Editor’s left pane, navigate through to the following path:
HKEY_CURRENT_USER\Software\Microsoft\Windows\CurrentVersion\Policies\Explorer
3. With Explorer expanded click on any or all of the DWORD values that have the world “hide” in it, depending on which system icons you want to be enabled or disabled from the Notification Area.
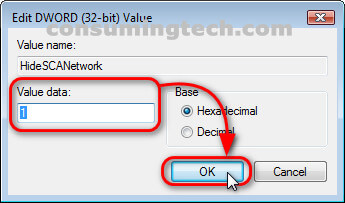
4. When you have the DWORD dialogs open, change the Value data to 1 and then click on the OK button to save the changes and close the dialog.
In conclusion, that is how to enable and disable the Notification Area system icons when using Windows Vista.


