Last Updated on February 25, 2024 by Mat Diekhake
To ramp up security and to get people accustomed to working with user accounts, Microsoft included a lock screen in the Windows 10 operating system. Those who didn’t like having the lock screen were then able to remove it from the computer by using a Group Policy or from the Registry if they really wanted the lock screen gone—and that they did as many people were found removing the lock screen by accessing one of those two things.
In the latest Windows 10 updated dubbed the Anniversary Update, Windows developers have removed the chance for you to disable the lock screen from Group Policy and the Registry which then looked like there was going to be no way to remove the lock screen from your computer that is running on the Windows 10 Anniversary Update.
Thanks to the work from a third-party developer that has now changed, and you can remove the lock screen in the Windows 10 Anniversary Update after all by using a third-party application on your computer appropriately named LockScreenGone.
Disabling the lock screen on the Windows 10 Anniversary Update by installing the LockScreenGone app on the computer
Download the LockScreenGone file from the official download source on the MDL forum and then extract the file on the computer. (You need to create an account on the MDL forum before you can download the link which might at worst sign you up for a newsletter that you need to unsubscribe from if you ever get an email).
Alternatively, you can install the LockScreenGone utility zip file called the LogonController Patch.
Extract the LogonController package to the Downloads folder on the computer (unless you have changed what the default download location of your files is when you go to find them).
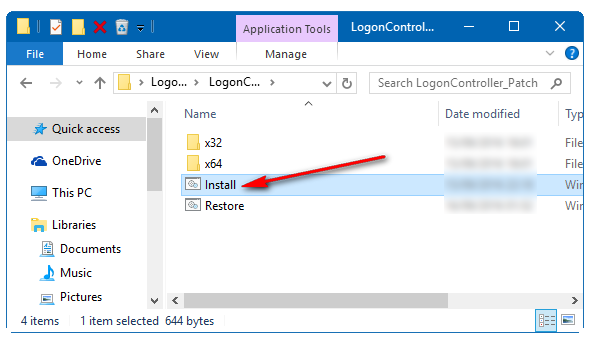
Once extracted, you will see the same as the screenshot below. Click on the “Install” button to run it. (Make sure you are running the tool as an administrator by right-clicking on the file first and then selecting to run it as the admin).
A command prompt window then opens, and it automatically installs the tool on the computer for you. You can tell when it’s done the job by observing the “Successfully processed 1 files” message in one of the lines.
Those of you who want to restore the lock screen on Windows 10 can run the Restore.cmd file that is available from the same LogonController package that you downloaded (or visit this page to download the link again).
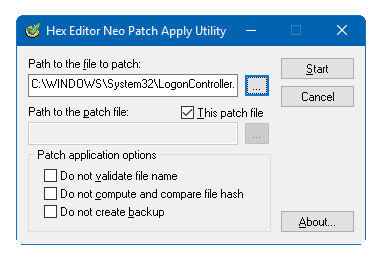
There’s no telling whether or not a new Windows 10 update in the future will prevent this tool from working. If that does happen, the same tool can work for you again—and you don’t have to download and install it all over again. You can get it working from the same folder that is on the computer already. All you need to do is open up the x32 or x64 folder depending on your version of the operating system (most computers run 64-bit processors these days if you don’t know yours), and run LogonController_Patch file under where it says “Patch to the file to patch.” Navigate to C:\Windows\System64 on the computer and then choose the LogonController.dll file and click on it to open it up.
That is everything you need to disable the lock screen after the Windows 10 Anniversary update that Microsoft has rolled out to most computers around the world these days.
You might also be interested in:
- Change Number of Items in Jump Lists with Windows 10
- How to View Recently Used Files from Programs in Windows 10
- How to Change Default Windows Video Player in Windows 10
Have something to say? You can contribute to this tech article by leaving a comment below.


