Last Updated on February 25, 2024 by Mat Diekhake
One thing you should always do before choosing to buy a new computer is research what kind of monitor that computer is offering. You might think you’ve found a good deal on a computer because it is made by the manufacturer you really wanted, has most of the hardware requirements that you wanted, and the outer shell looks nice and pretty, but it might be old monitor screen technology that is on offer in the computer. For instance, at the moment you want to be looking at something that has probably at least a 3K display if you are buying something new and not on a limited budget, but a lot of people don’t know that. So when you enter a store trying to sell you things, take a guess at what these salesmen are going to push to you? The computer with a 1080p display that “works really well” and is “really fantastic” because their job is to get rid of the stock that is in the store and not do what it is in your best interest you like you might have originally thought.
Some people might say there isn’t any real need for having a computer monitor that has such a high-resolution because most of the things you view on that screen aren’t showing at that resolution anyway. For example, if you were to buy a smart TV that has a 4K display, but you bring it home, and the quality of footage coming from the TV network is only 1080p. Does that make it useless? It makes it useless for now, but you aren’t buying it for now. You are probably buying it because your old one broke or is no longer good enough in a particular area, so you are looking to make a sound investment. The 4K display that isn’t all that useful right now is going to be that good investment because you will be making use of it in under a few years if not for some things already.
Your computers display (or monitor as its known better to some) has lots of single pixels that make up that completed display. DPI stands for “dots per inch, ” and it is referring to how many pixels are being shown per linear inch. It’s always good to have a monitor with outstanding DPI capabilities, but you might not always want to use it to its maximum ability all the time.
There are several factors you need to understand before choosing what your DPI should be for a monitor. Most people want to look at the best quality picture which would mean raising the DPI so that there are more pixels within an inch. However, you can only do that if your monitor can support the DPI you are asking for, and if you are happy with the additional resources it is using for it to offer you the higher DPI. For example, if you have a higher DPI and your hardware isn’t able to support it, the images you see can start lagging because it’s unable to keep up. Also, even if your hardware is capable of handling your DPI of choice, it might be using up more battery power than you would like. So, if you are someone who uses a laptop away from a power cable, for instance, a lower DPI setting might be more suitable so you can continue using the laptop without it running out of battery. To help make things easier for the end-user like yourselves, Microsoft offers a “Recommended” setting for the DPI so you don’t have to take a stab in the dark at what would be best for your computer. That said, just because that’s the recommended setting for your monitor doesn’t necessarily mean it’s what it would recommend for you if it were following you around all day. The recommendation is based on what it knows about your resolution and screen capabilities; not what you like to do in your life.
How to Change DPI Scaling Level for Displays From Settings App
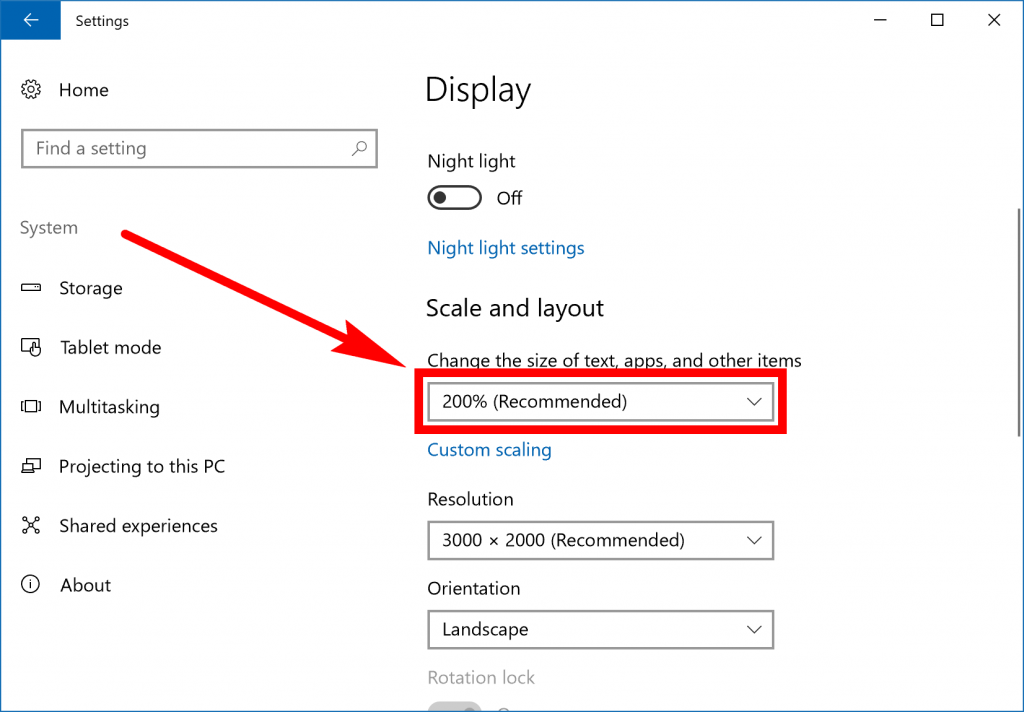
You can change the DPI scaling level of computer displays from the new Settings application. Open the Settings app and then click on the “System” link from the Windows Settings menu. When within the System area, look in the right side pane for the “Scale layout” heading and beneath it is a drop-down menu that you can use to select a bunch of different sizes for the scaling.
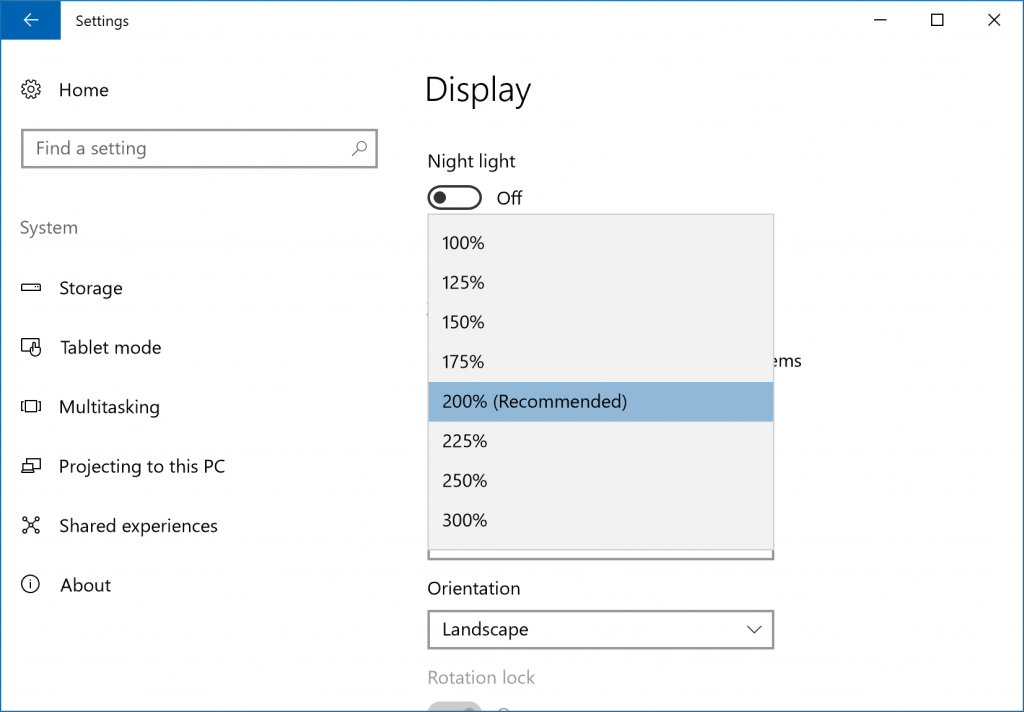
After you click on the drop-down menu, just choose the percentage you want. You should also notice the one that is was automatically set on is easily identifiable by the “(Recommended)” in brackets next to the size.
Multiple Monitors
If you are using a computer that has more than one monitor connected to it (a.k.a dual displays), then you can also scroll down the same “Display” section in the Settings app and change the DPI for each monitor. To do that, you need to highlight the monitor that you want to change by clicking on it and then scroll down to same “scale and layout” area to change each unique display. You might find that some applications won’t let you change the DPI for them until you sign out of them. You’ll see a link available from the same area in the Settings app that allows you to sign out of the required apps before making the changes.
All Monitors At Once
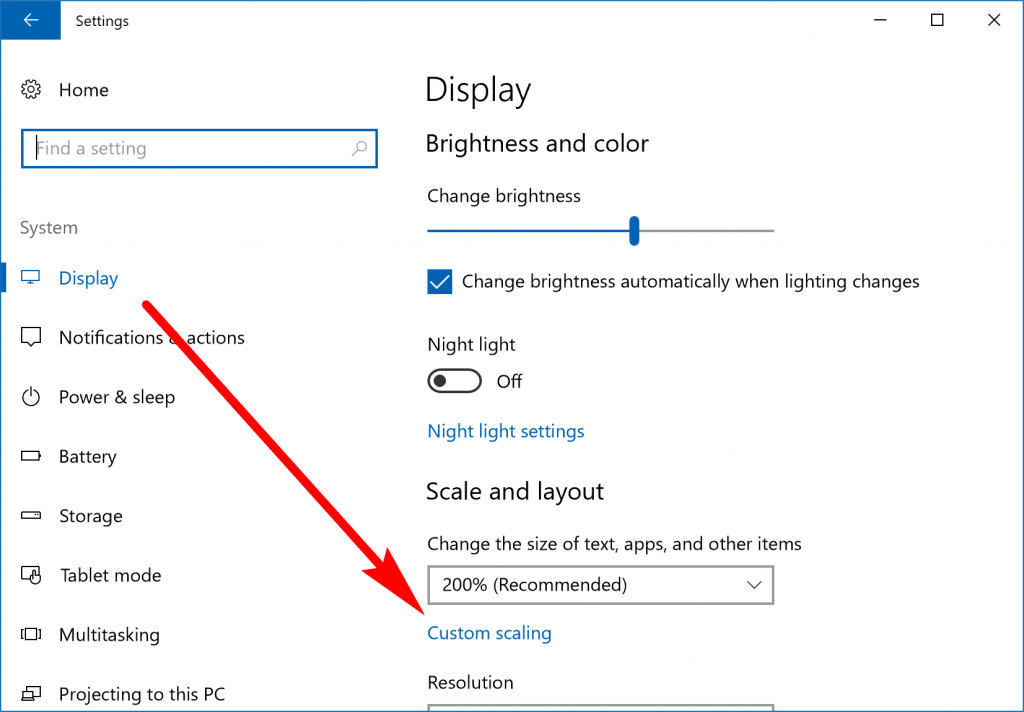
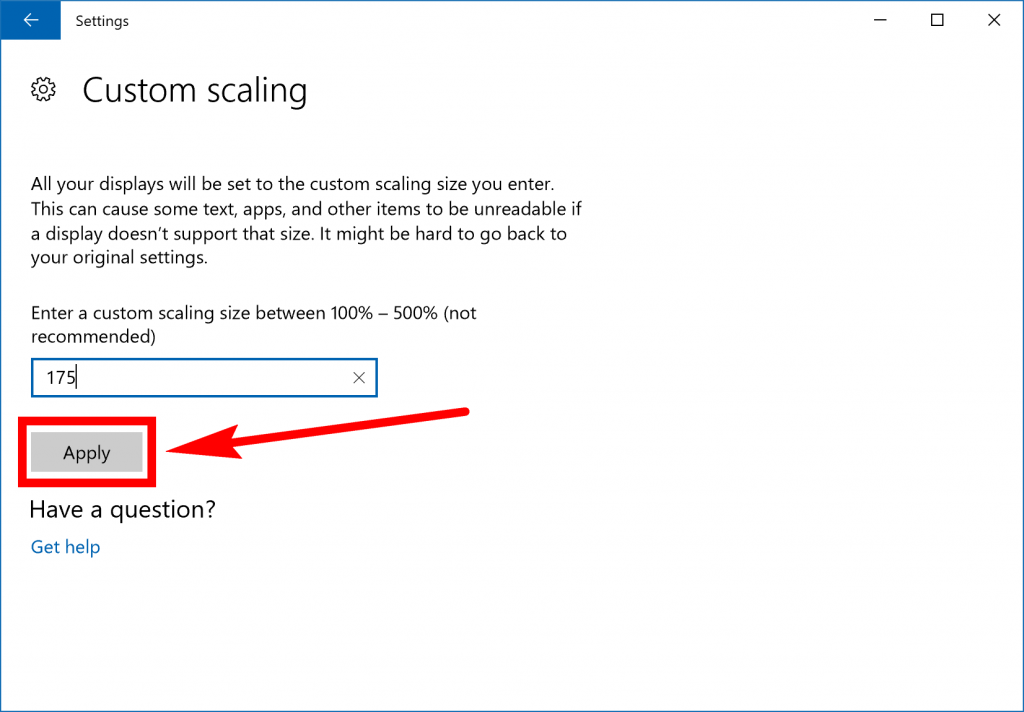
If you have multiple monitors and don’t wish to set unique scaling for each or any, then you can set the scaling for them all at the one time by clicking on the “Custom scaling” link in the right side pane instead. (This isn’t necessary if you only have the one monitor because adjusting the scaling like in the example above is all you need to do to adjust that one monitor. You do it this way if you want to “kill two birds with one stone” and not have to set each of your multiple monitors uniquely.)
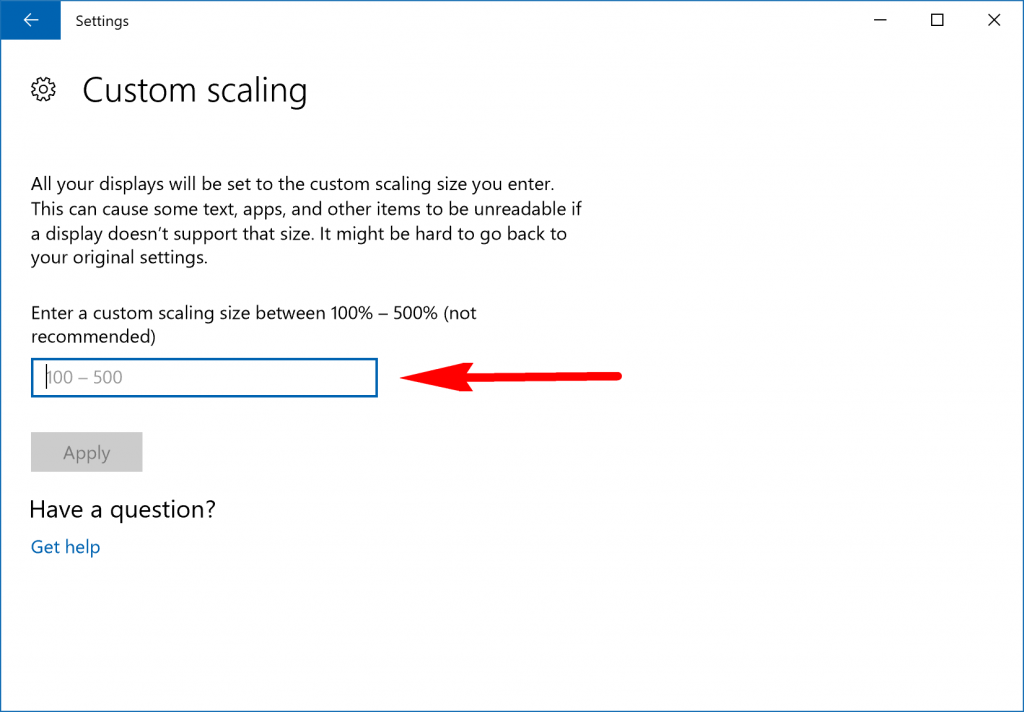
Enter the number (that will represent the percentage) of the scaling that you want in the available field.
Once you have entered the number, the Apply button is no longer grayed out. Click on the “Apply” button to apply the changes to the scaling.
How to Change DPI Scaling Level for Displays From Control Panel
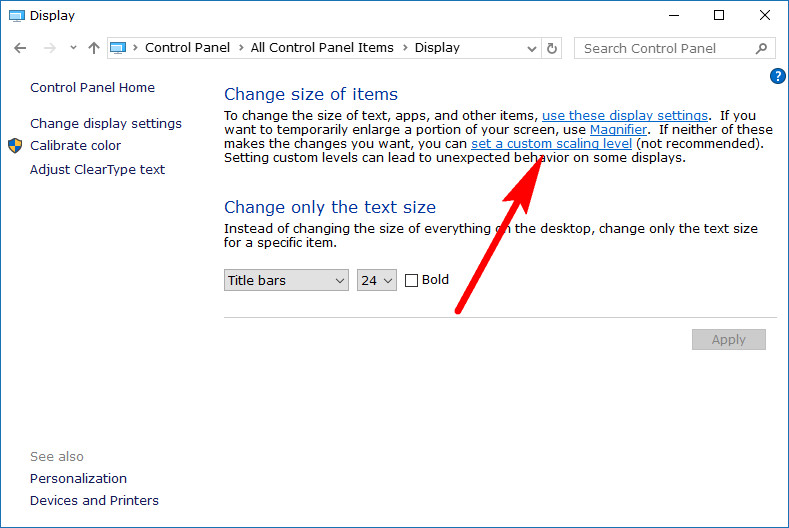
You can also set a custom DPI scaling level from the Control Panel in Windows 10 as well. To do that, open up the Control Panel so that it is showing the classic view from the smaller icons from the main menu and then click on the “Display” link. Next, under where it says “Change size of items” look for the “Set a custom scaling level” link in the text written beneath it and click on it.
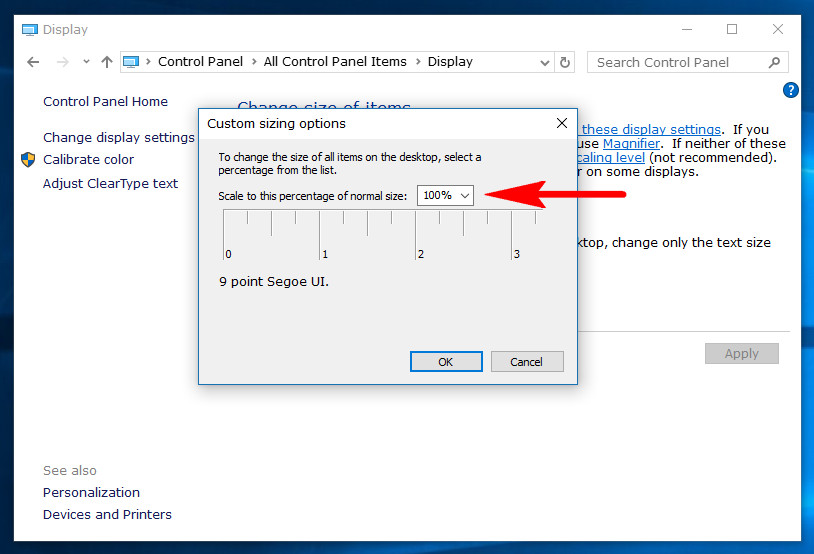
You then get a new window for customizing the sizing options. There’s a little drop-down menu again that you can click to choose a size that you want for the scaling.
Note: You’ll need to be running an older version of Windows 10 to be able to use the Control Panel method. At the time of writing this article (our articles are always dated if you look down the bottom of the article), it still works on some current Windows 10 Home editions in some parts of the world, so there is a chance you will still see the option available. If you don’t see the “Display” link from the Control Panel, however, it means that you are running on a version of Windows 10 that is post-Windows 10 build 15019. That’s when Microsoft decided to remove the “Display” link from the Control panel, and there’s nothing you can do about it unless you want to install older versions of Windows 10 again.
How to Change DPI Scaling Level for Displays From Registry Editor
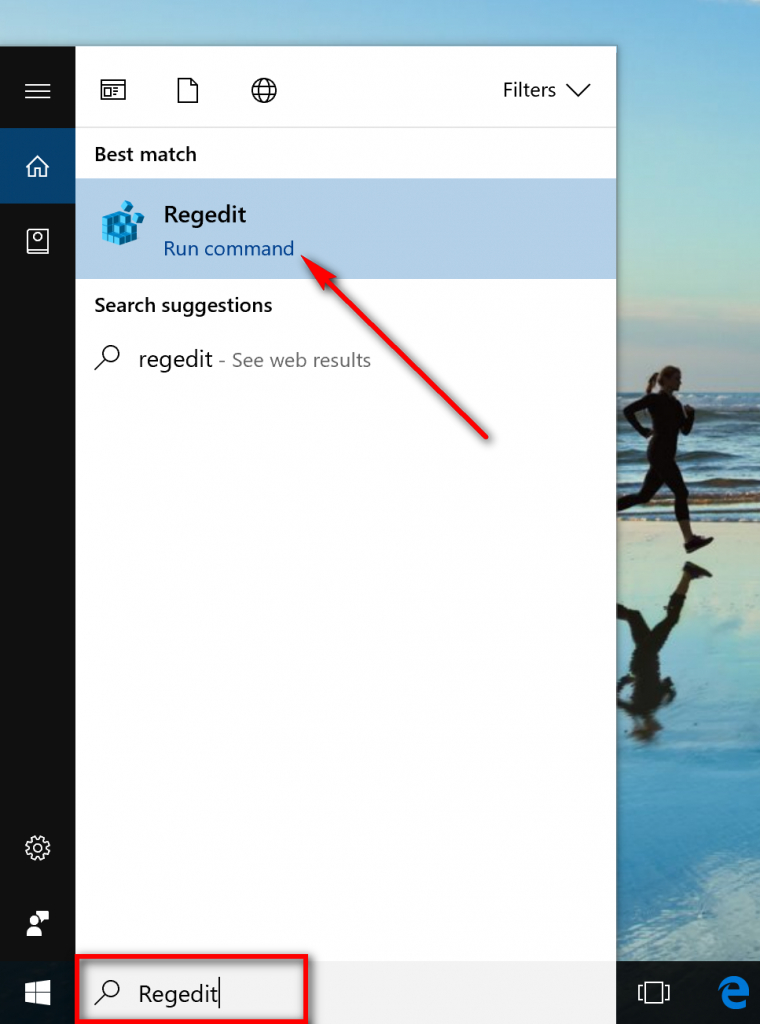
All editions of Windows 10 can also set a custom DPI scaling level by using the Registry Editor. To do it this way, type “Regedit” into the search field that is in the taskbar and then click on the “Regedit Run command” under the Best match section.
Look for the Registry Editor window in the background if you can’t see it or just click on the new Registry Editor icon that is available in the taskbar to open it up and have the window on the computer’s screen for you to use.
The Registry Editor doesn’t automatically reset itself after the last person has done something. As such, you might see an open key from the last time someone was inside the Registry. Close that key by clicking on all of the keys that were opened. That way you won’t get confused.
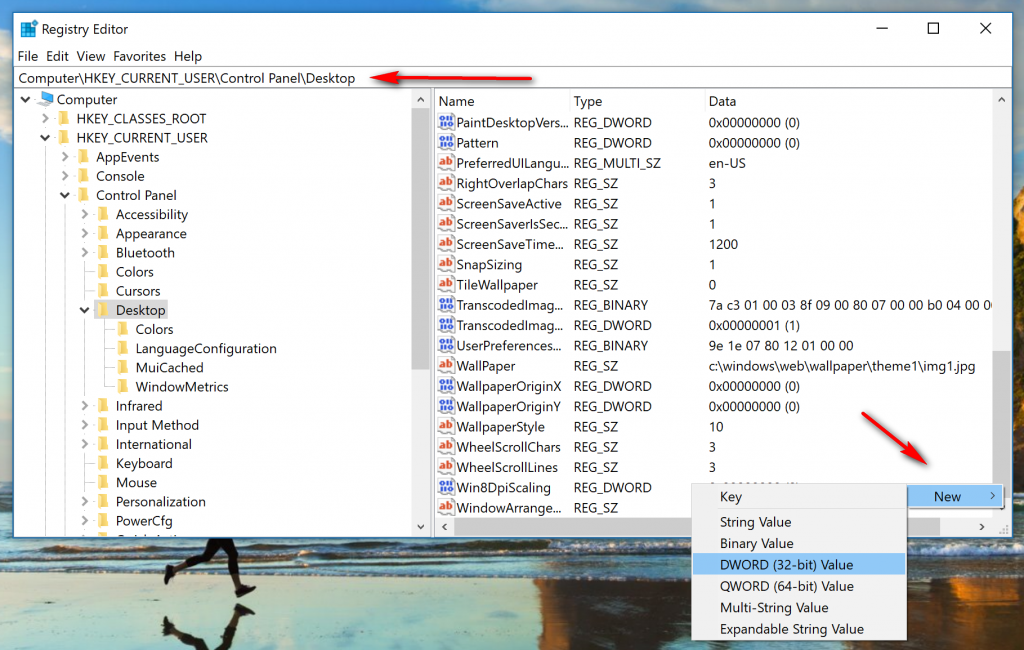
Open the following key path now by clicking on each entry: HKEY_CURRENT_USER\Control Panel\Desktop and then right-click the white background in the right side pane. Choose New > DWORD (32-bit) Value from the menu.
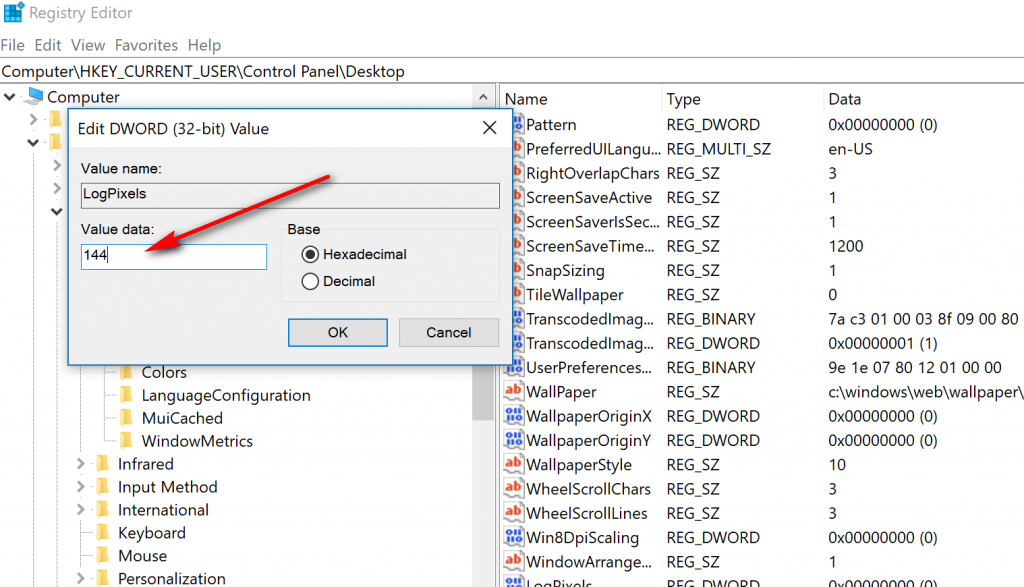
You’ll find the “LogPixels” entry that you just created stays at the bottom instead of moving into where you might have expected given that the rest of the right side pane is all in alphabetical order. That’s so you can easily identify it later and distinguish the difference between your work and Microsoft’s work. Otherwise, you might get confused if Windows automatically slotted it into alphabetical order.
Double-click the mouse on the “LogPixels” entry in the right pane and then change the value data accordingly. The rule you need to follow for the scaling is as follows:
- 100% = 96
- 125% = 120
- 150% = 144
- 200% = 192
- 250% = 240
- 300% = 288
- 400% = 383
- 500% = 480
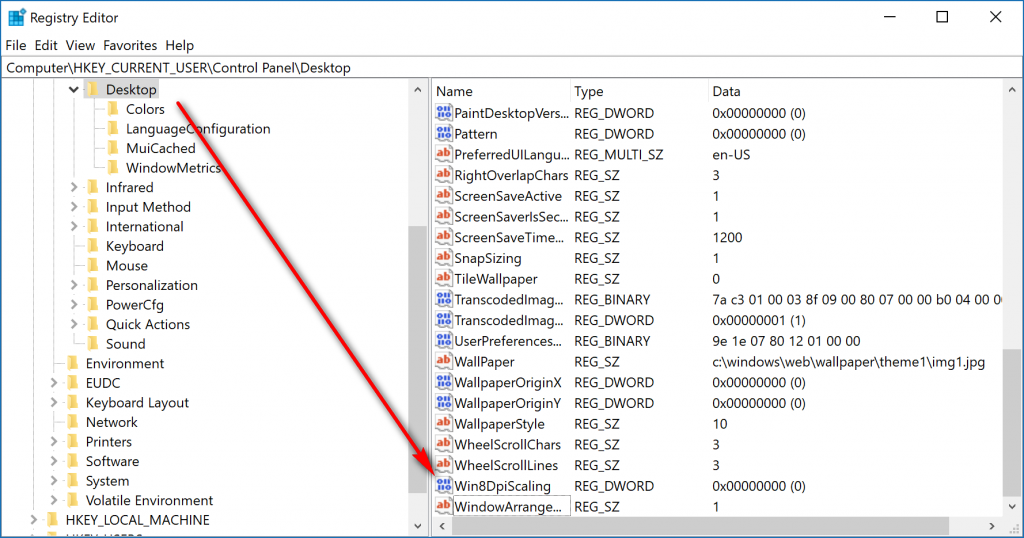
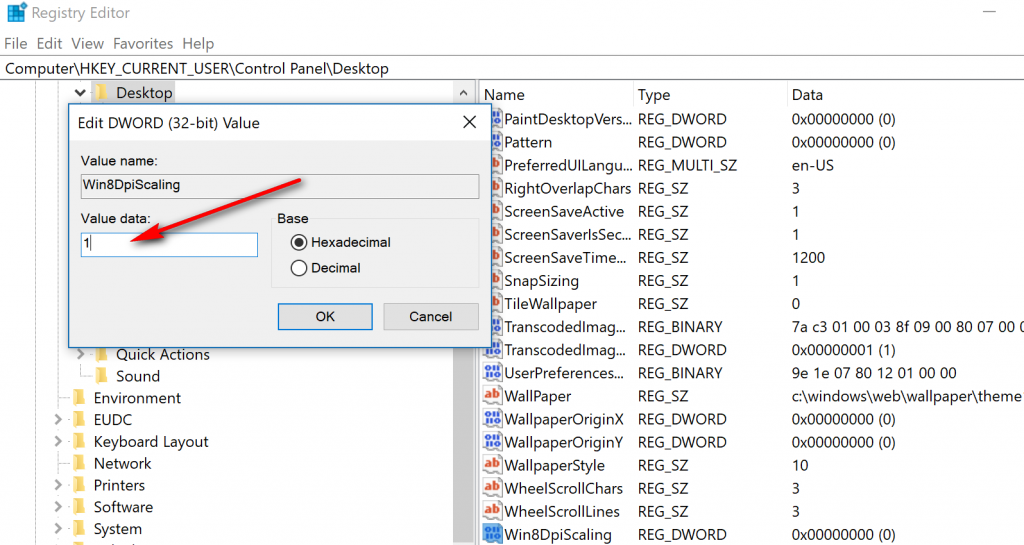
You’ve done a fair bit of work, but you aren’t done yet. You need to make one more tweak to the Registry for it to work. You should be able to find an existing value called “Win8DpiScaling” in the right pane (it’s in alphabetical order, so scroll down toward the very bottom). If you don’t see it there, right-click the white background again in the right side pane and click on the New > DWORD (32-bit) value again. This time call it “Win8DpiScaling” and hit the Enter hit on your keyboards. You should end up with the following:
Double-click on the entry and then change the value data to “1” if you have selected a custom size for the DPI scaling or leave the value data at “0” if you selected the 100% = 96 option from the steps above.
Many computers are now coming out with high DPI’s, and most people are enjoying it. But it isn’t always offering the best experience for people. On top of everything listed above, there are also many applications available for Windows that you might want install that aren’t ready for high DPI’s just yet. In addition to apps, DPI can also present problems with operating systems. The Windows 7 operating system, for example—that is still being used more than Windows 10 as well—wasn’t made for a high DPI display. Windows 10, on the other hand, is made for high DPI. Over time this problem will sort itself out, but for now, many people will want to get to know how to adjust DPI manually by themselves to yield the best results.
You might also be interested in:
- How to Add/Remove Favorites in Microsoft Edge in Windows 10
- How to Hide or Show Desktop Icons in Windows 10
- What Could Microsoft Edge Do to Get More Market Share Over Google Chrome?
- What Is Microsoft Edge and Why Would I Choose It Over Google Chrome and Other Web Browsers?
You can subscribe to our RSS, follow us on Twitter or like our Facebook page to keep on consuming more tech.

