Last Updated on September 18, 2024 by Mat Diekhake
Sometimes when I use Windows 11, I want to be signed into a different user account than the one that is tied to my main Microsoft account. I often want to do this when I am using apps in particular because I don’t always want to sign into the apps with the same email that I use for Windows. Microsoft makes it simple to switch between accounts so you can use certain apps with a different email. Moreover, you can do the same thing for work or school-related purposes.
In Windows 11, you can add or remove Microsoft, work, or school accounts that are used by apps and other services without affecting your primary Windows sign-in account. Here’s how to manage these accounts:
Add a Microsoft, Work, or School Account
1. Open Settings:
- Press Windows + I or click the Start button and select Settings.
2. Go to Accounts:
- In the left sidebar, select Accounts.
3. Access the “Email & accounts” Section:
- Click on Email & accounts from the Accounts menu.
4. Add an Account:
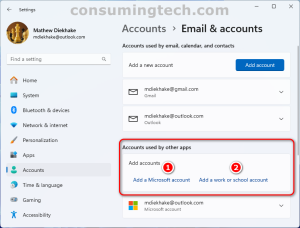
- Under Accounts used by other apps, click on the Add account button.
5. Choose Account Type:
- Select Microsoft account or Work or school account, depending on what type of account you wish to add.
6. Sign In:
- Enter the required account credentials (email and password) and follow the prompts to sign in.
Remove a Microsoft, Work, or School Account
1. Open Settings:
- Press Windows + I to open Settings.
2. Navigate to Accounts:
- Click on Accounts from the left sidebar.
3. Go to “Email & accounts”:
- Select Email & accounts.
4. Find the Account to Remove:
- Under Accounts used by other apps, locate the account you want to remove.
5. Remove the Account:
- Click on the account you want to remove and select Remove.
Confirm the action when prompted.
This will remove the account from apps and services on your Windows 11 device, but it will not delete the account itself.

