All versions of the Windows 10 operating system come with some apps preinstalled. Some of these apps that are installed on your computer are also the apps that show up as the suggested apps.
Windows developers have allowed you to remove any of the preinstalled applications that they put on there, so you no longer need to see them anywhere on the operating system. Once you have deleted the apps from the Settings, they are gone everywhere in sight until you choose to install them again—if that day ever comes.
There are two types of apps or programs that you can find on the operating system: desktop apps for all users and apps or programs that you installed from the Windows Store. If you are uninstalling an application from the Windows Store, the app is only deleted from the user account that you are using at the time of deletion. It used to be that only Microsoft accounts could install apps from the Windows Store, but in a more recent update to Windows 10 they changed that rule and had since allowed the local user accounts to install apps from the Windows Store also. (I guess there must’ve been more people option for the local user account over the Microsoft account that they initially had predicted.)
Microsoft Automatically Installing Apps on Computers That Run Windows 10
Bill gates is one of the richest men in the world thanks to his creation in Microsoft, so it was a bit frustrating to those old enough to understand economics when Microsoft used to charge so much money for its software. Clearly the man who is now almost known for his philanthropy as much as he is for his software could have just made his software more affordable in the first place, which would have been considerably more noteworthy of being philanthropical than the money he dishes out after collecting it all. But that’s just not how capitalism works: you charge people as much money as you can and then you throw back some of it into the pond after you know you’re well-off because, well, why would you do anything else?
Maybe if Bill could rewind the clock he would do things differently, or perhaps he’d do them exactly the same. He now has enough time to run one of the most trafficked Microsoft blogs on the planet, GatesNotes, on top of being the king of software, so you could always take so time to read it and get to know him better to try to find out.
No one outside of Microsoft or Gates’ inner circle really knows why Windows 10 became a free upgrade for most: perhaps it was just Microsoft wanting to improve its perception after recent Windows 8 blunders, or maybe Bill was just thinking he has enough luxuries in life already and just wanted to help the less fortunate being on an equal software playing field. He does do philanthropy after all, so why couldn’t it be so? There’s also the chance that Bill did want to make some money himself but at the same time wanted to help the less fortunate, which is something that can be achieved in today’s day and age with advertising. Bill’s an avid reader, so he knew how an online publication works: people generally read most of their content for free, provided that it is surrounded by advertisements. Some readers hate it and prefer paying a fee, others are able to see the upside in such a business model. That might be why Windows 10 came with so many subtle advertisements right from the get-go.
The ads in Windows 10 that Microsoft prefers to call “notifications” are still around today, and it hasn’t been made public why they’re there or how much, if any at all, money is being accepted in deals to spread these around the operating system. As much as people want their privacy when using Windows, it’s not really anyone’s business how much money Microsoft is asking for these anyway. But it is probably safe to assume that applications such as Candy Crush Saga that you’ll find from your All Apps list aren’t purely there to try to improve the perception of Microsoft’s software.
What has managed to offend more than a few though is the fact that Microsoft is often caught installing applications on PCS without the users permissions, and it won’t even let those among you using a version of Windows outside Enterprise or Education editions to disable it. To add to the frustration, the applications are also sending people notifications at times. There’s still nothing you can do about the advertising that’s coming from the Microsoft Consumer Experience, but if you like, you can turn on or off the notifications from apps and senders in Windows 10 directly from the Settings application.
How to Uninstall Desktop Apps and Windows Apps in Settings
Before getting stuck into removing the apps that you want going, it’s important not to remove any of the purchased apps or else they are gone for good. So, you ought to double check that no one you live with has purchased the apps that you intend to remove soon. Also, if you remove the Windows Store app, it is gone for good too, which means there will be no way for you to get access to any of the rest of the apps that are available to purchase from the Store, and that’s a bad thing.
1. Click on the Start button that is available on the left side of the taskbar, so you get access to the Start menu.
2. Click on the Settings gear icon from the left side pane in the Start menu. (click to enlarge screenshot below)
![]()
3. From the Windows Settings screen, click on where it says System to get access to all of the things that are to do with your Windows 10 operating systems.
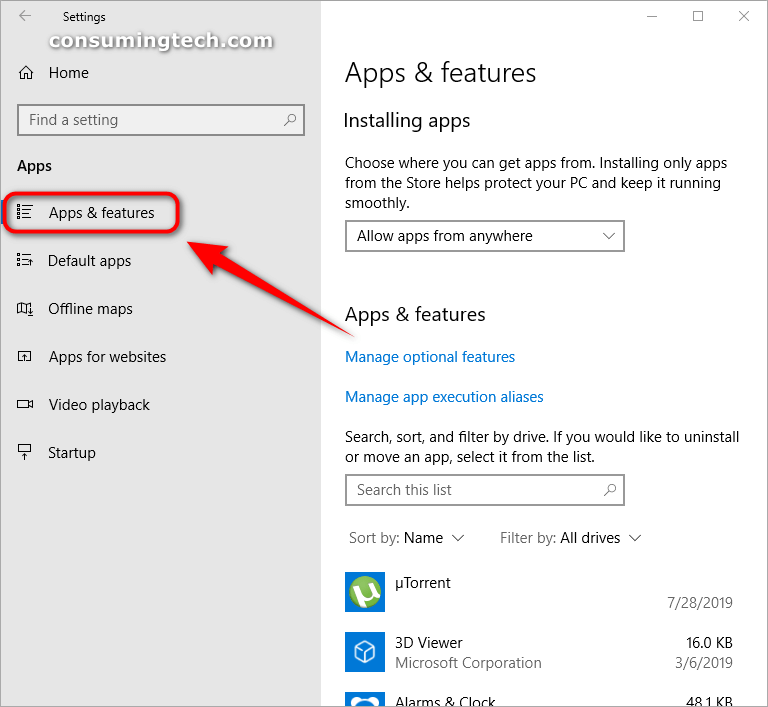
4. Naturally, it opens up with the first Display option open. Change that by clicking on the Apps & features link in the left pane to get access to your applications and programs that are already installed on the Windows 10 operating system.
Note: Newer versions of Windows 10 have changed where you get access to the apps from. Now you need to open Settings and then click on Apps from the main Windows Settings menu. From within the Apps category, you will find the Apps and features available in the left menu. (click to enlarge screenshot below)
5. It’s in here that you’ll find all of the programs and apps that are already installed. You’ll also find the apps that are showing up as suggested apps from the Start menu if they are games. (click to enlarge screenshot below)
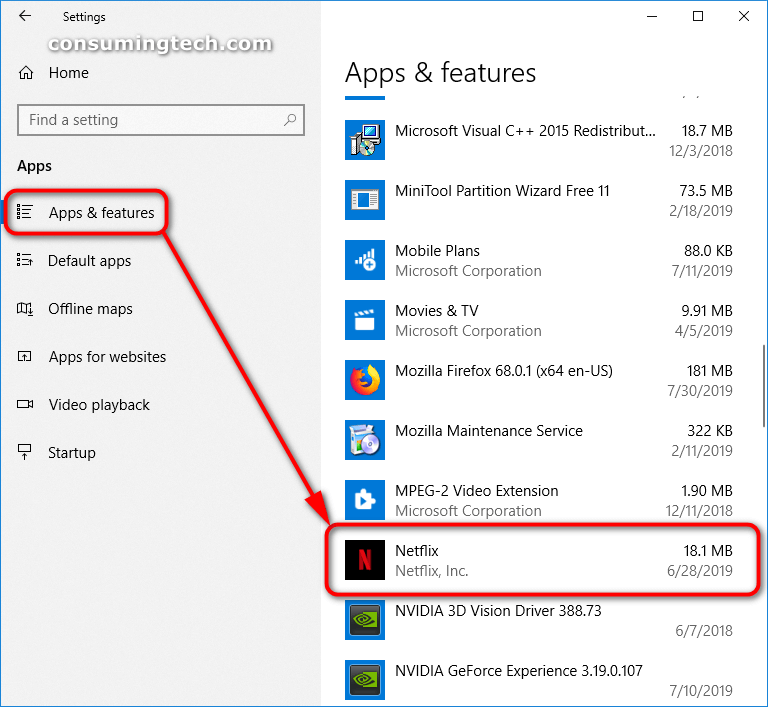
6. Click on the app that you want to be removed (in my case Royal Revolt 2), and then you get a couple of other options to choose from. The one you want to click next is the Uninstall button that becomes available. Now it will walk you through the steps for getting the application completely uninstalled from the Windows 10 operating system. (click to enlarge screenshot below)

You can now close the Settings app and continue using your computer if you like.
How to Uninstall Desktop Apps and Windows Apps in PowerShell
1. Users can also remove apps and programs from the Windows PowerShell also instead. For that to happen, you need to open up the PowerShell by typing PowerShell into the search field in the taskbar and then clicking on the PowerShell desktop application when it becomes available under the Best match section.
2. Once you have PowerShell open on your desktop, type the following command and hit the Enter key to reveal all packages installed on the computer. (click to enlarge screenshot below)
Get-AppxPackage | Select Name, PackageFullName
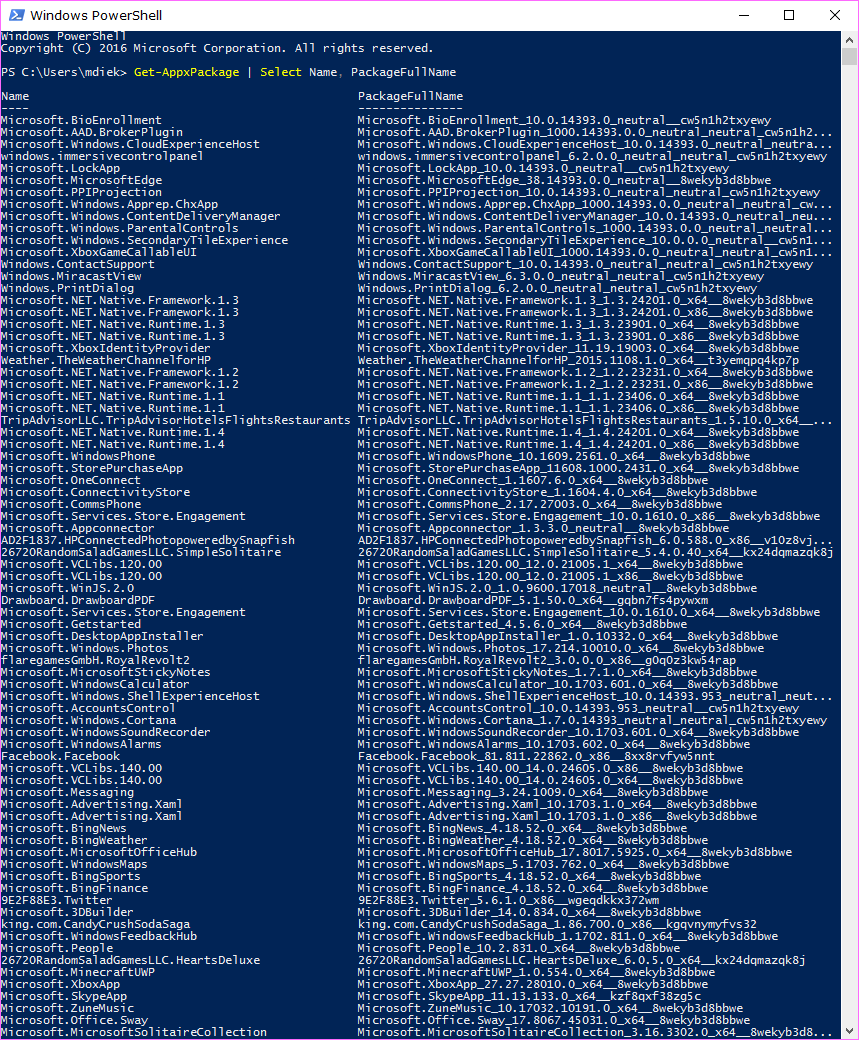
3. Now all you need to do is find the package that you want to be uninstalled.
4. You can see in my example that I have highlighted the line for the Xbox application. I know this is for the Xbox because it says that it is the Xbox app in the line.
5. Once you have found the name that you want to be removed, type the following command, substituting the FullPackageName foe the entire line of code from Powershell for that package. (click to enlarge screenshot below)
remove-appxpackage FullPackageName
So, in the example I have done with the Xbox app, it would be the following command to remove the Xbox app:
remove-appxpackage Microsoft.XboxApp_27.27.28010.0_x64_8wekyb3d8bbwe

You can now close the Windows PowerShell and continue suing your computer if you like.
How to Uninstall Desktop Apps Using Command Prompt
You can also uninstall the desktop applications from the command line, but with one catch: it’ll only work for apps that use Windows Installer when they get installed on the computer.
Note: You need to be signed into a user account that has the administrative permission assigned to it. The first user account to be set up on the computer has the administrative permissions, as do any other accounts that the original account chooses to share with other users.
1. To do it this way, open the elevated version of the Command Prompt window.
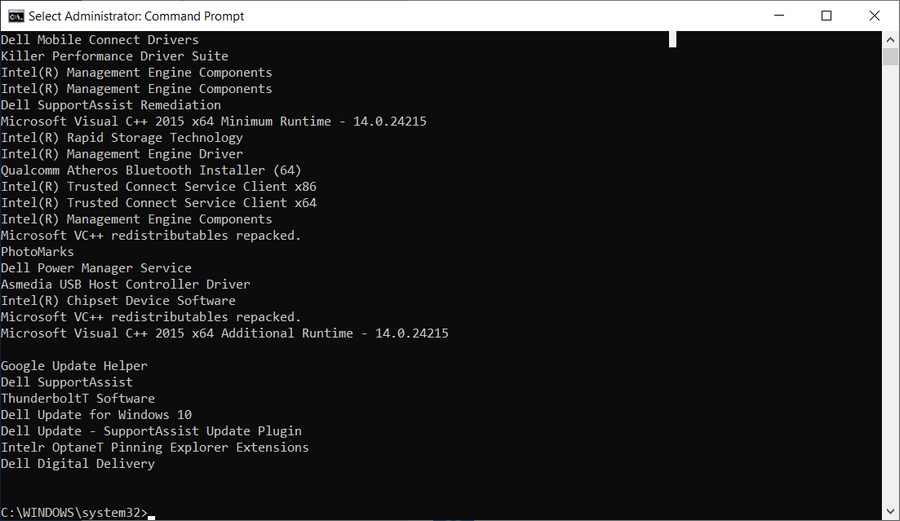
2. From the elevated Command Prompt window, type the following command and then hit the Enter key on your keyboard to execute the command. (click to enlarge screenshot below)
wmic product get name
3. You can now scroll down the command line and search through the applications for the one that you want to uninstall. You should recognize the names as the same names that you would see from the Settings app. The only real difference is you don’t get the cover pictures to go along with them.
4. Here are the command options you can choose between for removing the apps:
Remove with Y/N Prompt:
wmic product where name=”app name” call uninstall
Remove without Prompt:
wmic product where name=”app name” call uninstall /nointeractive
You can now close the Command Prompt and continue suing your computer if you like.
Microsoft has aimed at making everybody happy enough to enjoy every version of the Windows 10 operating system that has become available, all the way up until the creator’s update that is rolling out now. It’s no secret that some people take great offense to ads being shown either because they simply don’t like looking at them taking up extra space or because it is sometimes perceived as a way for someone else to make some money at their expense. Thanks to the new Windows settings available, you can always uninstall your apps from there. However, if you really wanted to, you also have the option of getting it done from the PowerShell too.
This article was last updated on May 16, 2019.
Related Tutorials
September 27, 2018 @ 06:45
Thanks.
My new Dell laptop I love, but it comes with many apps out of the box. It combined with Windows’ default apps is a bit much for me.
September 27, 2018 @ 06:51
Hello Cliff S,
I can understand that, but there are also some Dell apps that you might wish to keep.
For example, the Support Assist app actually does a great job of keeping your laptop up to date, healthy and functioning the way it should be. You can use this app to install driver updates, scan files, scan hardware, tune the performance, and so forth. I highly recommend keeping this app.
You’ll also find many other Dell useful apps, such as the Dell Customer Connect, Dell Digital Delivery, Dell Help and Support, and so on.
If you want to free up some more space and don’t play games, Microsoft offers you the option of uninstalling apps such as Candy Crush Saga. I would recommend uninstalling those sorts of apps before you think about removing the Dell ones. But if you’re destined to remove the Dell ones as well, have a good read of what the yare first and only remove the ones you don’t think you’ll ever need.