Windows 10 makes it much easier to fix issues that you may be having with the operating system than versions past ever did. The trick is knowing where to begin trying to diagnose the problem you are having. If the problem seems to be happening not long after you notice a software update, you could try solving the problem by learning what it takes to uninstall that update. The Settings application offers a few good things for that, such as the chance to roll back the recently installed build numbers from the Recovery section of the Settings app, installing Microsoft’s Show or Hide Updates tool from their website, or uninstalling the particular update directly from the Settings app as well. Anything that is related to the hard drive can be fixed by checking the drive for errors. If those options didn’t work out, then you could always try running a scan with your built-in Windows Defender antivirus and see if that helps.
Another feature that Windows 10 has in its arsenal for helping you fix computer problems is System Restore. System Restore has been around for a long time in Windows versions, and it’s hopefully going to remain around for years to come. There’s chatter that Microsoft has plans to get rid of it, partially because it takes up too much disk space and because backing up is now easier and using one of the other methods for recovering or uninstalling is now possible too.
System Restore is a feature that many geeks find useful. It allows you to chose a time when an earlier restore point was made on the computer and then load it so your computer restores that snapshot of the operating system, allowing you to go back in time to before you developed whatever particular problem you were currently suffering from and then starting to use the computer again without the problem. It’s as if you were playing a game, made a mistake then had the chance to rewind to before the mistake was made so you can continue happily playing again, only this time it’s no game—it’s the real operating system you may have been using for your professional life.
Windows 10 lets you turn on or off the System Restore feature so your computer will save restore points or it won’t. You don’t have to worry about System Restore using too much of your hard drive space either because you can set a limit of the drive that you want to allocate to restore points and Windows won’t go over that set amount. For example, if I set the total allocated amount of System Restore to 4% of the drive, then it will stop taking restore points once it uses up 4% of the drive and so forth.
If you have the max usage set to an amount, then you shouldn’t need to worry about having to delete the restore points since it’s handling them for you. However, if there is a particular update that you want to be removed from the computer, or you want to clear up some space urgently, you can do that by deleting the restore points.
How to Undo a System Restore in Windows 10
Note: You’ll need to be signed in to one of the user accounts that has the administrative permissions assigned to it. The first account created on the PC always has the administrator permissions assigned to it, and that admin account can assign them to other users as well.
1. You can undo a system restore that you might have previously taken in Windows 10 by using the Control Panel. To get started, open the Control panel by typing “Control Panel” into the search field in the taskbar and then clicking on the “Control Panel” desktop application result that appears under the Best match section.
2. You’ll then see the list of All Control panel Items. Make sure you have chosen the classic view by using the drop-down menu n the top right corner so you can see all the links and then click on the “Recovery” option.
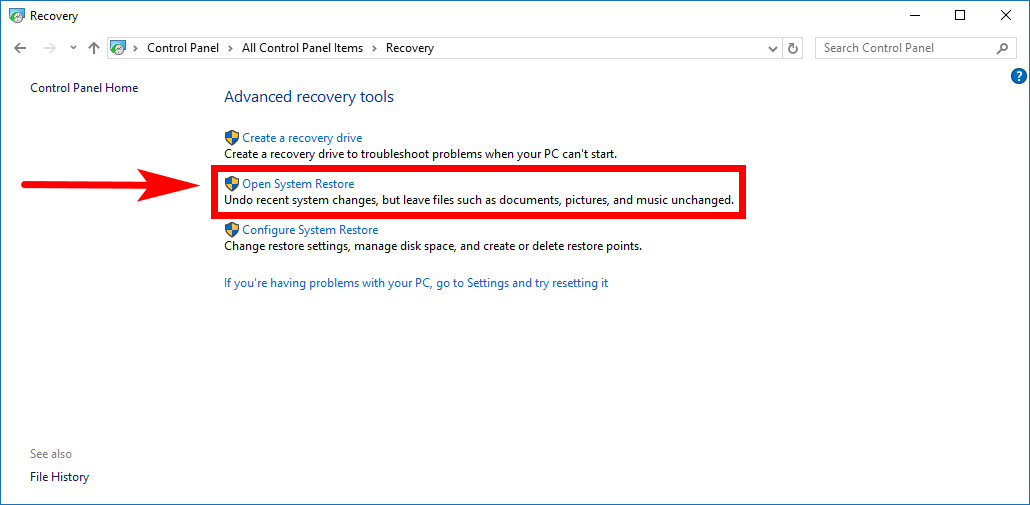
3. You’ll then see the list of Advanced recovery tools—two of which can allow you to get access to your system restore feature. The first way being by clicking on the “Open System Restore” link.
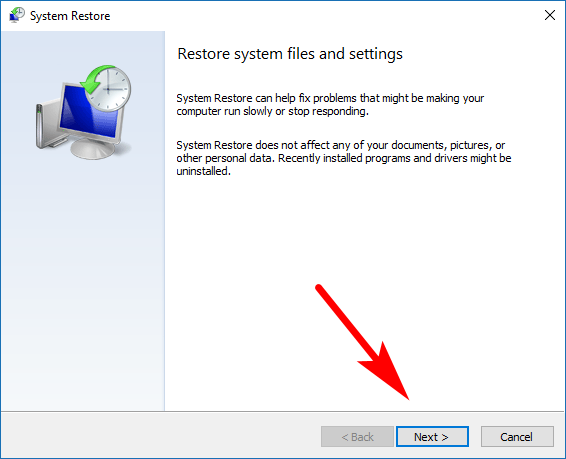
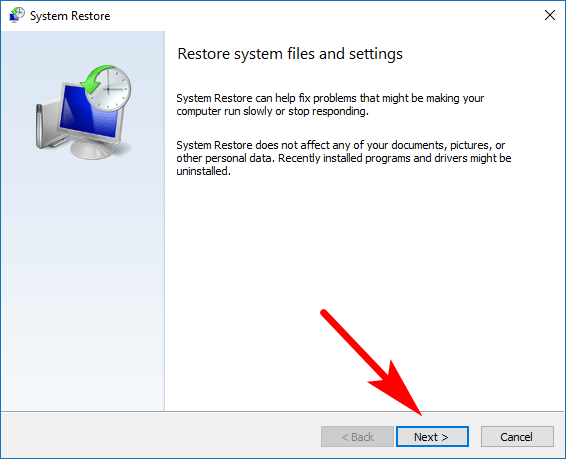
4. You’ll then get what looks like a setup wizard for the beginning of your system restore area. Read the introductions if you want and then click on the “Next” button available at the bottom of the window.
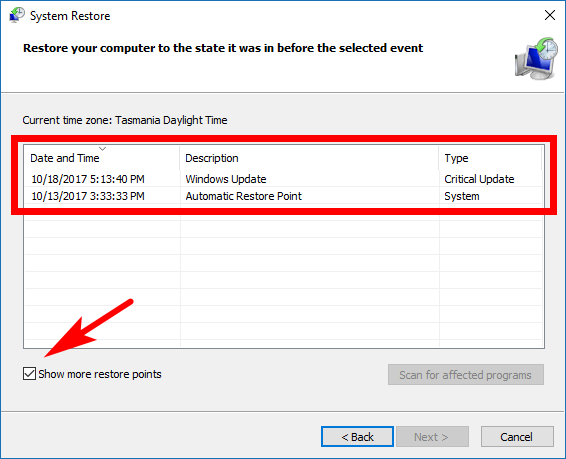
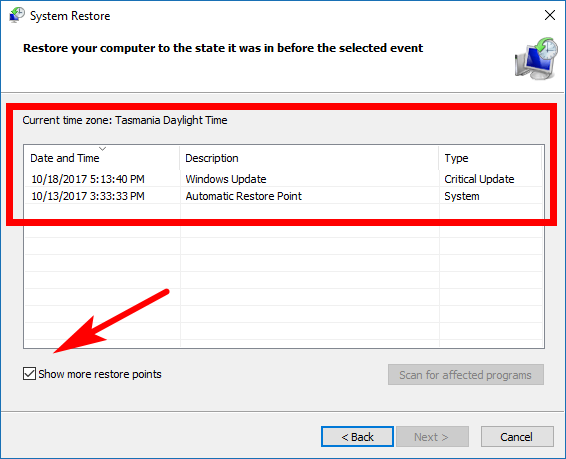
5. Make sure you check the box in the bottom left corner so you can see all the restore points and then highlight the restore point you want to undo by clicking on it once. You should see the “Undo” button under where it says the “type ” column. If you don’t see any option to undo it from there, then you don’t have any restore points at the moment that can be undone—that is the case in our picture below because we haven’t taken any restore points lately. You should always see the option to undo it if you have taken one recently.
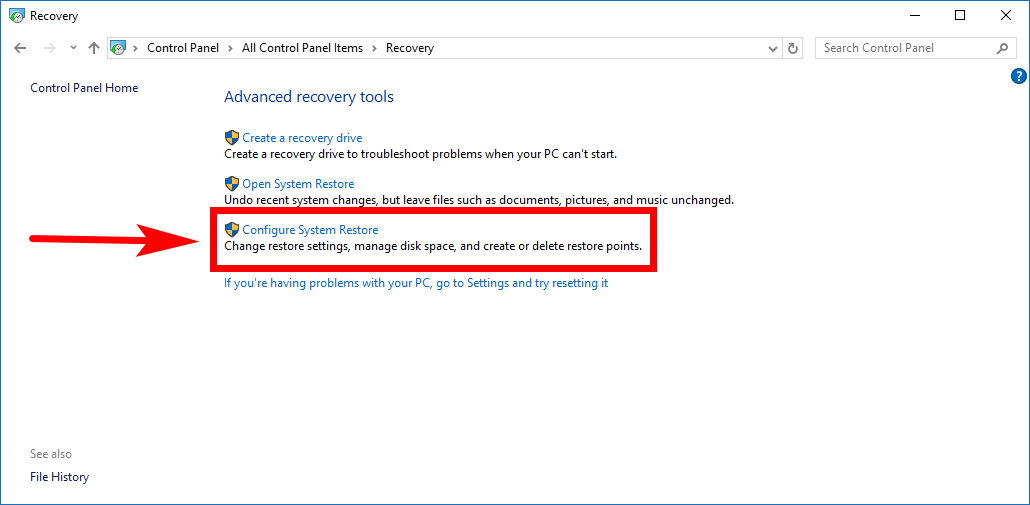
1. It’s also possible to use the Advanced recovery tools menu from the Control Panel a different way. Head there again by navigating to the Control Panel > Recovery and then click on the “Configure System restore” link from the Advanced recovery tools menu.
2. It opens up the System Properties dialog box where you then need to click on the “System Restore” button.

3. The same system restore setup wizard shows up where you then need to click on the “Next” button.
4. Check the box next to where it says “Show more restore points” in the bottom left corner so you can see them all and click on the one that you had used once so that it is now highlighted with the blue background and then click on the “Undo” button in the Type column.
Using Advanced Options At Boot to Undo System Restore Points
Note: You’ll still need to be signed in as an administrator before you can undo a system restore from the Advanced Options menu at boot.
1. It’s also possible to undo system restore points after booting up and accessing the Advanced Options menu that Windows 10 has on offer for everyone, no matter your edition. To do that, boot the computer to the Advanced Startup Options menu. There is many ways to do that, one of the most straightforward being heading to the Start > Settings > Update and security > Recovery > Advanced startup > Restart now button.
2. When you can see the chance to choose an option under the heading that says the same, click on the “Troubleshoot” button that shows a few pictures of some tools.
3. Now click on the “Advanced options” button from the next screen.
4. You now have the Advanced Options screen on your computer’s display—you can identify that by its heading on the page that says the same. Click on the “System Restore” button from that screen, followed by the “Windows 10” button and then the name of the user account that you have from the drop-down box. You’ll need to also enter the password for the user account before it lets you continue.
5. When the password is entered, the next thing you see is the system restore wizard window where you can click on the “Next” button, just like you did using the other two options in the guide above.
The System Restore feature in Windows 10 is great, and we hope it is here to say for at least a while longer. Few things beat the opportunity to turn back the clock and start using your computer the way it was before whatever gremlins have kicked in of late. Sometimes people use the system restore feature and realize they loaded the wrong one. Those are the times you can undo them by using the guide above.
You might also be interested in:
- How to Boot to Advanced Startup Options in Windows 10
- How to Change Number of Times Windows 10 Creates Restore Points
- How to Fix Startup Repair Loop in Windows 7 without Reinstalling Operating System
- How to Play Sound at Shutdown in Windows 10
You can subscribe to our RSS, follow us on Twitter or like our Facebook page to keep on consuming more tech.